
10 Mistakes to Avoid When Outsourcing Software Development
It’s true that every business process takes time to learn, execute, and grasp—but they are essential steps, nonetheless, and thus should be meticulously done to keep the company going.

However, it’s also true that all businesses aim to be the best in their industry and to achieve that, they need to focus more time and effort in the activities in which they intend to be experts. When you become the best in the field, you become more globally competitive, giving you an edge against other companies.
But that would mean abandoning other activities which may still be necessary. To solve this dilemma, outsourcing some businesses processes can help, especially with things like IT-related tasks. Outsourcing software development and other functions will allow you to focus your resources on your area of expertise, so you can have more time to modernize offerings, give better customer service, and increase profits.
Rising demand for software developers makes this a more competitive playing field, so it helps to know the best practices to take:
The Selection Process
Now that you’ve decided to get into outsourcing, it’s time to find the right partner. Keep in mind that not all software development services are created equal, so you need to be on the lookout for considerations that fit your needs. Due diligence can make or break the quality of the software, not to mention your business relationship with your third-party service provider.
Some factors to consider include:
- Location and distance of the outsourced company
- Experience and qualifications—including communication skills
- Technical expertise
- Cultural considerations
- Rates
- Legal, physical, and technical protection
Costly Mistakes When Outsourcing Software Development
Not doing market research
Before even attempting to outsource software development, do a bit of market research. Understand the hurdle that you want your solutions to overcome, then find the market for service providers that address said hurdle.
Identify what solutions your competitors are using. Look at some of the more successful brands in your industry. What are they offering? How do they execute their strategies? Don’t worry too much about the negative perception with copying your competitors’ strategies because without market research, you will fail even if your idea is original.
Poor selection process
As mentioned, a thorough selection process can help you find the best service provider. In essence, not considering the factors (perhaps, just choosing one because it’s cheap) is a recipe for disaster. Conduct research and analysis on your prospects, including cost-based and non-cost-based factors, operating model, and get an understanding of how the market functions.
You can also check reviews and feedbacks from previous customers, read their portfolio, website, blog posts, and social media accounts, or learn their company values and culture.
Unclear requirements and vision
Without details of the project, your outsourced team won’t be able to work on anything, and things can get worse if your details are incomplete. You first need to know exactly you want to create to form the idea and implement it through the software.
Along with a vision for the project, you need to have a plan on how to see it through. More importantly, communicate it clearly to the team—everyone from both sides must have a deep understanding of the project and should ask any questions if anything is unclear.
Putting hourly rate ahead of everything
Rates will always be a consideration when it comes to outsourcing, but the problem occurs when hourly rates become the main determinant when choosing a team. What many businesses don’t realize is that, in the long run, they could be spending much more on fixing the mistakes made by their badly-picked team. However, it’s also true that high hourly rates don’t guarantee high-quality work.
Instead, pay attention to the hourly rate but don’t consider it as the most critical consideration, as low prices don’t guarantee savings. Have a range of hourly rates that you’re happy to work with, filter the potential candidates by this factor, and then continue checking for other necessary elements.
Resisting knowledge of modern trends
There are a few reasons why some software development teams are not able to keep up with the newest techniques or trends in their industry. The problem lies when your work requires those modern ways to come into play. However, it’s also never a good indication when an outsourced company fails to learn new solutions to obstacles using the latest technology trends.
Ignorance of cultural differences
This often happens when the outsourced company is located abroad, or a country that is not of your own. Even if there’s no language barrier (as long as both parties speak proper English), discrepancies between cultures will always be evident, whether it’s through the gestures, speaking intonations, traditions, and customs.
When not appropriately handled, differences may cause communication breakdowns and process inefficiencies. Therefore, it’s also important to get acquainted with your partner’s cultural norms and orient your own staff about them.
Not considering the difference in time zone
Another problem that may arise when getting a partner abroad is the difference in time zones. Communication is essential when working with an outsourced company to ensure that the process is going smoothly. However, a difference in working hours may be a problem when progress gets halted due to delays that are the main consequences of different work schedules.
Despite this, there are ways to stay productive and keep the work going. May it be adjusting schedules as necessary or overlapping work hours to give both parties a chance to align, you need to sidestep this hurdle and work with this time zone difference in the best way possible (if applicable).
Poor communication
Contrary to what you may think, having a partner in a different country isn’t the only root cause of poor communication between teams. After all, there are tools like email and instant messaging that can make remote staffing work. It’s merely because, for some reason, there are teams who refuse to collaborate or stay informed about what’s going on.
Utilize multiple channels, so you have a backup just in case one doesn’t work. Make sure to respond promptly when questions or concerns are raised. Having regular meetings to keep the teams up to speed about any problems or what needs to be done next is also important. Orient the team, as well, on how to appropriately respond to emails or messages.
Not hiring your own in-house developer
You may have a solid team of software developers as partners, but who will supervise their work? This is where an expert can help you. Someone who has at least some degree of knowledge in software development can look after the quality and aptness of work. This employee can also set clear-cut requirements for the outsourced team to follow.
Not considering security and protection
Privacy is essential when it comes to many things, including software development. Different countries have different legal systems; therefore, it’s likely that when you get a partner from abroad, you are not automatically bound by the same intellectual property rules.
Before you hire an offshore vendor and trust them with potentially sensitive information, pay close attention to the contract management. Have a legal expert on staff so you can properly set a non-disclosure agreement with all areas clearly defined to protect your project as your intellectual property.
Get Outsourcing Right
In general, the right outsourcing company is one that is equally motivated as you are because you share the same vision, especially if your requirements are bespoke in nature. Having a working partner also entails building and maintaining a good relationship. After all, you’re basically working toward the same goal, and it’s a lot easier to meet the objectives when working in harmony.
Looking for an outsourced software provider to enhance your business' IT capabilities? Look no further than your expert team at Intelligent Bee!

How to set up a Node.js development environment
Context:
Here at IntelligentBee we wanted to establish a few ground rules that all of our developers should follow when developing an app in Node.js. In that way all of us would be familiar with a particular set of tools, something that would make us deliver better software, fast. Here is how we set up a Node.js development environment for a particular project:
- Installing NPM and Node.js
To get things started you need to install npm, and Node.js. You can easily do that by downloading them from here. - Create a project folder, and navigate to it using your favorite terminal. Then create a package.json file in that folder, a file that will save all the libraries you use. Using the terminal, run the command $ npm init . Write a few details about your project, and that’s it.
- The web framework
This should be project based, but we recommend Express.js as it the most mature and widely used framework for Node.js. From the Terminal, navigate to the folder where you will build your project, and run $ npm install express --save - The testing framework
To deliver robust code, you need to write tests. Node.js has a lot of testing frameworks available, but Mocha.js is by far the most used and proven test framework out there. To install, run $ npm install --save-dev mocha .Here we also need to mention the assertion library that can make life even easier. We recommend Chai.js, as it exposes all interfaces of asset, should and expect. Just run $ npm install --save-dev chai in your terminal to install. - The IDE
We’ve chosen Visual Studio Code over the more widely preferred Sublime Text, as it has a native support for Node.js debugging. Also, it is pretty easy for newer, less experienced developers to adopt it. You can get this free piece of software from here. - The linter
We decided to go with ESLint, as it is the most popular linter for Javascript and has a plugin for linting Node.js code. It is recommended that you install ESLint in the project folder that you work in, but you could also install it globally. To install it for your project, run $ npm install eslint --save-dev in your terminal. To make it aware of Node.js and Mocha you need to install these Eslint plugins as well:
- Eslint-node: $ npm install --save-dev eslint-plugin-node
- Eslint-mocha: $ npm install --save-dev eslint-plugin-mocha
The coding standards:
The Airbnb coding standard is one of the most popular out there, for JavaScript and Node.js. That would help you write clean code, that will be easier to understand later on, or by other people. In your terminal, run $ ./node_modules/.bin/eslint --init and choose Airbnb as your coding standard. After you do that, you need to open the newly .eslintrc.json file that was created, and add "mocha" and "node" in the file. Basically that file needs to look like this, if you saved the file using JSON format:
{
	"extends": "airbnb-base",
	"plugins": {
		"import",
		"mocha",
		"node"
	}
}- Install the ESLint plugin in VS Code
Go into the VS Code app, and navigate to its Extensions page. Search after "eslint", and install the first result from the list. Restart VS Code.
Now you should be all set up and start coding. Enjoy!
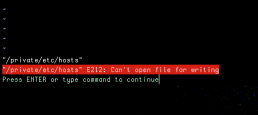
How to Save a File in Vim After Forgetting to Use Sudo
Many of you probably experienced this. You edit a file in Linux with Vim or Nano or whatever else text editor you might be using and when you try to save, you realise you forgot to launch the editor with sudo privileges, and file can't be written. Exiting without saving and editing again with sudo privileges is not always an option, especially if you lose a lot of work.
Solutions to save a file in vim
There are some workarounds. You can open a new terminal and grant the right permissions on the file with:
sudo chmod 666 <filename>
Now you can go back to your editor and saving will be possible. Don't forget to change back the right permissions for your file.
Also, you could save in a new file and then copy the newly created file over the old one.
But these are workarounds. Vim editor actually offers a solution.
In normal(command line) mode of Vim you can issue:
:w !sudo tee %
And that works like magic. For the geeks, here is how the "magic" works:
- :w - writes the contents of the buffer
- !sudo - pipes it to the stdin of sudo
- tee % - sudo executes tee that writes to "%" file
- % - Vim expands "%" to current file name
So Vim actually makes magic happen.

Why Should Your Online Business Offer API
There are several ways to extend a business model but API is a hot topic right now as the online world is expanding very fast. If you’re a developer or at least interacted with APIs before, you probably know why public APIs are so important, but there’s a big chance you didn’t hear or care about them before and now you’re wondering why everyone talks about them.
What is an API
In computer programming, an application programming interface (API) is a set of subroutine definitions, protocols, and tools for building application software. In general terms, it's a set of clearly defined methods of communication between various software components. (Wikipedia)
There is a simple way of saying this: an API is like a contract between two computer software agreeing to share information in a more or less standardised way.
Now it’s pretty clear what are we talking about, but why are them so important? How can APIs help us? In the following rows I will try to argument some good reasons.
Getting Started with Building APIs in Symfony2
Grow your business
You can grow your online business by integrating with additional tools or apps and engaging with others. This can be done using public APIs.
Let’s take Uber and Google Maps: everytime you search directions in Google Maps (from home to work, i.e.) you can automatically request an Uber, see your driver on the map or even contact him, all without having to leave Maps app thanks to Uber’s API.
Or if you have an online store, you might wanna offer public APIs so other apps can request price offers and display your products on their platforms.
Get ready for scaling
It’s all sweet and fun to start a new business and you probably want to do it faster and cost effective. Usually this means a monolithic application.
Success means scaling and this can be done by breaking the app into microservices. This will enable multiple options for you.
Let’s say you have a microservice that is being used very often and affects your server. That microservice can be moved on a new server with dedicated resources only for it and it will be accessible for the rest of the app via an API.
Or there is the case when you want to rewrite a single microservice (some languages are more efficient than others). This is the beauty of standardised API - you only have to make sure you accept the same API call as before and return the answer in the same format, so other dependent services won’t be affected.
Time saving
UX/UI is very important and we strongly advise you to continue to invest in that area, but there are cases when having to explore an UI for some actions is time consuming for some (more technical) users.
Let’s take SendGrid and their Marketing Campaigns app. You can create a new campaign by going through the UI process or you can simply make a call to their API. Second option is usually faster (but for more technical people or at least you need to develop an integration first) and the flow will always be the same, while UI can suffer some modifications over the time.
Mobile app
At some point you will probably want to add a dedicated mobile app to your business. Having APIs makes it possible. You are free to develop a new design or a new template without any changes on the API side.
Providing APIs must be a concern for every company, whether they focus on internal operations, partner integrations or public access. Join the revolution! Add API support to your product! Get a free quote now.

Building a Face Detection Web API in Node.js
Introduction
As a follow-up to my previous article on how to use your webcam for face detection with OpenCV, I’d like to show you how you can create your own web API for that.
There are a few Node.js modules out there that do just that. A few of them even provide bindings for OpenCV so you can use it directly from Javascript.
The catch is that most of these modules either rely directly on binaries or they need to be built for your machine from a makefile or a Visual Studio project, etc. That’s why some of them work on Windows for example, but not on Mac, or vice-versa.
The objective of this article is to show you the steps needed to create such a module for yourself so that you can customize it for your machine specifically. What we’re going to do is create a native Node.js add-on and a web server that will use that add-on to detect faces and show them to you.
Prerequisites
I’ve built this on a MacBook Pro running OS X El Capitan Version 10.11.1.
Since we’re going to use OpenCV you’ll need to set this up for your machine, I’ve described how to do this in this article.
Next, we’ll need Node.js which you can get from here. This will also install NPM (the package manager for node) which we need to install some extra node modules.
The next thing we need is node-gyp which you can install using npm. But before you do that make sure you have all the dependencies required which are described here. For Mac they are python 2.7, xcode, gcc and make. So basically if you followed the OpenCV installation guide you should be good on everything except python which you should install. After that you can install node-gyp like this :
npm install -g node-gyp
Node-gyp is used to generate the appropriate files needed to build a native node.js add-on.
That’s pretty much it. Next up, we’ll generate a simple native add-on.
Setting up
First, we need to create a folder for the node project, I’m doing this in my home directory :
mkdir ~/node-face-detect && cd ~/node-face-detect
Now we need a folder to hold the native module and navigate to it :
mkdir face-detect && cd face-detect
Node-gyp uses a file which specifies the target module name, source files, includes and libraries and other cflags to use when building the module. We need to create that file and call it binding.gyp. It’s contents should look like this :
{
  "targets": [
    {
      "target_name": "face-detect",
      "cflags" : [ "-std=c++1", "-stdlib=libc++" ],
      "conditions": [
        [ 'OS!="win"', {
          "cflags+": [ "-std=c++11" ],
          "cflags_c+": [ "-std=c++11" ],
          "cflags_cc+": [ "-std=c++11" ],
        }],
        [ 'OS=="mac"', {
          "xcode_settings": {
            "OTHER_CPLUSPLUSFLAGS" : [ "-std=c++11", "-stdlib=libc++" ],
            "OTHER_LDFLAGS": [ "-stdlib=libc++" ],
            "MACOSX_DEPLOYMENT_TARGET": "10.11"
                  },
        }],
      ],
      "sources": [ "src/face-detect.cpp" ],
      "include_dirs": [
        "include", "/usr/local/include"
      ],
      "libraries": [
        "-lopencv_core",
        "-lopencv_imgproc",
        "-lopencv_objdetect",
        "-lopencv_imgcodecs",
        "-lopencv_highgui",
        "-lopencv_hal",
        "-lopencv_videoio",
        "-L/usr/local/lib",
        "-llibpng",
        "-llibjpeg",
        "-llibwebp",
        "-llibtiff",
        "-lzlib",
        "-lIlmImf",
        "-llibjasper",
        "-L/usr/local/share/OpenCV/3rdparty/lib",
        "-framework AVFoundation",
        "-framework QuartzCore",
        "-framework CoreMedia",
        "-framework Cocoa",
        "-framework QTKit"
      ]
    }
  ]
}
Node-gyp still has some hiccups on Mac OS X and will use only either cc or c++ by default when building (instead of gcc/g++ or whatever you have configured).
Now we use node-gyp to generate the project files :
node-gyp configure
The native module
As specified in the binding.gyp file, we now need to create the source file of the native module i.e. src/face-detect.cpp.
Here is the source code for that :
//Include native addon headers
#include <node.h>
#include <node_buffer.h>
#include <v8.h>

#include <vector>

//Include OpenCV
#include <opencv2/opencv.hpp>

void faceDetect(const v8::FunctionCallbackInfo<v8::Value>& args) {
  v8::Isolate* isolate = args.GetIsolate();
  v8::HandleScope scope(isolate);

  //Get the image from the first argument
  v8::Local<v8::Object> bufferObj = args[0]->ToObject();
  unsigned char* bufferData = reinterpret_cast<unsigned char *>(node::Buffer::Data(bufferObj));
  size_t bufferLength = node::Buffer::Length(bufferObj);

  //The image decoding process into OpenCV's Mat format
  std::vector<unsigned char> imageData(bufferData, bufferData + bufferLength);
  cv::Mat image = cv::imdecode(imageData, CV_LOAD_IMAGE_COLOR);
  if(image.empty())
  {
    //Return null when the image can't be decoded.
    args.GetReturnValue().Set(v8::Null(isolate));
    return;
  }

  //OpenCV saves detection rules as something called a CascadeClassifier which
  //  can be used to detect objects in images.
  cv::CascadeClassifier faceCascade;

  //We'll load the lbpcascade_frontalface.xml containing the rules to detect faces.
  //The file should be right next to the binary of the native addon.
  if(!faceCascade.load("lbpcascade_frontalface.xml"))
  {
    //Return null when no classifier is found.
    args.GetReturnValue().Set(v8::Null(isolate));
    return;
  }

  //This vector will hold the rectangle coordinates to a detection inside the image.
  std::vector<cv::Rect> faces;

  //This function detects the faces in the image and places the rectangles of the faces in the vector.
  //See the detectMultiScale() documentation for more details about the rest of the parameters.
  faceCascade.detectMultiScale(
    image,
    faces,
    1.09,
    3,
    0 | CV_HAAR_SCALE_IMAGE,
    cv::Size(30, 30));

  //Here we'll build the json containing the coordinates to the detected faces
  std::ostringstream facesJson;

  facesJson << "{ \"faces\" : [ ";
  for(auto it = faces.begin(); it != faces.end(); it++)
  {
    if(it != faces.begin())
      facesJson << ", ";

    facesJson << "{ ";
    facesJson << "\"x\" : " << it->x << ", ";
    facesJson << "\"y\" : " << it->y << ", ";
    facesJson << "\"width\" : " << it->width << ", ";
    facesJson << "\"height\" : " << it->height;
    facesJson << " }";
  }

  facesJson << "] }";

  //And return it to the node server as an utf-8 string
  args.GetReturnValue().Set(v8::String::NewFromUtf8(isolate, facesJson.str().c_str()));
}

void init(v8::Local<v8::Object> target) {
  NODE_SET_METHOD(target, "detect", faceDetect);
}

NODE_MODULE(binding, init);
Basically what this code does is register a method to our module. The method gets the first parameter as a buffer, decodes it to an OpenCV Mat image, detects the faces within the image using the classifier (which should be placed next to the binary), and returns a JSON string containing the coordinates of the faces found in the image.
Now that we have all the pieces in place for the native module, we can build it using :
node-gyp build
If everything goes well, in the folder ./build/Release you should find a file called face-detect.node. This file represents our native module and we should now be able to require it in our javascript files. Also, next to this file, we need to copy the lbpcascade_frontalface.xml from the OpenCV source folder under /data/lbpcascades/.
The Server
Now we have to create the server.js file for the node server. We should load the native add-on for face detection, create a server that will listen to PUT requests and call the native add-on on the contents of these requests. The code for that should look like this :
//The path to our built native add-on
var faceDetect = require('./face-detect/build/Release/face-detect');

var http = require('http');

//Our web server
var server = http.createServer(function (request, response) {
  //Respond to PUT requests
  if (request.method == 'PUT')
  {
    request.setEncoding('binary');

    //Collect body chunks
    var body = null;
    request.on('data', function (data) {
      if(null == body)
        body = data;
      else
        body += data;

      //Destroy the connection if the file is too big to handle
      if (body.length > 1e6)
        request.connection.destroy();
    });

    //All chunks have been sent
    request.on('end', function () {
      //Create a node buffer from the body to send to the native add-on
      var bodyBuffer = new Buffer(body, "binary");

      //Call the native add-on
      var detectedFaces = faceDetect.detect(bodyBuffer);
      if(null == detectedFaces)
      {
        //Unsupported image format or classifier missing
        response.writeHead(500, {'Content-Type': 'applcation/json'});
        response.end('{"error" : "internal server error"}');
      }
      else
      {
        //Faces detected
        response.writeHead(200, {'Content-Type': 'applcation/json'});
        response.end(detectedFaces);
      }
    });
  }
  else
  {
    //Unsupported methods
    response.writeHead(405, {'Content-Type': 'applcation/json'});
    response.end('{"error" : "method not allowed"}');
  }
});

//Start listening to requests
server.listen(7000, "localhost");
To start the server just run :
node server.js
Test it out
Save an image containing human faces as image.jpg. Then, using curl from the command line send the image via a PUT request to the node server like this :
curl -i -X PUT http://localhost:7000/ -H "Content-Type: application/octet-stream" --data-binary "@image.jpg"
Depending on the image you send, you should see something like this :
HTTP/1.1 200 OK
Content-Type: applcation/json
Date: Wed, 17 Feb 2016 07:19:44 GMT
Connection: keep-alive
Transfer-Encoding: chunked

{ "faces" : [ { "x" : 39, "y" : 91, "width" : 240, "height" : 240 }] }
Conclusion
Sometimes Node.js libraries might not meet your application needs or they might not fit your machine resulting in errors during npm install. When that happens, you can write your own custom native Node.js add-on to address those needs and hopefully, this article showed you that it’s possible.
As an exercise you can try changing this application to return an image with rectangles surrounding the detected faces. If you’re having trouble returning a new buffer from inside the native add-on, try returning the image as Data URI string.

How To Mock Endpoints in Automated Acceptance Tests
The purpose of acceptance testing is to reproduce production environment as much as possible in order to evaluate the software in a 'real-world' situation similar to what the customers will experience and this includes using real endpoints.
But using real endpoints has some disadvantages. In automated acceptance tests, the endpoint will be stressed out and this is not performance testing. Also, you must use production data (even usernames and passwords) and this is not good because you might break something there. The list with the reasons could go on and on and this is why you should mock some endpoints in automated acceptance tests. Also, you should keep your endpoint's URL stored in environment variables to be able to change it easily (production URL or mock URL).
I will show you some basic examples of mocking endpoints written in Ruby, Python and GO.
Mock endpoint in Ruby
I have used Sinatra (DSL for quickly creating web applications in Ruby) which is very easy to use.
Install the gem:
gem install sinatra
#myapp.rb

require ‘json’
require ‘sinatra’

get '/:username' do
  if params[:username] != 'your_username'
  	status 404
  else
  	content_type :json
  	{'message' => 'success'}.to_json
  end
end
ruby myapp.rb -o 0.0.0.0 -p 5000 > /dev/null 2>&1 &
This will start the process in background and your endpoint on http://localhost:5000.
If you make a GET request on http://localhost:5000/your_username you will get a ‘success’ message, else a 404 status code.
Mock endpoint in Python
In Python it is very easy to create an endpoint with Flask.
To install it you have to run:
pip install flask-restful
#myapp.py

#!flask/bin/python
from flask import Flask, jsonify
from flask import Response
import json

app = Flask(__name__)

@app.route("/<username>", methods=['GET'])
def put_username(username):
    if username == 'your_username':
        resp = Response("success!\n", mimetype='application/json')
    else:
        resp = Response("", status=404, mimetype='application/json')

    return resp

if __name__ == '__main__':
    app.run(debug=True)
As you can see, this does the exact same thing as the endpoint created in Ruby.
You simply run it with
python myapp.py
Mock endpoint in GO
//myapp.go
package main

import (
	"fmt"
	"net/http"
	"github.com/julienschmidt/httprouter"
)

func username(w http.ResponseWriter, r *http.Request, p httprouter.Params) {
	if p.ByName("username") == "your_username" {
		w.Header().Set("Content-Type", "application/json")
		w.WriteHeader(200)
		fmt.Fprint(w, `{"message":"success"}`)
	} else {
		w.WriteHeader(404)
	}
}

func main() {
	r := httprouter.New()
	r.GET("/:username", username)
	http.ListenAndServe("localhost:5000", r)
}
This does the same thing as the previous two endpoints and you run it with:
go run myapp.go
Thanks for reading this. What other ways of mocking an endpoint did you find?

What Is the Difference between QA and QC/Software Testing
If you work in IT or, at least, had any experience in this area, you definitely know that there are multiple terms to define the testing world. The biggest competitors here are QA (Quality Assurance) and QC (Quality Control) which is basically the same as Software Testing.
Let's see how these are defined:
Quality Assurance (QA) is a part of quality management focused on providing confidence that quality requirements will be fulfilled. [ISO 9000]
Quality Control/Testing is a process that consisting of all the life cycles activities, both static and dynamic, concerned with planning, preparing and evaluating software products and related work products. It tries to determine if they satisfy specified requirements in order to demonstrate that they are fit for purpose and to detect defects. [ISTQB glossary]
Quality Assurance
This is about process oriented and preventive activities. It means that these activities are focused on improving the software development process and that the system will meet its objectives. The QA Engineer is active throughout the product’s lifecycle and communicates with all the people involved in the process, from Project Manager to Software Developer and QC Engineer. The QA analyses and seeks the continuous improvement of both process and product while ensuring all tasks demonstrate appropriate quality and that are finished on time.
Quality Control/Software testing
Well, this is about product orientated activities and it is a corrective process (testing is a process rather than a single activity - there are a series of activities involved). The QC Engineer must find bugs in the system before users do, investigate and report on how well the software performs relative to its expectations and is generally active at the end of a coding cycle.
Conclusions
QA and QC both have to make the software better, however, QA is about process orientated and preventive activities, while QC involves a corrective process and product orientated activities.

Usability Rules and Principles for Websites
We all now that nowadays there are some well known standards when creating a new web application: it must support a big number of users, no errors on loading, it must be responsive and clear. Beside those, every website must have a user-centered design and to have that, here are some rules and principles for usability.
Usability Rules and Principles for Websites
1. 7+-2 Principle
– there must be 7+-2 elements in a navigation bar
2. 2-Second-Rule
– a user shouldn’t wait more than 2 seconds for a response from the server
3. 3-Click-Rule
– if a user cannot access a site functionality or the information in 3 clicks, he will leave the site (this underlines the necessity of having a clean navigation, a logical structure and a simple to follow site hierarchy)
4. Shneiderman’s rules for design
a. Consistency
– consistent sequences of actions should be requested in similar situations
– the same terminology should be used in prompts, menus, help windows
b. Informative feedback
– for every action there should be a feedback system. For minor and frequent actions the response can be modest, and for major and rare actions, the response should be substantial
c. Closure dialogs
– action sequences should be organized in groups with a beginning, middle and an end
d. Easy handling of errors
– the user shouldn’t be allowed to make serious errors
– if an error is produced, the system should be able to detect it and to offer an easy to understand mechanism for treating it
e. The system should permit action canceling
5. Banner-Blindness
– users tend to ignore colored and animated banners, same for other graphic elements
– the focus is moved to the text and hyperlinks
6. Users should be allowed to test a functionality without authentication
– to continue using the functionality, users would be more than happy to fill in a form
7. Registration form
– filling should last about 30 seconds
– if there are too many fields and the user must scroll, horizontal alignment can be a solution
– [Labels] because the forms are vertically oriented (users fill the form from top to bottom), the input label is indicated to be placed above
– [Search box] the ideal width of a search box is 27 characters
– ‘Submit’ button should be either left aligned or centered
– it's better not to name a submit type button “Submit”, but the actual action that is done when the form is sent, for example: 'Create Account', 'Subscribe Now', 'Send Message', 'Register Free'
8. Text
– it's appropriate to use within 3 typefaces in three sizes
– for a natural result you can choose the font size value for the body from the Fibonacci series (16-24-40-64-104)
I hope these rules help you become a better web developer! Good luck :)

How to Build an Android Login Screen
Many applications require users to login in order to access all the available features. In this tutorial we will secure an Android activity by requiring users to enter their username and password.
We will start by creating a new blank activity with fragment, LoginActivity.
We will use the following layout for the login fragment (2 edit texts for username & password, 1 button to submit the login form and one text view to show any errors that could happen):
<RelativeLayout xmlns:android="http://schemas.android.com/apk/res/android"
    xmlns:tools="http://schemas.android.com/tools" android:layout_width="match_parent"
    android:layout_height="match_parent" android:paddingLeft="@dimen/activity_horizontal_margin"
    android:paddingRight="@dimen/activity_horizontal_margin"
    android:paddingTop="@dimen/activity_vertical_margin"
    android:paddingBottom="@dimen/activity_vertical_margin"
    tools:context="com.sendgrid.android.sendgrid.app.LoginActivity$PlaceholderFragment">

    <EditText
        android:layout_width="wrap_content"
        android:layout_height="wrap_content"
        android:inputType="textEmailAddress"
        android:ems="10"
        android:id="@+id/username"
        android:hint="Username"
        android:layout_centerVertical="true"
        android:layout_centerHorizontal="true" />

    <EditText
        android:layout_width="wrap_content"
        android:layout_height="wrap_content"
        android:inputType="textPassword"
        android:ems="10"
        android:id="@+id/password"
        android:layout_below="@+id/username"
        android:layout_alignLeft="@+id/editText"
        android:layout_alignStart="@+id/editText"
        android:hint="Password" />

    <Button
        android:layout_width="wrap_content"
        android:layout_height="wrap_content"
        android:text="Login"
        android:id="@+id/button"
        android:layout_below="@+id/password"
        android:layout_alignLeft="@+id/editText2"
        android:layout_alignStart="@+id/editText2"
        android:layout_alignRight="@+id/editText2"
        android:layout_alignEnd="@+id/editText2"
        android:onClick="tryLogin"/>

    <TextView
        android:layout_width="wrap_content"
        android:layout_height="wrap_content"
        android:text=""
        android:id="@+id/error"
        android:layout_above="@+id/username"
        android:layout_centerHorizontal="true"
        android:textColor="#ffff0000" />

</RelativeLayout>
Before writing the actual login code, we will create a helper class to read & save related values to Android's SharedPreferences:
public class Utility {
    public static Boolean isUserLoggedIn(Context context) {
        SharedPreferences prefs = PreferenceManager.getDefaultSharedPreferences(context);

        return prefs.getBoolean("isUserLoggedIn", false);
    }

    public static void setUserLoggedIn(Context context, Boolean isLoggedIn)
    {
        SharedPreferences prefs = PreferenceManager.getDefaultSharedPreferences(context);
        SharedPreferences.Editor editor = prefs.edit();
        editor.putBoolean("isUserLoggedIn", isLoggedIn);
        editor.commit();
    }

    public static void logout(Context context) {
        SharedPreferences prefs = PreferenceManager.getDefaultSharedPreferences(context);
        SharedPreferences.Editor editor = prefs.edit();
        editor.putBoolean("isUserLoggedIn", false);
        editor.commit();
    }

    public static void saveUsernameAndPassword(Context context, String username, String password)
    {
        SharedPreferences prefs = PreferenceManager.getDefaultSharedPreferences(context);
        SharedPreferences.Editor editor = prefs.edit();
        editor.putString("username", username);
        editor.putString("password", password);
        editor.commit();
    }
}
Now let's see the actual login code:
public class LoginActivity extends ActionBarActivity {

    @Override
    protected void onCreate(Bundle savedInstanceState) {
        super.onCreate(savedInstanceState);
        setContentView(R.layout.activity_login);
        if (savedInstanceState == null) {
            getSupportFragmentManager().beginTransaction()
                    .add(R.id.container, new LoginFragment())
                    .commit();
        }
    }

    @Override
    public boolean onCreateOptionsMenu(Menu menu) {
        return false;
    }

    public void tryLogin(View view) {
        LoginFragment fragment = (LoginFragment) getSupportFragmentManager().findFragmentById(R.id.container);
        fragment.tryLogin(view);
    }

    /**
     * A placeholder fragment containing a simple view.
     */
    public static class LoginFragment extends Fragment {

        public LoginFragment() {
        }

        @Override
        public View onCreateView(LayoutInflater inflater, ViewGroup container,
                                 Bundle savedInstanceState) {
            View rootView = inflater.inflate(R.layout.fragment_login, container, false);
            return rootView;
        }

        public void login(Boolean result)
        {
            Utility.setUserLoggedIn(getActivity(), result);
            if(result) {
                EditText user = (EditText)getActivity().findViewById(R.id.username);
                EditText pass = (EditText)getActivity().findViewById(R.id.password);
                String username = user.getText().toString();
                String password = pass.getText().toString();
                Utility.saveUsernameAndPassword(getActivity(), username, password);

                getActivity().finish();
            } else {
                Utility.saveUsernameAndPassword(getActivity(), null, null);
                TextView error = (TextView)getActivity().findViewById(R.id.error);
                error.setText("Login failed! Please try again.");
            }
        }

        public void tryLogin(View view) {
            EditText user = (EditText)getActivity().findViewById(R.id.username);
            EditText pass = (EditText)getActivity().findViewById(R.id.password);
            String username = username.getText().toString();
            String password = password.getText().toString();

            if(!username.isEmpty() && !password.isEmpty()) {
                TextView error = (TextView)getActivity().findViewById(R.id.error);
                error.setText("");
                CheckLoginTask loginTask = new CheckLoginTask();
                loginTask.execute(username, password);
            }
        }

        // we will use an AsyncTask to connect to an API service to check the username and the password
        // the doInBackground method will return true if the login succeeds
        public class CheckLoginTask extends AsyncTask<String, Void, Boolean> {
            @Override
            protected Boolean doInBackground(String... params) {
                HttpsURLConnection urlConnection = null;
                BufferedReader reader = null;
                String responseJsonStr = null;

                try {
                    // Construct the URL for the get User query
                    final String GET_PROFILE_BASE_URL ="https://api.domain.com/user?";
                    Uri builtUri = Uri.parse(GET_PROFILE_BASE_URL).buildUpon().build();
                    URL url = new URL(builtUri.toString());
                    // Create the request to server and open the connection
                    urlConnection = (HttpsURLConnection) url.openConnection();
                    // Create the SSL connection
                    SSLContext sc;
                    sc = SSLContext.getInstance("TLS");
                    sc.init(null, null, new SecureRandom());
                    urlConnection.setSSLSocketFactory(sc.getSocketFactory());
                    // Add API credentials
                    String user = params[0];
                    String password = params[1];
                    String userpass = user + ":" + password;
                    // Create the Authentication Token
                    String basicAuth = "Basic " + Base64.encodeToString(userpass.getBytes(), Base64.DEFAULT);
                    // Add the required Headers.
                    urlConnection.addRequestProperty("Authorization", basicAuth);
                    urlConnection.addRequestProperty("Content-Type", "application/json");
                    urlConnection.setRequestProperty("accept", "application/json");
                    // Method
                    urlConnection.setRequestMethod("GET");
                    // Connect
                    urlConnection.connect();

                    int status = urlConnection.getResponseCode();
                    String reason = urlConnection.getResponseMessage();

                    Log.v("LOGIN", status + reason);

                    // Read the input stream into a String
                    InputStream inputStream = urlConnection.getInputStream();
                    StringBuffer buffer = new StringBuffer();
                    if (inputStream == null) {
                        // Nothing to do here
                        return null;
                    }
                    reader = new BufferedReader(new InputStreamReader(inputStream));

                    String line;
                    while ((line = reader.readLine()) != null) {
                        // Since it's JSON, adding a newline isn't necessary (it won't affect parsing)
                        // But it does make debugging a *lot* easier if you print out the completed
                        // buffer for debugging.
                        buffer.append(line + "\n");
                    }

                    if (buffer.length() == 0) {
                        // Stream was empty. No point in parsing.
                        return null;
                    }
                    responseJsonStr = buffer.toString();
                    getNameDataFromJson(responseJsonStr);

                } catch (IOException | NoSuchAlgorithmException | JSONException | KeyManagementException e) {
                    Log.e("LOGIN", "Error", e);

                    return false;
                } finally {
                    if (urlConnection != null) {
                        urlConnection.disconnect();
                    }
                    if (reader != null) {
                        try {
                            reader.close();
                        } catch (final IOException e) {

                        }
                    }
                }

                // if we reach here it means we successfully logged in
                return true;
            }

            @Override
            protected void onPostExecute(Boolean result) {
                super.onPostExecute(result);
                login(result);
            }
        }
    }

}
In the end, all that's left is to start this activity whenever we need the user to login:
public class MainActivity extends Activity {
    // ...

    @Override
    protected void onResume() {
        super.onResume();

        if(!Utility.isUserLoggedIn(this)){
            startActivity(new Intent(this, LoginActivity.class));
        }
    }

    // ...
}

How to Show the Full Path in the OS X Terminal
Working and constantly switching between multiple projects in the OS X Terminal or iTerm (whatever you prefer) can be hassle since, by default, you cannot see the full path of the directory you're working in. Here's how to change that.
How to show the full path in the os x terminal
But first, in the spirit of full disclosure, I'd like to mention that I only found out how to display the full path after I accidentally destroyed the virtual machine of the wrong project and I had to install the whole damn thing all over again.
As you might have noticed, the Terminal only displays the current folder in which you're working so it can be pretty easy to make a mistake when your projects have a similar folder structure or are built with the same framework.
This first thing you need to do to address that is to fire up your Terminal and open your .bash_profile file:
sudo nano ~/.bash_profile
Then head over to a new line and add:
PS1="\w$ "
Save and close the file, then restart your Terminal. You should now notice that when you browse through your directories, the path should look something like this:
~/Development/hpm/vagrant$
The \w symbol you noticed stands for "Current working directory, full path (ie: /Users/Admin/Desktop)" while the $ mark followed by a space is simply a separator between the working path and the input area.
How to show the full path in the os x terminal
If you want to make the Terminal look even more awesome, here are some other options you can add to PS1:
\W – Current working directory (ie: Desktop/)

\d – Current date

\t – Current time

\h – Host name

\# – Command number

\u – User name
So for, example, using PS1="\u@\w$ " will output "Sebi@~/Development$ ".
I really hope this small tutorial helped. Have fun!