GlusterFS - Replicate a volume over two nodes
When you are using a load balancer with two or more backend nodes(web servers) you will probably need some data to be mirrored between the two nodes. A high availability solution is offered by GlusterFS.
Within this article, I am going to show how you can set volume replication between two CentOS 7 servers.
Let's assume this:
- node1.domain.com - 172.31.0.201
- node2.domain.com - 172.31.0.202
First, we edit /etc/hosts of each of the servers and append this:
172.31.0.201     node1.domain.com     node1
172.31.0.202     node2.domain.com     node2
We should now be able to ping between the nodes.
PING node2.domain.com (172.31.0.202) 56(84) bytes of data.
64 bytes from node2.domain.com (172.31.0.202): icmp_seq=1 ttl=64 time=0.482 ms
64 bytes from node2.domain.com (172.31.0.202): icmp_seq=2 ttl=64 time=0.261 ms
64 bytes from node2.domain.com (172.31.0.202): icmp_seq=3 ttl=64 time=0.395 ms

--- node2.domain.com ping statistics ---
3 packets transmitted, 3 received, 0% packet loss, time 2001ms
rtt min/avg/max/mdev = 0.261/0.379/0.482/0.092 ms
Installation:
Run these on both nodes:
yum -y install epel-release yum-priorities
Add priority=10 to the [epel]section in /etc/yum.repos.d/epel.repo
[epel]
name=Extra Packages for Enterprise Linux 7 - $basearch
#baseurl=http://download.fedoraproject.org/pub/epel/7/$basearch
mirrorlist=https://mirrors.fedoraproject.org/metalink?repo=epel-7&arch=$basearch
failovermethod=priority
enabled=1
priority=10
gpgcheck=1
gpgkey=file:///etc/pki/rpm-gpg/RPM-GPG-KEY-EPEL-7
Update packages and install:
yum -y update
yum -y install centos-release-gluster
yum -y install glusterfs-server
Start glusterd service, also enable it to start at boot:
service glusterd start
systemctl enable glusterd
You can use service glusterd status and glusterfsd --version to check all is working properly.
Remember, all the installation steps should be executed on both servers!
Setup:
On node1 server run:
[root@node1 ~]# gluster peer probe node2
peer probe: success.
[root@node1 ~]# gluster peer status
Number of Peers: 1

Hostname: node2
Uuid: 42ee3ddb-e3e3-4f3d-a3b6-5c809e589b76
State: Peer in Cluster (Connected)
On node2 server run:
[root@node2 ~]# gluster peer probe node1
peer probe: success.
[root@node2 ~]# gluster peer status
Number of Peers: 1

Hostname: node1.domain.com
Uuid: 68209420-3f9f-4c1a-8ce6-811070616dd4
State: Peer in Cluster (Connected)
Other names:
node1
[root@node2 ~]# gluster peer status
Number of Peers: 1

Hostname: node1.domain.com
Uuid: 68209420-3f9f-4c1a-8ce6-811070616dd4
State: Peer in Cluster (Connected)
Other names:
node1
We need to create now the shared volume, and this can be done from any of the two servers.
[root@node1 ~]# gluster volume create shareddata replica 2 transport tcp node1:/shared-folder node2:/shared-folder force
volume create: shareddata: success: please start the volume to access data
[root@node1 ~]# gluster volume start shareddata
volume start: shareddata: success
[root@node1 ~]# gluster volume info

Volume Name: shareddata
Type: Replicate
Volume ID: 30a97b23-3f8d-44d6-88db-09c61f00cd90
Status: Started
Snapshot Count: 0
Number of Bricks: 1 x 2 = 2
Transport-type: tcp
Bricks:
Brick1: node1:/shared-folder
Brick2: node2:/shared-folder
Options Reconfigured:
transport.address-family: inet
nfs.disable: on
This creates a shared volume named shareddata, with two replicas on node1 and node2 servers, under /shared-folder path. It will also silently create the shared-folder directory if it doesn't exist.If there are more servers in the cluster, do adjust the replica number in the above command. The "force" parameter was needed, because we replicated in the root partition. It is not needed when creating under another partition.
Mount:
In order for the replication to work, mounting the volume is needed. Create a mount point:
mkdir /mnt/glusterfs
On node1 run:
[root@node1 ~]# echo "node1:/shareddata    /mnt/glusterfs/  glusterfs       defaults,_netdev        0 0" >> /etc/fstab
[root@node1 ~]# mount -a
[root@node1 ~]# df -h
Filesystem                       Size  Used Avail Use% Mounted on
/dev/mapper/VolGroup00-LogVol00   38G  1.1G   37G   3% /
devtmpfs                         236M     0  236M   0% /dev
tmpfs                            245M     0  245M   0% /dev/shm
tmpfs                            245M  4.4M  240M   2% /run
tmpfs                            245M     0  245M   0% /sys/fs/cgroup
/dev/sda2                       1014M   88M  927M   9% /boot
tmpfs                             49M     0   49M   0% /run/user/1000
node1:/shareddata                 38G  1.1G   37G   3% /mnt/glusterfs
On node2 run:
[root@node2 ~]# echo "node2:/shareddata    /mnt/glusterfs/  glusterfs       defaults,_netdev        0 0" >> /etc/fstab
[root@node2 ~]# mount -a
[root@node2 ~]# df -h
Filesystem                       Size  Used Avail Use% Mounted on
/dev/mapper/VolGroup00-LogVol00   38G  1.1G   37G   3% /
devtmpfs                         236M     0  236M   0% /dev
tmpfs                            245M     0  245M   0% /dev/shm
tmpfs                            245M  4.4M  240M   2% /run
tmpfs                            245M     0  245M   0% /sys/fs/cgroup
/dev/sda2                       1014M   88M  927M   9% /boot
tmpfs                             49M     0   49M   0% /run/user/1000
node2:/shareddata                 38G  1.1G   37G   3% /mnt/glusterfs
Testing:
On node1:
touch /mnt/glusterfs/file01
touch /mnt/glusterfs/file02
on node2:
[root@node2 ~]# ls /mnt/glusterfs/ -l
total 0
-rw-r--r--. 1 root root 0 Sep 24 19:35 file01
-rw-r--r--. 1 root root 0 Sep 24 19:35 file02
This is how you mirror one folder between two servers. Just keep in mind, you will need to use the mount point /mnt/glusterfs in your projects, for the replication to work.
Mysqldump Command - Useful Usage Examples
One of the tasks a sysadmin will always have on their list is backing up databases. These backups are also called dump files because, usually, they are generated with mysqldump command.
I am going to share a few tricks on mysqldump that will help when handling servers with many relatively small databases.
Mysqldump Command
The most simple way to backup databases would be using mysqldump command with the the --all-databases attribute. But I find that having each database saved in its own file more convenient to use.
Lets first suppose that you need to run a script that alters in databases, and that you just need a simple way to have a rollback point, just in case. I used to run something like this before:
for i in \
`ls /var/lib/mysql/`; \
do mysqldump -u root -p*** --skip-lock-tables --skip-add-locks --quick --single-transaction $i > $i.sql; done
where *** is your root password. The aditional parameters --skip-lock-tables --skip-add-locks --quick --single-transaction assure availability and consistency of dump file for InnoDB databases (the default storage engine as of MySQL 5.5.5).
Mysql stores databases in folders using same name as database name in /var/lib/mysql. The command picks database names from the listing of /var/lib/mysql folder and exports to files using same name adding the .sql.
There are 2 issues with the above command:
- It will try to execute a dump for every file/folder listed in
/var/lib/mysql. So if you have error logs or whatever other files it will create.sqldumps for them too. This will send just directory names as database names to export:for i in \ `find /var/lib/mysql/ -type d | sed 's/\/var\/lib\/mysql\///g'`;\ do mysqldump -u root -p*** --skip-lock-tables --skip-add-locks --quick --single-transaction $i > $i.sql; done
I find this to be hard to type and prefer to use one I will explain in point 2, since it also covers this.
- When database names have characters like
-the folder name will have@002instead. If that is the case, you can use something like:for i in \ `mysql -u root -p*** -e 'show databases'`;\ do mysqldump -u root -p*** --skip-lock-tables --skip-add-locks --quick --single-transaction $i > $i.sql;done
This picks database names to export form mysql
show databasescommand.
But, one time I had to export databases with / in their names. And there is no way to export as I showed above, since / can't be used in file names since it is actually a markup for directories. So I did this:
for i in \
`mysql -u root -p*** -e 'show databases'`;\
do mysqldump -u root -p*** --skip-lock-tables --skip-add-locks --quick --single-transaction $i > `echo $i | sed "s/\//_/g"`.sql;done
This wil replace / with _ for the dump file names.
For all of the above, we could (for obvious reasons) not use root mysql user. We could also run the backing up from a different location. In order to do this, we would need to create a mysql user with the right privileges on the machine we want to back up.
create user 'backupuser'@'111.222.333.444' identified by 'backuppassword';

grant select, show view, trigger, lock tables, reload, show databases on *.* to 'backupuser'@'111.222.333.444';
flush privileges;
where 111.222.333.444 is the ip of the remote machine.
Now you can issue mysqldump command from the other machine like this:
for i in \
`mysql -u backupuser -pbackuppassword -e 'show databases'`;\
do mysqldump -u backupuser -pbackuppassword -h 444.333.222.111 --skip-lock-tables --skip-add-locks --quick --single-transaction $i > `echo $i | sed "s/\//_/g"`.sql;done
where 444.333.222.111 is the ip of the machine we want to backup.
Lets take it to the next step , and put all our knowledge in a shell script.
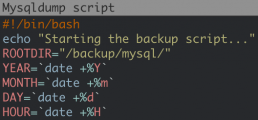
#!/bin/bash
echo "Starting the backup script..."
ROOTDIR="/backup/mysql/"
YEAR=`date +%Y`
MONTH=`date +%m`
DAY=`date +%d`
HOUR=`date +%H`
SERVER="444.333.222.111"
BLACKLIST="information_schema performance_schema"
ADDITIONAL_MYSQLDUMP_PARAMS="--skip-lock-tables --skip-add-locks --quick --single-transaction"
MYSQL_USER="backupuser"
MYSQL_PASSWORD="backuppassword"

# Read MySQL password from stdin if empty
if [ -z "${MYSQL_PASSWORD}" ]; then
 echo -n "Enter MySQL ${MYSQL_USER} password: "
 read -s MYSQL_PASSWORD
 echo
fi

# Check MySQL credentials
echo exit | mysql --user=${MYSQL_USER} --password=${MYSQL_PASSWORD} --host=${SERVER} -B 2>/dev/null
if [ "$?" -gt 0 ]; then
 echo "MySQL ${MYSQL_USER} - wrong credentials"
 exit 1
else
 echo "MySQL ${MYSQL_USER} - was able to connect."
fi

#creating backup path
if [ ! -d "$ROOTDIR/$YEAR/$MONTH/$DAY/$HOUR" ]; then
    mkdir -p "$ROOTDIR/$YEAR/$MONTH/$DAY/$HOUR"
    chmod -R 700 $ROOTDIR
fi

echo "running mysqldump"
dblist=`mysql -u ${MYSQL_USER} -p${MYSQL_PASSWORD} -h $SERVER -e "show databases" | sed -n '2,$ p'`
for db in $dblist; do
    echo "Backuping $db"
    isBl=`echo $BLACKLIST |grep $db`
    if [ $? == 1 ]; then
        mysqldump ${ADDITIONAL_MYSQLDUMP_PARAMS} -u ${MYSQL_USER} -p${MYSQL_PASSWORD} -h $SERVER $db | gzip --best > "$ROOTDIR/$YEAR/$MONTH/$DAY/$HOUR/`echo $db | sed 's/\//_/g'`.sql.gz"
        echo "Backup of $db ends with $? exit code"
    else
        echo "Database $db is blacklisted, skipped"
    fi
done
echo
echo "dump completed"
This will also compress the dump files to save storage.
Save the script as backup-mysql.sh somewhere on the machine you want backups saved, ensure you have the mysql user with the right credentials on the server hosting the mysql. You will also need mysql installed on the backup server. Executesudo chmod 700 backup-mysql.sh. Run the script with sudo sh backup-mysql.sh . After making sure it works properly, you can also add it to your crontab, so that it runs on a regular schedule.
OOP in Golang vs C++
Before I started to learn Go, every online opinion I would read about the language complained about the lack of generics and how OOP was dumbed down and so on.
It made me put off learning it for quite some time, more than I would like to admit. Coming from a C++ background, OOP, generics and meta-programming was my daily bread.
It wasn't until I had to actually learn Go that I saw what it offered me in terms of OOP and it was just enough. As such, I wanted to put a side-by-side comparison of typical C++ code that deals with classes, and it's corresponding implementation in Go that does more or less the same thing.
This is by no means an exhaustive list of examples, but I thought it might prove useful for someone trying to figure out Go.
To run all Go examples, copy them to a file and run go run filename.go .
To run all C++ examples, copy them to a file and run g++ -o filename filename.cpp -std=c++14 && ./filename .
Class declaration
In C++:
#include <iostream>
#include <memory>
#include <string>

class MyClass {
    private:
        std::string property1;

        void Method1(std::string param1, int param2);

    public:
        std::string property2;

        MyClass(std::string constructor_argument);
        int Method2(int param);
};

MyClass::MyClass(std::string constructor_argument) {
    this->property1 = constructor_argument;
}

void MyClass::Method1(std::string param1, int param2) {
    std::cout << param1 << std::endl << param2 << std::endl;
    std::cout << this->property2 << std::endl;
}

int MyClass::Method2(int param) {
    this->Method1(this->property1, param);

    return param + 1;
}

int main(int argc, char *argv[]) {
    auto obj = std::make_unique<MyClass>("property 1 value");

    obj->property2 = "property 2 value";

    std::cout << obj->Method2(4) << std::endl;

    return 0;
}
Go equivalent:
package main

import "fmt"

type MyClass struct {
	// properties that start with a lowercase character are private
	property1 string
	// properties that start with an uppercase character are public
	Property2 string

	/*
		Keep in mind that public and private in Golang actually
		means exported by package. Code from the same package
		can access a structure's private properties and methods.
	*/
}

func NewMyClass(constructor_argument string) *MyClass {
	return &MyClass{property1: constructor_argument}
}

func (mc *MyClass) method1(param1 string, param2 int) {
	fmt.Printf("%s\n%d\n", param1, param2)
	fmt.Printf("%s\n", mc.property1)
}

func (mc *MyClass) Method2(param int) int {
	mc.method1(mc.property1, param)

	return param + 1
}

func main() {
	obj := NewMyClass("property 1 value")

	obj.Property2 = "property 2 value"

	fmt.Printf("%d\n", obj.Method2(4))

	// No return needed
}
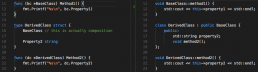
Inheritance (sort of)
In C++:
#include <iostream>
#include <memory>
#include <string>

class BaseClass {
    public:
        std::string property1;
        void method1();
};

void BaseClass::method1() {
    std::cout << this->property1 << std::endl;
}

class DerivedClass : public BaseClass {
    public:
        std::string property2;
        void method2();
};

void DerivedClass::method2() {
    std::cout << this->property2 << std::endl;
}

int main(int argc, char *argv[]) {
    auto obj = std::make_unique<DerivedClass>();
    obj->property1 = "property 1 value";
    obj->property2 = "property 2 value";

    obj->method1();
    obj->method2();

    return 0;
}
Go equivalent:
package main

import "fmt"

type BaseClass struct {
	Property1 string

	// no need for method declaration here
}

func (bc *BaseClass) Method1() {
	fmt.Printf("%s\n", bc.Property1)
}

type DerivedClass struct {
	BaseClass // this is actually composition

	Property2 string
}

func (dc *DerivedClass) Method2() {
	fmt.Printf("%s\n", dc.Property2)
}

func main() {
	obj := &DerivedClass{}
	obj.Property1 = "property 1 value"
	obj.Property2 = "property 2 value"

	obj.Method1()
	obj.Method2()

	// no need to return
}
Interfaces
In C++:
#include <iostream>
#include <memory>
#include <string>

class MyInterface {
    public:
        virtual void method() = 0;
};

class Class1 : public MyInterface {
    public:
        void method() override;
};

void Class1::method() {
    std::cout << "Class 1" << std::endl;
}

class Class2 : public MyInterface {
    public:
        void method() override;
};

void Class2::method() {
    std::cout << "Class 2" << std::endl;
}

std::shared_ptr<MyInterface> NewClass1() {
    return std::make_shared<Class1>();
}

std::shared_ptr<MyInterface> NewClass2() {
    return std::make_shared<Class2>();
}

int main(int argc, char *argv[]) {
    auto obj1 = NewClass1();
    auto obj2 = NewClass2();

    obj1->method();
    obj2->method();

    return 0;
}
Go equivalent:
package main

import "fmt"

type MyInterface interface {
	Method()
}

type Class1 struct {
}

func (c1 *Class1) Method() {
	fmt.Println("Class 1")
}

type Class2 struct {
}

func (c2 *Class2) Method() {
	fmt.Println("Class 2")
}

func NewClass1() MyInterface {
	return &Class1{}
}

func NewClass2() MyInterface {
	return &Class2{}
}

func main() {
	obj1 := NewClass1()
	obj2 := NewClass2()

	obj1.Method()
	obj2.Method()
}
Conclusion
There are basic equivalences between traditional OOP languages like C++ and the syntax and functionality that Golang provides.
In it's own simple way, Golang provides ways to implement encapsulation, inheritance and polymorphism. In my humble opinion, these mechanisms are enough for most object-oriented projects.

Emulate a Redis Failover with Docker
Reading the Redis documentation can be a bit confusing without the hands-on experience. You could in theory create multiple processes of the Redis Server on your machine and configure each of them in part, but what if you could do it in a few commands? Not only that but emulate the network they’re connected to as well.
I’ve been looking into this and there’s a few examples out there on Web, the best one I could find was this one: https://github.com/AliyunContainerService/redis-cluster
So, starting from that example, I’ve tried to do the next best thing, which is to create a single docker-compose.yml file for all of it. Removing the need to build each image, just to do a docker-compose up and scale as needed.
Here’s what I got:
master:
  image: redis
slave:
  image: redis
  command: redis-server --slaveof master 6379
  links:
    - master
sentinel:
  image: redis
  command: >
    bash -c "echo 'port 26379' > sentinel.conf &&
    echo 'dir /tmp' >> sentinel.conf &&
    echo 'sentinel monitor master master 6379 2' >> sentinel.conf &&
    echo 'sentinel down-after-milliseconds master 5000' >> sentinel.conf &&
    echo 'sentinel parallel-syncs master 1' >> sentinel.conf &&
    echo 'sentinel failover-timeout master 5000' >> sentinel.conf &&
    cat sentinel.conf &&
    redis-server sentinel.conf --sentinel"
  links:
    - master
    - slave
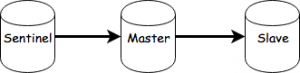
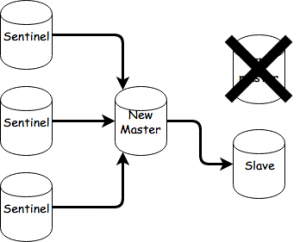
Basically, after saving this into a docker-compose.yml file and running docker-compose up in that folder you’ll get this:
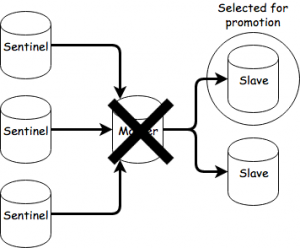
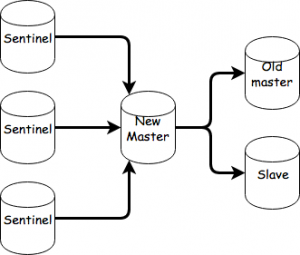
You can now scale as needed. For example, by running:
docker-compose scale slave=2 sentinel=3
You’ll end up with:

To initiale a failover, you’ll need to take the master out of the picture, you can do that with:
docker-compose pause master
You can now observe the communication between the sentinels and slaves. After the down-after-milliseconds and failover timeout passes, one of the slaves will be selected for promotion.
After the sentinels agree on the selection, the slave will become the new master.
You can now unpause the old master by doing this:
docker-compose unpause master
The old master will now become a slave of the new master and perform a sync.
That’s about it. As an exercise you could try setting up a cluster starting from this and observe failovers there.

Counting lines and words using Go
For those who need to count words and lines in text files, an easy approach for this matter is to use bufio.ScanWords and bufio.ScanLine in order to quickly solve the problem.
To count words:
input := "Spicy jalapeno pastrami ut ham turducken.\n Lorem sed ullamco, leberkas sint short loin strip steak ut shoulder shankle porchetta venison prosciutto turducken swine.\n Deserunt kevin frankfurter tongue aliqua incididunt tri-tip shank nostrud.\n"
scanner := bufio.NewScanner(strings.NewReader(input))

// Set the split function for the scanning operation.
scanner.Split(bufio.ScanWords)

// Count the words.
count := 0
for scanner.Scan() {
    count++
}

if err := scanner.Err(); err != nil {
    fmt.Fprintln(os.Stderr, "reading input:", err)
}

fmt.Printf("%d\n", count)
ScanWords is a split function for a Scanner that returns each space-separated (checks unicode.IsSpace) word of text, with trimmed whitespace.
To count lines:
input := "Spicy jalapeno pastrami ut ham turducken.\n Lorem sed ullamco, leberkas sint short loin strip steak ut shoulder shankle porchetta venison prosciutto turducken swine.\n Deserunt kevin frankfurter tongue aliqua incididunt tri-tip shank nostrud.\n"
scanner := bufio.NewScanner(strings.NewReader(input))

// Set the split function for the scanning operation.
scanner.Split(bufio. ScanLines)

// Count the lines.
count := 0
for scanner.Scan() {
    count++
}

if err := scanner.Err(); err != nil {
    fmt.Fprintln(os.Stderr, "reading input:", err)
}

fmt.Printf("%d\n", count)
ScanLines is a split function for a Scanner that returns each line of text (separated by "\r?\n"). It returns also empty lines and the last line is returned even if it has no newline at the end.

Debugging Golang apps in Docker with Visual Studio Code
Context
We’ve recently had some problems with a Go application that was running inside a Docker container in a very big Docker Compose setup.
After getting fed up with writing console prints and rebuilding the Docker image for that container and spinning up all the containers to debug things, we started investigating how we could speed up our debugging process.
Enter Visual Studio Code and its wonderful Go extension which supports Delve.
Now if you read through the pages linked above you will find out how to install and setup all these things. It’s pretty straight forward. The Docker part, however, is not. As such, I will show you a basic Go application which mimics what we had to deal with and how to set up debugging for it.
The application
The following is the main.go of our app. It will connect to a Redis server, set and get a value.
package main


import (
    "fmt"


    "github.com/garyburd/redigo/redis"
)


func main() {
    client, err := redis.Dial("tcp", "redis:6379")
    if err != nil {
        panic(err)
    }
    defer client.Close()


    result, err := client.Do("SET", "key1", "value1")
    if err != nil {
        panic(err)
    }
    fmt.Printf("%v\n", result)


    result, err = client.Do("GET", "key1")
    if err != nil {
        panic(err)
    }
    fmt.Printf("%v\n", result)
}
As you can see, it relies on the Redigo package, so make sure you get it and place it in your vendor folder.
To make sure you have everything setup the right way, go ahead and build it locally by running :
go build -o main main.go
If you run the application built this way, it will fail of course, because you need to connect to Redis. I’ve set the hostname for the server to redis which will point to an IP on the docker-machine when we docker-compose up.
The Dockerfile
Now we have to build the image for this application.
FROM golang


ENV GOPATH /opt/go:$GOPATH
ENV PATH /opt/go/bin:$PATH
ADD . /opt/go/src/local/myorg/myapp
WORKDIR /opt/go/src/local/myorg/myapp


RUN go get github.com/derekparker/delve/cmd/dlv
RUN go build -o main main.go
CMD ["./main"]
When this image will be built, it will basically copy the application code, set up the environment and build the Go application. The application’s entrypoint will be the main executable that will be built. We also install the Delve command line tool but we won’t use it if we run a container from this image directly (i.e. docker run).
Note the GOPATH variable and the path to which we copy our code. This path is very important for Delve and our debug configuration.
The Docker Compose file
Now that we have the Dockerfile to build the image, we have to define the docker-compose.yml file. Here, however we will overwrite the entrypoint for the container to launch Delve. Also the code that we copied will be replaced with a volume that will point to the code on the host machine, and we will also remove some security constraints that prevent Delve from forking the process.
Essentially, for the context I mentioned above we try not to touch the base image for the application since it might get accidentally pushed to the Docker Hub with debugging parameters. So in order to avoid that we have our Docker Compose process override the image with what we need to go about debugging.
Here’s the docker-compose.yml file :
version: '2'
services:
  redis:
    image: redis
    ports:
      - "6379:6379"
    expose:
      - "6379"
  myapp:
    build: .
    security_opt:
      - seccomp:unconfined
    entrypoint: dlv debug local/myorg/myapp -l 0.0.0.0:2345 --headless=true --log=true -- server
    volumes:
      - .:/opt/go/src/local/myorg/myapp
    ports:
      - "2345:2345"
    expose:
      - "2345"
It's here that we introduce the Redis server dependency we have. Note that for the myapp container we’ve exposed the ports that the Delve command line tool listens to.
So to see that everything is working, you can now run :
docker-compose up --build
This will build the image and start up the redis and myapp containers.
You should see the following output coming from the myapp container:
myapp_1  | 2016/12/15 08:50:39 server.go:71: Using API v1
myapp_1  | 2016/12/15 08:50:39 debugger.go:65: launching process with args: [/opt/go/src/local/myorg/myapp/debug server]
myapp_1  | API server listening at: [::]:2345
Which means that the Delve command line tool compiled our Go code into a debug executable, started it, and it’s listening for remote connections to the debugger on port 2345.
Now we just have to set up our launch.json config in the .vscode folder of our project.
The launch configuration
Here’s how our launch.json should look like:
{
    "version": "0.2.0",
    "configurations": [
       {
           "name": "Remote Docker",
           "type": "go",
           "request": "launch",
           "mode": "remote",
           "remotePath": "/opt/go/src/local/myorg/myapp",
           "port": 2345,
           "host": "192.168.99.100",
           "program": "${workspaceRoot}",
           "env": {},
           "args": []
       }
    ]
}
You might have to change the host IP to what your docker-machine ip output is.
Now all we have to do is set up a few breakpoints and start the debugger using the Remote Docker configuration.
Our docker compose terminal should print something like this from the myapp container :
myapp_1  | 2016/12/15 08:50:45 debugger.go:242: created breakpoint: &api.Breakpoint{ID:1, Name:"", Addr:0x4010af, File:"/opt/go/src/local/myorg/myapp/main.go", Line:11, FunctionName:"main.main", Cond:"", Tracepoint:false, Goroutine:false, Stacktrace:0, Variables:[]string(nil), LoadArgs:(*api.LoadConfig)(nil), LoadLocals:(*api.LoadConfig)(nil), HitCount:map[string]uint64{}, TotalHitCount:0x0}
myapp_1  | 2016/12/15 08:50:45 debugger.go:242: created breakpoint: &api.Breakpoint{ID:2, Name:"", Addr:0x401116, File:"/opt/go/src/local/myorg/myapp/main.go", Line:16, FunctionName:"main.main", Cond:"", Tracepoint:false, Goroutine:false, Stacktrace:0, Variables:[]string(nil), LoadArgs:(*api.LoadConfig)(nil), LoadLocals:(*api.LoadConfig)(nil), HitCount:map[string]uint64{}, TotalHitCount:0x0}
myapp_1  | 2016/12/15 08:50:45 debugger.go:242: created breakpoint: &api.Breakpoint{ID:3, Name:"", Addr:0x4013d1, File:"/opt/go/src/local/myorg/myapp/main.go", Line:22, FunctionName:"main.main", Cond:"", Tracepoint:false, Goroutine:false, Stacktrace:0, Variables:[]string(nil), LoadArgs:(*api.LoadConfig)(nil), LoadLocals:(*api.LoadConfig)(nil), HitCount:map[string]uint64{}, TotalHitCount:0x0}
myapp_1  | 2016/12/15 08:50:45 debugger.go:397: continuing
You can Next and Continue, look at the callstack, see the locals, view contents of specific variables, etc.
Final thoughts
I hope this proves to be as useful to you as it did for us. The tools mentioned in this post really save us a heap of trouble.
We really have to thank the open source community that brought us these tools. They are the real heroes.
Happy debugging!

Build a Face Detector on OS X Using OpenCV and C++
Building and using C++ libraries can be a daunting task, even more so for big libraries like OpenCV. This article should get you started with a minimal build of OpenCV and a sample application written in C++.
This application will get images from the webcam, draw rectangles around the faces in the images and show them to you on screen
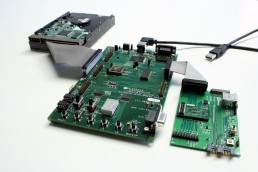
Build a Face Detector on OS X Using OpenCV and C - Requirements
I've built this on a MacBook Pro running OS X El Capitan Version 10.11.1.
We'll be using the GNU C++ compiler (g++) from the command line. Note that you should still have Xcode installed (I have Xcode 7.1 installed).
Here's what you need to do :
- Get "OpenCV for Linux/Mac" from the OpenCV Downloads Page I got version 3.0.
- Extract the contents of the zip file from step 1 to a folder of your choosing (I chose ~/opencv-3.0.0).
- Get a binary distribution of Cmake from the Cmake Downloads Page I got cmake-3.4.0-Darwin-x86_64.dmg.
- Install Cmake.
Building OpenCV
OpenCV uses CMake files to describe how the project needs to be built. CMake can transform these files into actual project settings (e.g. an Xcode project, Unix makefiles, a Visual Studio project, etc.) depending on the generator you choose.
First open CMake and a small window will pop-up that will let you choose your build options based on the CMakeList.txt files in the opencv source directory. First click on the Browse Source... button and choose the path to the opencv source folder (the folder you extracted the zip file to at step 2). Then click on the Browse Build... button and choose a path to a build folder, I'm going to create a new folder called build in the previously mentioned source folder.
If at any point you are prompted to choose a generator, pick Unix Makefiles. If the paths you chose were correct, after you click the Configure button, you should be looking at something like this :
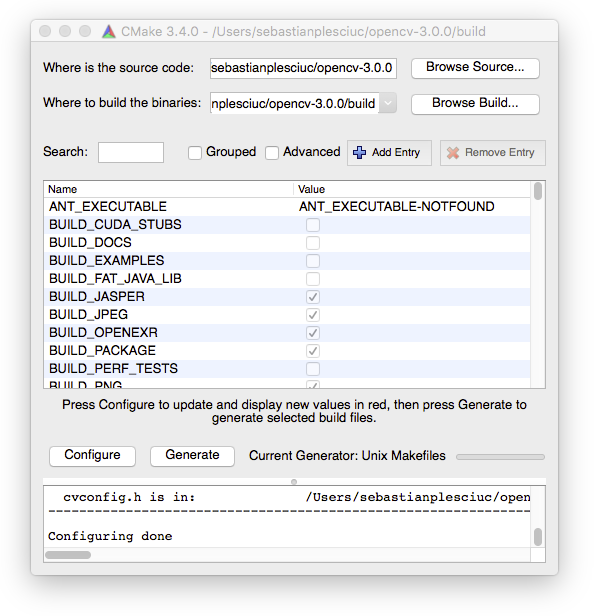
For a somewhat minimal OpenCV build, make sure you only have the following options enabled :
- BUILD_JASPER
- BUILD_JPEG
- BUILD_OPENEXR
- BUILD_PACKAGE
- BUILD_PNG
- BUILD_TIFF
- BUILD_WITH_DEBUG_INFO
- BUILD_ZLIB
- BUILD_opencv_apps
- BUILD_opencv_calib3d
- BUILD_opencv_core
- BUILD_opencv_features2d
- BUILD_opencv_flann
- BUILD_opencv_hal
- BUILD_opencv_highgui
- BUILD_opencv_imgcodecs
- BUILD_opencv_imgproc
- BUILD_opencv_ml
- BUILD_opencv_objdetect
- BUILD_opencv_photo
- BUILD_opencv_python2
- BUILD_opencv_shape
- BUILD_opencv_stitching
- BUILD_opencv_superres
- BUILD_opencv_ts
- BUILD_opencv_video
- BUILD_opencv_videoio
- BUILD_opencv_videostab
- ENABLE_SSE
- ENABLE_SSE2
- WITH_1394
- WITH_JASPER
- WITH_JPEG
- WITH_LIBV4L
- WITH_OPENEXR
- WITH_PNG
- WITH_TIFF
- WITH_V4L
- WITH_WEBP
You should disable the options that are not in the list, especially the BUILD_SHARED_LIBS one. Don't touch the options that are text fields unless you know what you're doing.
Most of these options you don't need for this particular exercise, but it will save you time by not having to rebuild OpenCV should you decide to try something else.
Once you have selected the settings above, click Generate. Now you can navigate to the build folder, I'll do so with cd ~/opencv-3.0.0/build/ and run make to build OpenCV.
Installing OpenCV
If everything goes well, after the build finishes, run make install to add the OpenCV includes to the /usr/local/include folder and the libraries to the /usr/local/lib and /usr/local/share/OpenCV/3rdparty/lib folders.
After that's done, you should be able to build your own C++ applications that link against OpenCV.
The Face Detector Application
Now let's try to build our first application with OpenCV
Here's the code and comments that explain how to do just that :
#include <iostream>

//Include OpenCV
#include <opencv2/opencv.hpp>

int main(void )
{
   //Capture stream from webcam.
   cv::VideoCapture capture(0);

   //Check if we can get the webcam stream.
   if(!capture.isOpened())
   {
      std::cout << "Could not open camera" << std::endl;
      return -1;
   }

   //OpenCV saves detection rules as something called a CascadeClassifier which
   //    can be used to detect objects in images.
   cv::CascadeClassifier faceCascade;

   //We'll load the lbpcascade_frontalface.xml containing the rules to detect faces.
   //The file should be right next to the binary.
   if(!faceCascade.load("lbpcascade_frontalface.xml"))
   {
      std::cout << "Failed to load cascade classifier" << std::endl;
      return -1;
   }

   while (true)
   {
      //This variable will hold the image from the camera.
      cv::Mat cameraFrame;

      //Read an image from the camera.
      capture.read(cameraFrame);

      //This vector will hold the rectangle coordinates to a detection inside the image.
      std::vector<cv::Rect> faces;

      //This function detects the faces in the image and
      // places the rectangles of the faces in the vector.
      //See the detectMultiScale() documentation for more details
      // about the rest of the parameters.
      faceCascade.detectMultiScale(
        cameraFrame,
        faces,
        1.09,
        3,
        0 | CV_HAAR_SCALE_IMAGE,
        cv::Size(30, 30));

      //Here we draw the rectangles onto the image with a red border of thikness 2.
      for( size_t i = 0; i < faces.size(); i++ )
            cv::rectangle(cameraFrame, faces[i], cv::Scalar(0, 0, 255), 2);

      //Here we show the drawn image in a named window called "output".
      cv::imshow("output", cameraFrame);

      //Waits 50 miliseconds for key press, returns -1 if no key is pressed during that time
      if (cv::waitKey(50) >= 0)
          break;
   }

   return 0;
}
I saved this as main.cpp. To build it I used the following command :
g++ -o main main.cpp -I/usr/local/include \
-L/usr/local/lib -lopencv_core -lopencv_imgproc -lopencv_objdetect \
-lopencv_imgcodecs -lopencv_highgui -lopencv_hal -lopencv_videoio \
-L/usr/local/share/OpenCV/3rdparty/lib -llibpng -llibjpeg -llibwebp \
-llibtiff -lzlib -lIlmImf -llibjasper -framework AVFoundation -framework QuartzCore \
-framework CoreMedia -framework Cocoa -framework QTKit
Hopefully, no errors should occur.
Conclusions
Build a Face Detector on OS X Using OpenCV and C? Before running the application, you have to copy the lbpcascade_frontalface.xml next to the main file. You can find this file in the OpenCV source folder under /data/lbpcascades/. You can also find some other cascades to detect eyes, cat faces, etc.
Now just run the ./main and enjoy!

An Introduction to Artificial Intelligence: Facts and Fallacies
One way or another, we all heard of Artificial Intelligence. It's been there since we were born and it will surely outlive us. It’s a promise of a Utopian future and could be a harbinger of our own demise. It could help us end poverty, disease and pollution or it could see us a threat and decide to take us out. Whatever the future might hold, one thing's certain: Artificial Intelligence is (or will be) the Pyramids of a generation and most likely mankind's greatest creation.
How to Overwrite the OS on an Ecrypted Machine
I've recently come across a situation where I had an encrypted Samsung laptop that needed a reimage. The previous owner had encrypted the HDD so that no one who would find /steal the laptop could access the data from it, which made it difficult to even boot from the USB I wanted to use, as it always loaded the OS it had installed.
How to Overwrite the OS on an Ecrypted Machine
If you are ever in this situation, here is what needs to be done to make the laptop usable again:
- Boot the computer → BIOS
- Go to Advanced → Fast Bios Mode → set it to disabled (this will allow you the needed time to boot the OS from the bootable USB stick/CD/DVD you plan to use)
- Then go to Boot Priority order and set them as follows:
- USB HDD (the bootable USB I used in my case)
- SATA HDD
- …
- Ubuntu → disable it (this was the OS previously installed on the laptop – this step is optional)
- Reboot → Install OS
- Reboot → Advanced → Fast Bios Mode → Enabled
- Celebrate.
How to Overwrite the OS on an Ecrypted Machine
You could also install the OS from Live mode and use EFI mode to delete the previous record of the OS used, so that there wouldn't be multiple entries of the same OS. What is mandatory for Samsung laptops is to disable the Fast boot mode and the order for boot devices to be set 1st for the bootable USB you plan to use, the purpose here being installing a new OS (be it Ubuntu or anything else).

c
Customer support has been designed to be a link between the customer and the product. Now, even though we may be super smart and figure out almost everything on our own, there may come a day when customer support is needed. Here are 10 things to keep in mind in order to get the best out of a support interaction: