Building and using C++ libraries can be a daunting task, even more so for big libraries like OpenCV. This article should get you started with a minimal build of OpenCV and a sample application written in C++.
This application will get images from the webcam, draw rectangles around the faces in the images and show them to you on screen.
Requirements
I’ve built this on a MacBook Pro running OS X El Capitan Version 10.11.1.
We’ll be using the GNU C++ compiler (g++) from the command line. Note that you should still have Xcode installed (I have Xcode 7.1 installed).
Here’s what you need to do :
- Get “OpenCV for Linux/Mac” from the OpenCV Downloads Page I got version 3.0.
- Extract the contents of the zip file from step 1 to a folder of your choosing (I chose ~/opencv-3.0.0).
- Get a binary distribution of Cmake from the Cmake Downloads Page I got cmake-3.4.0-Darwin-x86_64.dmg.
- Install Cmake.
Building OpenCV
OpenCV uses CMake files to describe how the project needs to be built. CMake can transform these files into actual project settings (e.g. an Xcode project, Unix makefiles, a Visual Studio project, etc.) depending on the generator you choose.
First open CMake and a small window will pop-up that will let you choose your build options based on the CMakeList.txt files in the opencv source directory. First click on the Browse Source… button and choose the path to the opencv source folder (the folder you extracted the zip file to at step 2). Then click on the Browse Build… button and choose a path to a build folder, I’m going to create a new folder called build in the previously mentioned source folder.
If at any point you are prompted to choose a generator, pick Unix Makefiles. If the paths you chose were correct, after you click the Configure button, you should be looking at something like this :
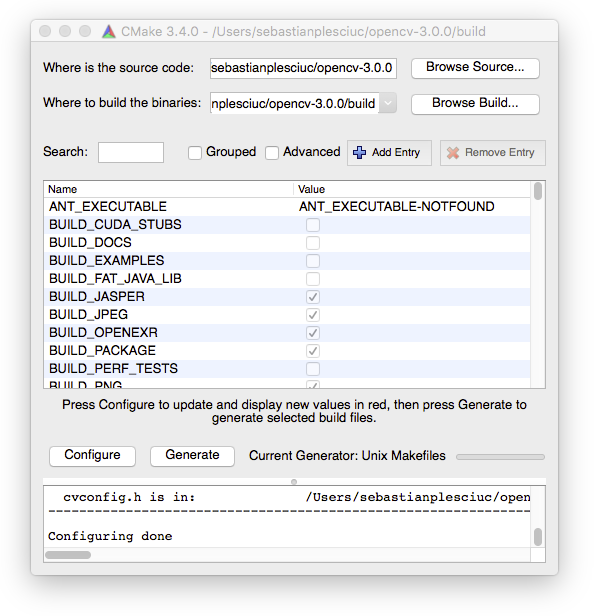
For a somewhat minimal OpenCV build, make sure you only have the following options enabled :
- BUILD_JASPER
- BUILD_JPEG
- BUILD_OPENEXR
- BUILD_PACKAGE
- BUILD_PNG
- BUILD_TIFF
- BUILD_WITH_DEBUG_INFO
- BUILD_ZLIB
- BUILD_opencv_apps
- BUILD_opencv_calib3d
- BUILD_opencv_core
- BUILD_opencv_features2d
- BUILD_opencv_flann
- BUILD_opencv_hal
- BUILD_opencv_highgui
- BUILD_opencv_imgcodecs
- BUILD_opencv_imgproc
- BUILD_opencv_ml
- BUILD_opencv_objdetect
- BUILD_opencv_photo
- BUILD_opencv_python2
- BUILD_opencv_shape
- BUILD_opencv_stitching
- BUILD_opencv_superres
- BUILD_opencv_ts
- BUILD_opencv_video
- BUILD_opencv_videoio
- BUILD_opencv_videostab
- ENABLE_SSE
- ENABLE_SSE2
- WITH_1394
- WITH_JASPER
- WITH_JPEG
- WITH_LIBV4L
- WITH_OPENEXR
- WITH_PNG
- WITH_TIFF
- WITH_V4L
- WITH_WEBP
You should disable the options that are not in the list, especially the BUILD_SHARED_LIBS one. Don’t touch the options that are text fields unless you know what you’re doing.
Most of these options you don’t need for this particular exercise, but it will save you time by not having to rebuild OpenCV should you decide to try something else.
Once you have selected the settings above, click Generate. Now you can navigate to the build folder, I’ll do so with cd ~/opencv-3.0.0/build/ and run make to build OpenCV.
Installing OpenCV
If everything goes well, after the build finishes, run make install to add the OpenCV includes to the /usr/local/include folder and the libraries to the /usr/local/lib and /usr/local/share/OpenCV/3rdparty/lib folders.
After that’s done, you should be able to build your own C++ applications that link against OpenCV.
The Face Detector Application
Now let’s try to build our first application with OpenCV
Here’s the code and comments that explain how to do just that :
#include <iostream>

//Include OpenCV
#include <opencv2/opencv.hpp>

int main(void )
{
   //Capture stream from webcam.
   cv::VideoCapture capture(0);

   //Check if we can get the webcam stream.
   if(!capture.isOpened())
   {
      std::cout << "Could not open camera" << std::endl;
      return -1;
   }

   //OpenCV saves detection rules as something called a CascadeClassifier which
   //    can be used to detect objects in images.
   cv::CascadeClassifier faceCascade;

   //We'll load the lbpcascade_frontalface.xml containing the rules to detect faces.
   //The file should be right next to the binary.
   if(!faceCascade.load("lbpcascade_frontalface.xml"))
   {
      std::cout << "Failed to load cascade classifier" << std::endl;
      return -1;
   }

   while (true)
   {
      //This variable will hold the image from the camera.
      cv::Mat cameraFrame;

      //Read an image from the camera.
      capture.read(cameraFrame);

      //This vector will hold the rectangle coordinates to a detection inside the image.
      std::vector<cv::Rect> faces;

      //This function detects the faces in the image and
      // places the rectangles of the faces in the vector.
      //See the detectMultiScale() documentation for more details
      // about the rest of the parameters.
      faceCascade.detectMultiScale(
        cameraFrame,
        faces,
        1.09,
        3,
        0 | CV_HAAR_SCALE_IMAGE,
        cv::Size(30, 30));

      //Here we draw the rectangles onto the image with a red border of thikness 2.
      for( size_t i = 0; i < faces.size(); i++ )
            cv::rectangle(cameraFrame, faces[i], cv::Scalar(0, 0, 255), 2);

      //Here we show the drawn image in a named window called "output".
      cv::imshow("output", cameraFrame);

      //Waits 50 miliseconds for key press, returns -1 if no key is pressed during that time
      if (cv::waitKey(50) >= 0)
          break;
   }

   return 0;
}
I saved this as main.cpp. To build it I used the following command :
g++ -o main main.cpp -I/usr/local/include \
-L/usr/local/lib -lopencv_core -lopencv_imgproc -lopencv_objdetect \
-lopencv_imgcodecs -lopencv_highgui -lopencv_hal -lopencv_videoio \
-L/usr/local/share/OpenCV/3rdparty/lib -llibpng -llibjpeg -llibwebp \
-llibtiff -lzlib -lIlmImf -llibjasper -framework AVFoundation -framework QuartzCore \
-framework CoreMedia -framework Cocoa -framework QTKit
Hopefully, no errors should occur.
Conclusions
Before running the application, you have to copy the lbpcascade_frontalface.xml next to the main file. You can find this file in the OpenCV source folder under /data/lbpcascades/. You can also find some other cascades to detect eyes, cat faces, etc.
Now just run the ./main and enjoy!
[…] a follow-up to my previous article on how to use your webcam for face detection with OpenCV, I’d like to show you how you can create […]