React Native is a framework for building native apps using React made by Facebook. With React Native, you don’t build a “mobile web app”, an “HTML5 app”, or a “hybrid app”. You build a real mobile app that’s indistinguishable from an app built using Objective-C or Java. React Native uses the same fundamental UI building blocks as regular iOS and Android apps. You just put those building blocks together using JavaScript and React. – from https://facebook.github.io/react-native/
In the following lines we will take a short tour of React Native to help you familiarize with the platform and hopefully get you started in your React Native development career.
We will create a simple app called RandomNumbers that will pick some numbers from a pool, numbers that you can use later at anything you need (for example playing the lottery).
Install React Native
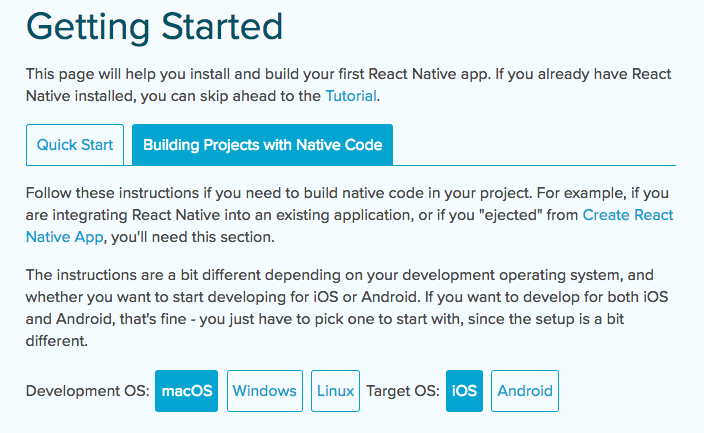
You will need to install Node, Watchman, the React Native command line interface, a JDK, and Xcode or Android Studio (or both). You can find details on how exactly do to this, depending on your platform, here: https://facebook.github.io/react-native/docs/getting-started.html. Select the “Building Projects with Native Code” tab and then follow the instructions.
When you’re done, create a new project with the react-native init RandomNumbers command then cd into the newly created RandomNumbers folder.
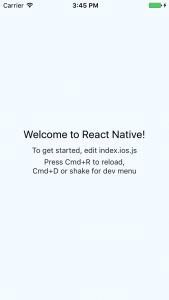
The above command created an empty React Native project that you can immediately run on your device using the react-native run-ios or react-native run-android commands (you need to have an Android emulator already started for the last command to work).
Make Your First Change
Open the RandomNumbers folder in an code editor of your choice. Here you will find some files and folders, the most important ones being the index.ios.js and index.android.js files that contain our starting point of the app.
Edit one (or both) of the files above, depending on the platform you are testing, to the following:
// ...

export default class RandomNumbers extends Component {
  render() {
    return (
      <View style={styles.container}>
        <Text style={styles.welcome}>
          Random Numbers
        </Text>
      </View>
    );
  }
}

// ...
Save the edited file, then, in the emulator, press Cmd+R to reload the app. It will refresh itself to reflect the changes, no recompiling needed. Isn’t this cool?
React Native Components
Just like in React, a React Native app is made up by several components that work together to achieve the ultimate goal of the app. To see the list of available components visit https://facebook.github.io/react-native/docs/getting-started.html and scroll to the Components section in the left menu.
We will start by making the two React Native starting points (from the index.ios.js and index.android.js files) to load a single component called App.
Create a new App.js file with the following content:
import React, { Component } from 'react';
import {
    View,
    Text,
    StyleSheet
} from 'react-native';

export default class App extends Component {
    render() {
        return (
            <View style={styles.container}>
                <Text style={styles.welcome}>
                    Random Numbers
                </Text>
            </View>
        );
    }
}

const styles = StyleSheet.create({
    container: {
        flex: 1,
        justifyContent: 'center',
        alignItems: 'center',
        backgroundColor: '#F5FCFF',
    },
    welcome: {
        fontSize: 20,
        textAlign: 'center',
        margin: 10,
    },
});
Now change the index.ios.js and index.android.js to the following (both will have the same content):
import React, { Component } from 'react';
import {
  AppRegistry
} from 'react-native';
import App from './App';

export default class RandomNumbers extends Component {
  render() {
    return (
       <App />
    );
  }
}

AppRegistry.registerComponent('RandomNumbers', () => RandomNumbers);
We just removed everything from them and loaded the App component so we now have a common starting point for both platforms.
Generate a Random Number
Let’s add a Button that will trigger the number generator of our app. First import the Button component, then add the actual button to the render method (in App.js):
// ...

import {
    View,
    Text,
    Button,
    StyleSheet
} from 'react-native';

export default class App extends Component {
    render() {
        return (
            <View style={styles.container}>
                <Text style={styles.welcome}>
                    Random Numbers
                </Text>
                <Button onPress={this.generateRandomNumber} title="Generate!" />
            </View>
        );
    }
}

// ...
For this to work we need to define a new method generateRandomNumber:
// ...
export default class App extends Component {
generateRandomNumber = () => {
let random = Math.floor(Math.random() * 100);
console.log(random);
}
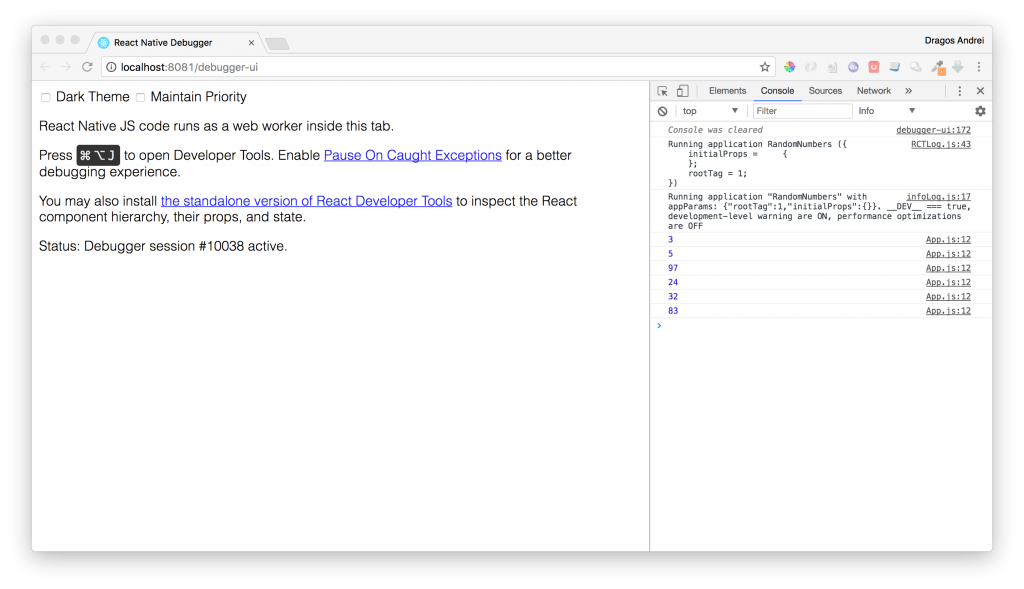
// ...Now if you click on the Generate! button, a random number between 0 and 100 will be generated and printed to the console.
To see the console output open the developer menu in your app by pressing Cmd+D and select Debug JS Remotely. A new browser window will open and there you can check the console output like you normally do when developing for the web.
Output Data to the Screen
Now we have our generated random number, but how can we show it to the user? For this we will use the state concept of React. The are two fundamental concepts of React that you need to understand: the state and props.
There are two types of data that control a component: props and state. Props are set by the parent and they are fixed throughout the lifetime of a component. For data that is going to change, we have to use state.
You can read more about this topic here:
- https://facebook.github.io/react-native/docs/props.html
- https://facebook.github.io/react-native/docs/state.html
Start by creating a constructor for our App component that sets the initial state:
// ...

export default class App extends Component {
    constructor(props) {
        super(props);

        this.state = {
            random: null
        };
    }

// ...
In the generateRandomNumber method, change the state to contain the newly generated number:
// ...

generateRandomNumber = () => {
    let random = Math.floor(Math.random() * 100);
    this.setState({random: random});
}

// ...
Finally add a new Text component in the render() method that will show the random number from the app’s state:
// ...
render() {
return (
<View style={styles.container}>
<Text style={styles.welcome}>
Random Numbers
</Text>
<Text>{this.state.random}</Text>
<Button onPress={this.generateRandomNumber} title="Generate!" />
</View>
);
}
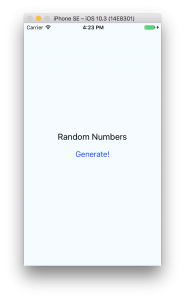
// ...Now, every time you click the Generate! button a new random number will appear on the screen.
How Many Numbers?
What if you need more than one number, extracted from a pool of numbers?
To define the pool of numbers we will use a slider with values from 1 to 100. To define how many numbers do we need to be extracted from the pool, we will use a picker with values from 1 to 10. This way we can configure the app to do what we need at run-time.
Import the Slider component then add it to the app:
<Text style={styles.welcome}>
    Random Numbers
</Text>
<Slider style={{width: '100%'}} minimumValue={1} maximumValue={100} />
<Text>{this.state.random}</Text>
We need to show the current slider value to the user so we will add it to the state of our app:
this.state = {
    random: null,
    pool: 1
};
When the slider moves, we have to update the state:
<Slider style={{width: '100%'}} minimumValue={1} maximumValue={100} onValueChange={(value) => this.setState({pool: Math.round(value)})} />Add a new text component to show it to the user (and an informative label):
<Text style={styles.welcome}>
    Random Numbers
</Text>
<Text>Pool of numbers:</Text>
<Text>{this.state.pool}</Text>
Now to select how many numbers we need, let’s try a picker:
<Picker selectedValue={this.state.amount} style={{width: '100%'}} onValueChange={(itemValue, itemIndex) => this.setState({amount: itemValue})}>
    <Picker.Item label="1" value="1" />
    <Picker.Item label="2" value="2" />
    <Picker.Item label="3" value="3" />
    <Picker.Item label="4" value="4" />
    <Picker.Item label="5" value="5" />
    <Picker.Item label="6" value="6" />
    <Picker.Item label="7" value="7" />
    <Picker.Item label="8" value="8" />
    <Picker.Item label="9" value="9" />
    <Picker.Item label="10" value="10" />
</Picker>
For this we added amount to the state:
this.state = {
    random: null,
    pool: 1,
    amount: 1
};
Now let’s change the generateRandomNumbers method to take in account the new settings:
generateRandomNumber = () => {
    // build the pool of numbers
    var pool = [];
    for(let i = 1; i <= this.state.pool; i++) {
        pool.push(i);
    }

    // generate random numbers
    var randomString = '';
    for(let i = 1; i <= this.state.amount; i++) {
        let index = Math.floor(Math.random() * pool.length);
        let random = pool[index];
        pool.splice(index, 1);
        randomString = randomString + (randomString ? ", " : "") + random;
    }
    this.setState({random: randomString});
}
What if you try to generate 10 numbers out of 5? Or something like this? We will have to tell the user that’s not possible using an alert.
generateRandomNumber = () => {
    if(this.state.amount > this.state.pool) {
        Alert.alert("Error", "The pool must not be smaller than the amount of numbers you want to generate!");
        return;
    }

    // ...
That’s all we had to do for our app functionality. Try it!
… but, to be honest, it doesn’t look so good 🙁
Making the App Look Good
Let’s start by adding a nice background to our app. First download the image from here and save it to your project folder. Then replace the root <View> with an <Image> component (also be sure to include the Image component at the beginning of the file):
<Image source={require('./background.png')} style={styles.container}>
…
</Image>
Update the container style to this:
container: {
    flex: 1,
    padding: 15,
    backgroundColor: '#fff',
    alignItems: 'center',
    justifyContent: 'space-between',
    width: null,
    height: null
}
Now, let’s take care of the button. We will remove the <Button> component because it’s not as customizable as we need and replace it with a <TouchableOpacity> (don’t forget to include this component too and remove the <Button> from the includes because we will not use it anymore). Also get the button background image from here.
<TouchableOpacity onPress={this.generateRandomNumber}>
    <Image style={styles.button} source={require('./button.png')}>
        <Text style={styles.buttonText}>Generate!</Text>
    </Image>
</TouchableOpacity>
Next we will use some styling for the rest of the components, here is all the render() code and styles:
render() {
    return (
        <Image source={require('./background.png')} style={styles.container}>
            <Text style={styles.textTitle}>Random Numbers</Text>
            <Text style={styles.text}>Pool of numbers:</Text>
            <Text style={styles.text}>{this.state.pool}</Text>
            <Slider
                style={styles.slider}
                minimumValue={1}
                maximumValue={100}
                onValueChange={(value) => this.setState({pool: Math.round(value)})}
                minimumTrackTintColor="#a0a0a0"
                maximumTrackTintColor="#a0a0a0"
                thumbTintColor="#ff0000"
                thumbImage={require('./thumb.png')}
            />
            <Text style={styles.resultText}>{this.state.random}</Text>
            <Picker
                selectedValue={this.state.amount}
                style={styles.picker}
                itemStyle={styles.pickerItem}
                onValueChange={(itemValue, itemIndex) => this.setState({amount: itemValue})}>
                <Picker.Item label="1" value="1" color="#FF6600" />
                <Picker.Item label="2" value="2" color="#FF6600" />
                <Picker.Item label="3" value="3" color="#FF6600" />
                <Picker.Item label="4" value="4" color="#FF6600" />
                <Picker.Item label="5" value="5" color="#FF6600" />
                <Picker.Item label="6" value="6" color="#FF6600" />
                <Picker.Item label="7" value="7" color="#FF6600" />
                <Picker.Item label="8" value="8" color="#FF6600" />
                <Picker.Item label="9" value="9" color="#FF6600" />
                <Picker.Item label="10" value="10" color="#FF6600" />
            </Picker>
            <TouchableOpacity onPress={this.generateRandomNumber}>
                <Image style={styles.button} source={require('./button.png')}>
                    <Text style={styles.buttonText}>Generate!</Text>
                </Image>
            </TouchableOpacity>
        </Image>
    );
}
const styles = StyleSheet.create({
container: {
flex: 1,
padding: 15,
backgroundColor: '#fff',
alignItems: 'center',
justifyContent: 'space-between',
width: null,
height: null
},
textTitle: {
color: '#ffffff',
backgroundColor: '#00000000',
fontSize: 28
},
text: {
color: '#ffffff',
backgroundColor: '#00000000'
},
resultText: {
color: '#ffffff',
backgroundColor: '#00000000',
fontSize: 18
},
slider: {
width: '100%'
},
picker: {
width: '100%',
backgroundColor: '#000000C0',
borderRadius: 10,
borderWidth: 2,
borderColor: '#000000'
},
pickerItem: {
color: '#ffffff'
},
button: {
flexDirection: 'row',
alignItems: 'center',
justifyContent: 'center',
width: 175,
height: 60
},
buttonText: {
color: '#ffffff',
fontWeight: 'bold',
backgroundColor: '#00000000'
}
});You will also need the slider thumb images from here and here.
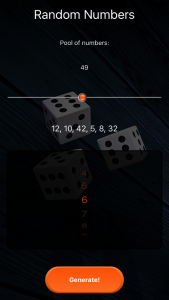
If you run the app now, you will find a much better interface:
The images used in this tutorial were downloaded from pixabay.com then edited using Photoshop:
- https://pixabay.com/en/cube-play-random-luck-points-1979775/
- https://pixabay.com/en/button-click-hit-web-element-2155595/
- https://pixabay.com/en/buttons-gloss-round-circle-colors-150235/
Getting Your App Ready to Be Published
So our app is done, how do we publish it to the AppStore and Google Play Store?
First, let’s fix one small problem: if you rotate your emulator screen (Cmd+Left or Right Arrow) you will see that the app will go into landscape and it will not be usable anymore 🙁

Too lock the app to portrait we need to go “native”.
For iOS, open xCode then open the project found in the randomNumbers/ios folder. Select the project in the left pane then, under Deployment Info, uncheck Landscape Left and Landscape Right Device Orientation so we are only left with the Portrait orientation.
For Android, you can just open the android/app/src/AndroidManifest.xml and add android:screenOrientation="portrait" under the activity section:
<activity
    android:name=".MainActivity"
    android:label="@string/app_name"
    android:configChanges="keyboard|keyboardHidden|orientation|screenSize"
    android:screenOrientation="portrait"
    android:windowSoftInputMode="adjustResize">
    <intent-filter>
        <action android:name="android.intent.action.MAIN" />
        <category android:name="android.intent.category.LAUNCHER" />
    </intent-filter>
</activity>
Now, to see those changes, you have to relaunch the app again. Not just reload, relaunch with the react-native run-ios or react-native run-android commands and try to rotate the emulator. Everything should be fine this time.
Now back to our main task, getting the app ready to be published.
iOS
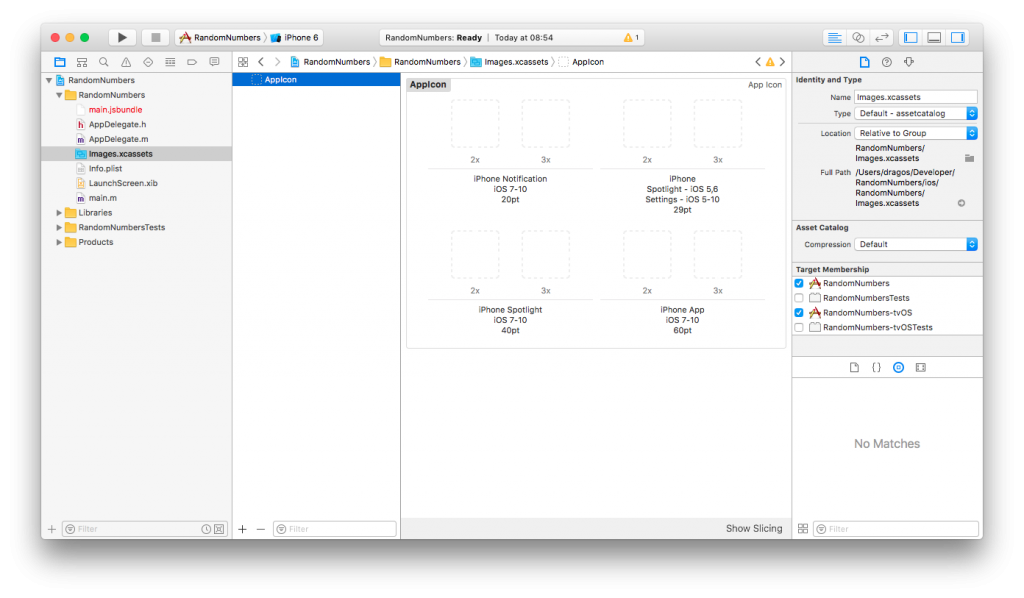
First let’s add the app’s icons. Open the xCode project and select Images.xcassets from the left panel. Then select the AppIcon item and drag each icon image to its corresponding placeholder. Download the icons from here.
When you’re done, select Product -> Archive from the menu to build the iOS package (it only works with a Generic iOS Device selected or a real device, no emulators).
Android
To add app icons in Android, you have to put them in the android/app/src/main/res/mipmap* folders (overwrite the existing ic_launcher.png). You can get the icons from here.
Now you need to generate a signing key then a signed APK. I found the walkthrough from the React Native documentation to be pretty good so you just follow it: https://facebook.github.io/react-native/docs/signed-apk-android.html
Final Words
That’s it! You now have your first React Native application ready to be sent into the wild. I hope you had fun doing this, please let us know in the comments how it worked for you. Oh, and you can find the final code here.
Have a nice mobile developer life! 🙂