Symfony2 Jobeet Day 3: The Data Model
* This article is part of the original Jobeet Tutorial, created by Fabien Potencier, for Symfony 1.4.
If you’re itching to open your text editor and lay down some PHP, you will be happy to know that today will get us into some development. We will define the Jobeet data model, use an ORM to interact with the database and build the first module of the application. But as Symfony does a lot of work for us, we will have a fully functional web module without writing too much PHP code.
The Relational Model
The user stories from the previous day describe the main objects of our project: jobs, affiliates, and categories. Here is the corresponding entity relationship diagram:
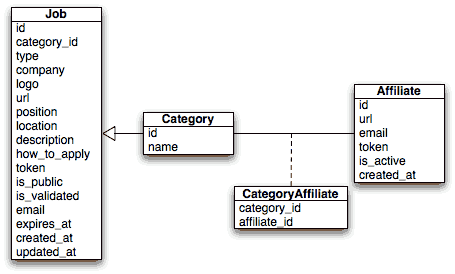
In addition to the columns described in the stories, we have also added created_at and updated_at columns. We will configure Symfony to set their value automatically when an object is saved or updated.
The Database
To store the jobs, affiliates and categories in the database, Symfony 2.3.2 uses Doctrine ORM. To define the database connection parameters, you have to edit the app/config/parameters.yml file (for this tutorial we will use MySQL):
parameters:
    database_driver: pdo_mysql
    database_host: localhost
    database_port: null
    database_name: jobeet
    database_user: root
    database_password: password
    # ...
Now that Doctrine knows about your database, you can have it create the database for you by typing the following command in your terminal:
php app/console doctrine:database:create
The Schema
To tell Doctrine about our objects, we will create “metadata” files that will describe how our objects will be stored in the database. Now go to your code editor and create a directory named doctrine, inside src/Ibw/JobeetBundle/Resources/config directory. Doctrine will contain three files: Category.orm.yml, Job.orm.yml and Affiliate.orm.yml.
IbwJobeetBundleEntityCategory:
    type: entity
    table: category
    id:
        id:
            type: integer
            generator: { strategy: AUTO }
    fields:
        name:
            type: string
            length: 255
            unique: true
    oneToMany:
        jobs:
            targetEntity: Job
            mappedBy: category
    manyToMany:
        affiliates:
            targetEntity: Affiliate
            mappedBy: categories
IbwJobeetBundleEntityJob:
type: entity
table: job
id:
id:
type: integer
generator: { strategy: AUTO }
fields:
type:
type: string
length: 255
nullable: true
company:
type: string
length: 255
logo:
type: string
length: 255
nullable: true
url:
type: string
length: 255
nullable: true
position:
type: string
length: 255
location:
type: string
length: 255
description:
type: text
how_to_apply:
type: text
token:
type: string
length: 255
unique: true
is_public:
type: boolean
nullable: true
is_activated:
type: boolean
nullable: true
email:
type: string
length: 255
expires_at:
type: datetime
created_at:
type: datetime
updated_at:
type: datetime
nullable: true
manyToOne:
category:
targetEntity: Category
inversedBy: jobs
joinColumn:
name: category_id
referencedColumnName: id
lifecycleCallbacks:
prePersist: [ setCreatedAtValue ]
preUpdate: [ setUpdatedAtValue ]IbwJobeetBundleEntityAffiliate:
type: entity
table: affiliate
id:
id:
type: integer
generator: { strategy: AUTO }
fields:
url:
type: string
length: 255
email:
type: string
length: 255
unique: true
token:
type: string
length: 255
is_active:
type: boolean
nullable: true
created_at:
type: datetime
manyToMany:
categories:
targetEntity: Category
joinTable:
name: category_affiliate
joinColumns:
affiliate_id:
referencedColumnName: id
inverseJoinColumns:
category_id:
referencedColumnName: id
lifecycleCallbacks:
prePersist: [ setCreatedAtValue ]The ORM
Now Doctrine can generate the classes that define our objects for us with the command:
php app/console doctrine:generate:entities IbwJobeetBundle
If you take a look into Entity directory from IbwJobeetBundle, you will find the newly generated classes in there: Category.php, Job.php and Affiliate.php. Open Job.php and set the created_at and updated_at values as below:
// ...

    /**
     * @ORMPrePersist
     */
    public function setCreatedAtValue()
    {
        if(!$this->getCreatedAt()) {
            $this->created_at = new DateTime();
        }
    }

    /**
     * @ORMPreUpdate
     */
    public function setUpdatedAtValue()
    {
        $this->updated_at = new DateTime();
    }
You will do the same for created_at value of the Affiliate class:
// ...

    /**
     * @ORMPrePersist
     */
    public function setCreatedAtValue()
    {
        $this->created_at = new DateTime();
    }

// ...
This will make Doctrine to set the created_at and updated_at values when saving or updating objects. This behaviour was defined in the Affiliate.orm.yml and Job.orm.yml files listed above.
We will also ask Doctrine to create our database tables with the command below:
php app/console doctrine:schema:update --force
This task should only be used during the development. For a more robust method of systematically updating your production database, read about Doctrine migrations.
The tables have been created in the database but there is no data in them. For any web application, there are three types of data: initial data (this is needed for the application to work, in our case we will have some initial categories and an admin user), test data (needed for the application to be tested) and user data (created by users during the normal life of the application).
To populate the database with some initial data, we will use DoctrineFixturesBundle. To setup this bundle, we have to follow the next steps:
1. Add the following to your composer.json file, in the require section:
// ...
    "require": {
        // ...
        "doctrine/doctrine-fixtures-bundle": "dev-master",
        "doctrine/data-fixtures": "dev-master"
    },

// ...
2. Update the vendor libraries:
php composer.phar update
3. Register the bundle DoctrineFixturesBundle in app/AppKernel.php:
// ...

public function registerBundles()
{
    $bundles = array(
        // ...
        new DoctrineBundleFixturesBundleDoctrineFixturesBundle()
    );

    // ...
}
Now that everything is set up, we will create some new classes to load data in a new folder, named src/Ibw/JobeetBundle/DataFixtures/ORM, in our bundle:
<?php
namespace IbwJobeetBundleDataFixturesORM;

use DoctrineCommonPersistenceObjectManager;
use DoctrineCommonDataFixturesAbstractFixture;
use DoctrineCommonDataFixturesOrderedFixtureInterface;
use IbwJobeetBundleEntityCategory;

class LoadCategoryData extends AbstractFixture implements OrderedFixtureInterface
{
    public function load(ObjectManager $em)
    {
        $design = new Category();
        $design->setName('Design');

        $programming = new Category();
        $programming->setName('Programming');

        $manager = new Category();
        $manager->setName('Manager');

        $administrator = new Category();
        $administrator->setName('Administrator');

        $em->persist($design);
        $em->persist($programming);
        $em->persist($manager);
        $em->persist($administrator);
        $em->flush();

        $this->addReference('category-design', $design);
        $this->addReference('category-programming', $programming);
        $this->addReference('category-manager', $manager);
        $this->addReference('category-administrator', $administrator);
    }

    public function getOrder()
    {
        return 1; // the order in which fixtures will be loaded
    }
}
<?php
namespace IbwJobeetBundleDataFixturesORM;

use DoctrineCommonPersistenceObjectManager;
use DoctrineCommonDataFixturesAbstractFixture;
use DoctrineCommonDataFixturesOrderedFixtureInterface;
use IbwJobeetBundleEntityJob;

class LoadJobData extends AbstractFixture implements OrderedFixtureInterface
{
    public function load(ObjectManager $em)
    {
         $job_sensio_labs = new Job();
         $job_sensio_labs->setCategory($em->merge($this->getReference('category-programming')));
         $job_sensio_labs->setType('full-time');
         $job_sensio_labs->setCompany('Sensio Labs');
         $job_sensio_labs->setLogo('sensio-labs.gif');
         $job_sensio_labs->setUrl('http://www.sensiolabs.com/');
         $job_sensio_labs->setPosition('Web Developer');
         $job_sensio_labs->setLocation('Paris, France');
         $job_sensio_labs->setDescription('You've already developed websites with symfony and you want to work with Open-Source technologies. You have a minimum of 3 years experience in web development with PHP or Java and you wish to participate to development of Web 2.0 sites using the best frameworks available.');
         $job_sensio_labs->setHowToApply('Send your resume to fabien.potencier [at] sensio.com');
         $job_sensio_labs->setIsPublic(true);
         $job_sensio_labs->setIsActivated(true);
         $job_sensio_labs->setToken('job_sensio_labs');
         $job_sensio_labs->setEmail('job@example.com');
         $job_sensio_labs->setExpiresAt(new DateTime('+30 days'));
         $job_extreme_sensio = new Job();
         $job_extreme_sensio->setCategory($em->merge($this->getReference('category-design')));
         $job_extreme_sensio->setType('part-time');
         $job_extreme_sensio->setCompany('Extreme Sensio');
         $job_extreme_sensio->setLogo('extreme-sensio.gif');
         $job_extreme_sensio->setUrl('http://www.extreme-sensio.com/');
         $job_extreme_sensio->setPosition('Web Designer');
         $job_extreme_sensio->setLocation('Paris, France');
         $job_extreme_sensio->setDescription('Lorem ipsum dolor sit amet, consectetur adipisicing elit, sed do eiusmod tempor incididunt ut labore et dolore magna aliqua. Ut enim ad minim veniam, quis nostrud exercitation ullamco laboris nisi ut aliquip ex ea commodo consequat. Duis aute irure dolor in reprehenderit in.');
         $job_extreme_sensio->setHowToApply('Send your resume to fabien.potencier [at] sensio.com');
         $job_extreme_sensio->setIsPublic(true);
         $job_extreme_sensio->setIsActivated(true);
         $job_extreme_sensio->setToken('job_extreme_sensio');
         $job_extreme_sensio->setEmail('job@example.com');
         $job_extreme_sensio->setExpiresAt(new DateTime('+30 days'));

         $em->persist($job_sensio_labs);
         $em->persist($job_extreme_sensio);
         $em->flush();
    }

    public function getOrder()
    {
        return 2; // the order in which fixtures will be loaded
    }
}
Once your fixtures have been written, you can load them via the command line by using thedoctrine:fixtures:load command:
php app/console doctrine:fixtures:load
Now, if you check your database, you should see the data loaded into tables.
See it in the browser
If you run the command below, it will create a new controller src/Ibw/JobeetBundle/Controllers/JobController.php with actions for listing, creating, editing and deleting jobs (and their corresponding templates, form and routes):
php app/console doctrine:generate:crud --entity=IbwJobeetBundle:Job --route-prefix=ibw_job --with-write --format=yml
After running this command, you will need to do some configurations the prompter requires you to. So just select the default answers for them.
To view this in the browser, we must import the new routes that were created in src/Ibw/JobeetBundle/Resources/config/routing/job.yml into our bundle main routing file:
IbwJobeetBundle_job:
        resource: "@IbwJobeetBundle/Resources/config/routing/job.yml"
        prefix:   /job

# ...
We will also need to add a _toString() method to our Category class to be used by the category drop down from the edit job form:
// ...

public function __toString()
{
    return $this->getName() ? $this->getName() : "";
}

// ...
Clear the cache:
php app/console cache:clear --env=dev
php app/console cache:clear --env=prod
You can now test the job controller in a browser: http://jobeet.local/job/ or, in development environment, http://jobeet.local/app_dev.php/job/ .
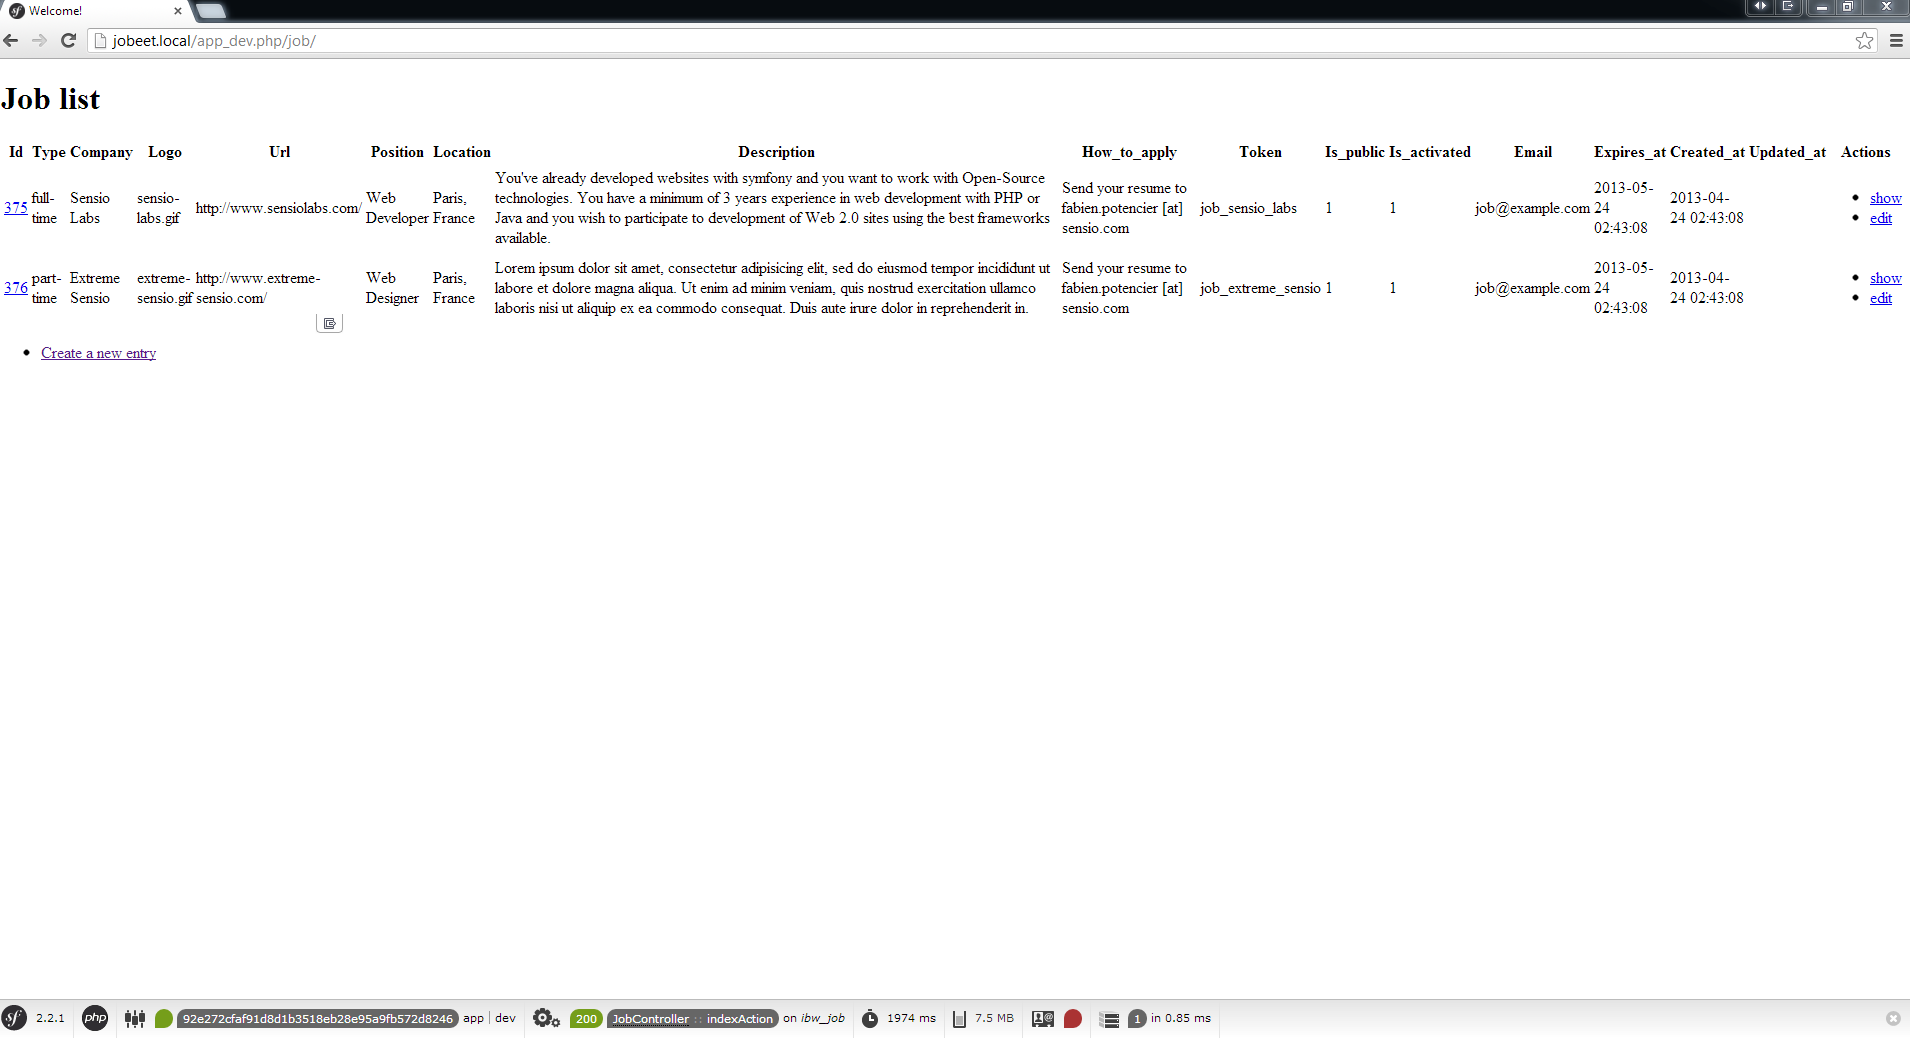
You can now create and edit jobs. Try to leave a required field blank, or try to enter invalid data. That’s right, Symfony has created basic validation rules by introspecting the database schema.
That’s all. Today, we have barely written PHP code but we have a working web module for the job model, ready to be tweaked and customized. Tomorrow, we will get familiar with the controller and the view. See you next time!

This work is licensed under a Creative Commons Attribution-ShareAlike 3.0 Unported License.
Symfony2 Jobeet Day 2: The Project
* This article is part of the original Jobeet Tutorial, created by Fabien Potencier, for Symfony 1.4.
We have not written a single line of code yet, but, in Day 1, we setup the environment and created an empty Symfony project.
This day is about the project specifications. Before diving into the code head-first, let’s describe the project a bit more. The following sections describe the features we want to implement in the first version/iteration of the project with some simple stories.
Symfony2 Jobeet - User Stories
The Jobeet website will have four type of users: admin (owns and manages the website), user (visits the website looking for a job), poster (visits the website to post jobs) and affiliate (re-publishes jobs on his website).
In the original tutorial, we had to make two applications, the frontend, where the users interact with the website, and the backend, where admins manage the website. Using Symfony 2.3.2, we would not do this anymore. We will have only one application and, in it, a separate secured section for admins.
Story F1: On the homepage, the user sees the latest active jobs
When a user comes to Jobeet website, he sees a list of active jobs. The jobs are sorted by category and then by publication date – newer jobs first. For each job, only the location, the position available and the company are displayed.
For each category, the list shows the first 10 jobs and a link that allows to list all the jobs for a given category (Story F2).
On the homepage, the user can refine the job list (Story F3) or post a new job (Story F5).
Story F2: A user can ask for all the jobs in a given category
When a user clicks on a category name or on a “more jobs” link on the homepage, he sees all the jobs for this category sorted by date.
The list is paginated with 20 jobs per page.
Story F3: A user refines the list with some keywords
The user can enter some keywords to refine his search. Keywords can be words found in the location, the position, the category or the company fields.
Story F4: A user clicks on a job to see more detailed information
The user can select a job from a list to see more detailed information.
Story F5: A user posts a job
A user can post a job. A job is made of several pieces of information:
- Company
- Type (full-time, part-time or freelance)
- Logo (optional)
- URL (optional)
- Position
- Location
- Category (the user chooses in a list of possible categories)
- Job description (URLs and emails are automatically linked)
- How to apply (URLs and emails are automatically linked)
- Public (wether the job can also be published on affiliate websites)
- Email (email of poster)
The process has only two steps: first, the user fills in the form with all the needed information to describe the job, then validates the information by previewing the final job page.
There is no need to create an acount to post a job. A job can be modified afterwards thanks to a specific URL (protected by a token given to the user when the job is created).
Each job post is online for 30 days (this is configurable by admin). A user can come back to re-activate or extend the validity of the job for an extra 30 days, but only when the job expires in less than 5 days.
Story F6: A user applies to become an affiliate
A user needs to apply to become an affiliate and be authorized to use Jobeet API. To apply, he must give the following information:
- Name
- Website URL
The affiliate account must be activated by the admin (Story B3). Once activated, the affiliate receives a token to use with the API via email.
Story F7: An affiliate retrieves the current active job list
An affiliate can retrieve the current job list by calling the API with his affiliate token. The list can be returned in the XML, JSON or YAML format. The affiliate can limit the number of jobs to be returned and, also, refine his query by specifying a category.
Story B1: An admin configures the website
An admin can edit the categories available on the website.
Story B2: An admin manages the jobs
An admin can edit and remove any posted job.
Story B3: An admin manages the affiliates
The admin can create or edit affiliates. He is responsible for activating an affiliate and can also disable one. When the admin activates a new affiliate, the system creates a unique token to be used by the affiliate.
As a developer, you never start coding from the first day. Firstly, you need to gather the requirements of your project and understand how your project is supposed to work. That’s what you have done today. See you tomorrow!

This work is licensed under a Creative Commons Attribution-ShareAlike 3.0 Unported License.
Symfony2 Jobeet Day 1: Starting up the Project
* This article is part of the original Jobeet Tutorial, created by Fabien Potencier, for Symfony 1.4.
What is Jobeet?
Jobeet is an Open-Source job board software which provides you day-by-day tutorials, that will help you learn the latest Web Technolgy, Symfony 2.3.2 (for those who don’t know yet, Symfony is a framework for PHP).
Each chapter/day is meant to last about one hour, and will be the occasion to learn Symfony by coding a real website, from start to finish.
Every day, new features will be added to the application and we’ll take advantage of this development to introduce you to new Symfony functionalities, as well as good practices in Symfony web development.
Today, being your first day, you won’t be writing any code. Instead, you will setup a working development environment.
Setting up the working development environment
First of all, you need to check that your computer has a friendly working environment for web development. We will use Ubuntu 12.04 LTS Server installed in a VMware Player virtual machine. At a minimum, you need a web server (Apache, for instance), a database engine (MySQL) and PHP 5.3.3 or later.
1. Install Apache, your web server:
sudo apt-get install apache2
and enable Apache mod-rewrite:
sudo a2enmod rewrite
2, Install the MySQL Server:
sudo apt-get install mysql-server mysql-client
3. Install PHP, the server scripting language
sudo apt-get install php5 libapache2-mod-php5 php5-mysql
4. Install Intl extension:
sudo apt-get install php5-intl
5. Now, you need to restart Apache service:
sudo service apache2 restart
Download and install Symfony 2.3.2
The first thing to do is to prepare a directory on your web server where you want to install the new project. Let’s call it jobeet: /var/www/jobeet.
mkdir /var/www/jobeet
We have a directory prepared, but what to put in it? Go to http://symfony.com/download, choose Symfony Standard 2.3.2 without vendors and download it. Now, unzip the files inside the Symfony directory to your prepared directory, jobeet.
Updating Vendors
At this point, you’ve downloaded a fully-functional Symfony project in which you’ll start to develop your own application. A Symfony project depends on a number of external libraries. These are downloaded into the vendor/ directory of your project via a library called Composer.
Composer is a dependency management library for PHP, which you can use to download the Symfony 2.3.2 Standard Edition. Start by downloading Composer onto your jobeet directory:
curl -s https://getcomposer.org/installer | php
If you don’t have
curlextension installed, you can install it using this command:sudo apt-get install curl
Next, type the following command to start downloading all the necessary vendor libraries:
php composer.phar install
Web Server Configuration
A good web practice is to put under the web root directory only the files that need to be accessed by a web browser, like stylesheets, JavaScripts and images. By default, it’s recommended to store these files under the web/ sub-directory of a symfony project.
To configure Apache for your new project, you will create a virtual host. In order to do that, go to your terminal and type in the next command :
sudo nano /etc/apache2/sites-available/jobeet.local
Now, a file named jobeet.local is created. Put the following inside that file, then hit Control – O and Enter to save it, then Control – X to exit the editor.
<VirtualHost *:80>
    ServerName jobeet.local
    DocumentRoot /var/www/jobeet/web
    DirectoryIndex app.php
    ErrorLog /var/log/apache2/jobeet-error.log
    CustomLog /var/log/apache2/jobeet-access.log combined
    <Directory "/var/www/jobeet/web">
        AllowOverride All
        Allow from All
     </Directory>
</VirtualHost>
The domain name jobeet.local used in the Apache configuration has to be declared locally. If you run a Linux system, it has to be done in the /etc/hosts file. If you run Windows, this file is located in the C:WindowsSystem32driversetc directory. Add the following line:
127.0.0.1 jobeet.local
Replace 127.0.0.1 with the ip of your web server machine in case you are working on a remote server.
If you want this to work, you need to enable the newly created virtual host and restart your Apache. So go to your terminal and type:
sudo a2ensite jobeet.local
sudo service apache2 restart
Symfony comes with a visual server configuration tester to help make sure your Web server and PHP are correctly configured to use Symfony. Use the following URL to check your configuration:
http://jobeet.local/config.php
If you don’t run this from your localhost, you should locate and openweb/config.phpfile and comment the lines that restrict the access outside localhost:if (!isset($_SERVER['HTTP_HOST'])) { exit('This script cannot be run from the CLI. Run it from a browser.'); } /* if (!in_array(@$_SERVER['REMOTE_ADDR'], array( '127.0.0.1', '::1', ))) { header('HTTP/1.0 403 Forbidden'); exit('This script is only accessible from localhost.'); } */ // ...Do the same for
web/app_dev.php:use SymfonyComponentHttpFoundationRequest; use SymfonyComponentDebugDebug; // If you don't want to setup permissions the proper way, just uncomment the following PHP line // read http://symfony.com/doc/current/book/installation.html#configuration-and-setup for more information //umask(0000); // This check prevents access to debug front controllers that are deployed by accident to production servers. // Feel free to remove this, extend it, or make something more sophisticated. /* if (isset($_SERVER['HTTP_CLIENT_IP']) || isset($_SERVER['HTTP_X_FORWARDED_FOR']) || !in_array(@$_SERVER['REMOTE_ADDR'], array('127.0.0.1', 'fe80::1', '::1')) ) { header('HTTP/1.0 403 Forbidden'); exit('You are not allowed to access this file. Check '.basename(__FILE__).' for more information.'); } */ $loader = require_once __DIR__.'/../app/bootstrap.php.cache'; Debug::enable(); require_once __DIR__.'/../app/AppKernel.php'; // ...
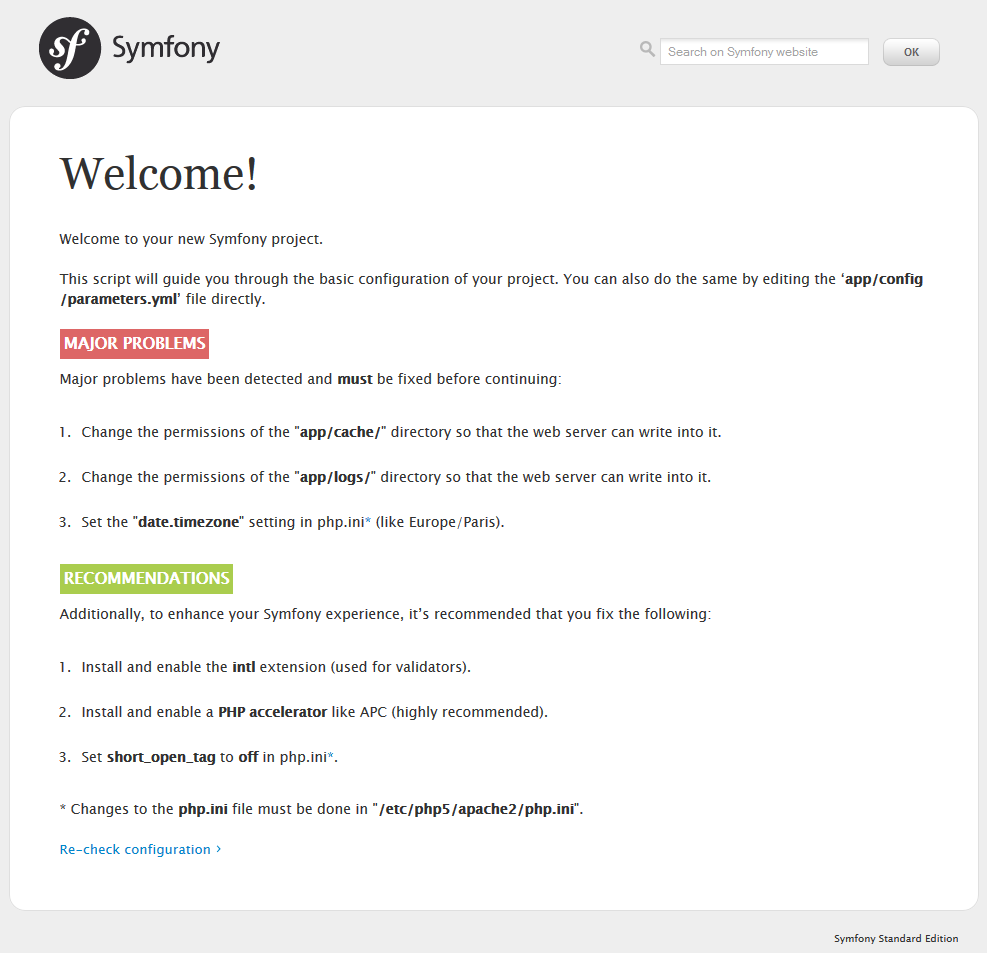
Probably, you will get all kind of requirements when you go to config.php. Below, is a list of things to do for not getting all those “warnings”.
1. Change the permissions of app/cache and app/logs:
sudo chmod -R 777 app/cache
sudo chmod -R 777 app/logs
sudo setfacl -dR -m u::rwX app/cache app/logs
Install ACL if you don’t have it yet:
sudo apt-get install acl
2. Set the date.timezone setting in php.ini
date.timezone = Europe/Bucharest
sudo nano /etc/php5/apache2/php.ini
date.timezone setting for [date] section and set it to your timezone. After that, erase “;”, placed at the beginning of the line.short_open_tag setting to off in the same php.ini fileshort_open_tag Default Value: Off
4. Install and enable a PHP Accelerator (APC recommended)
sudo apt-get install php-apc
sudo service apache2 restart
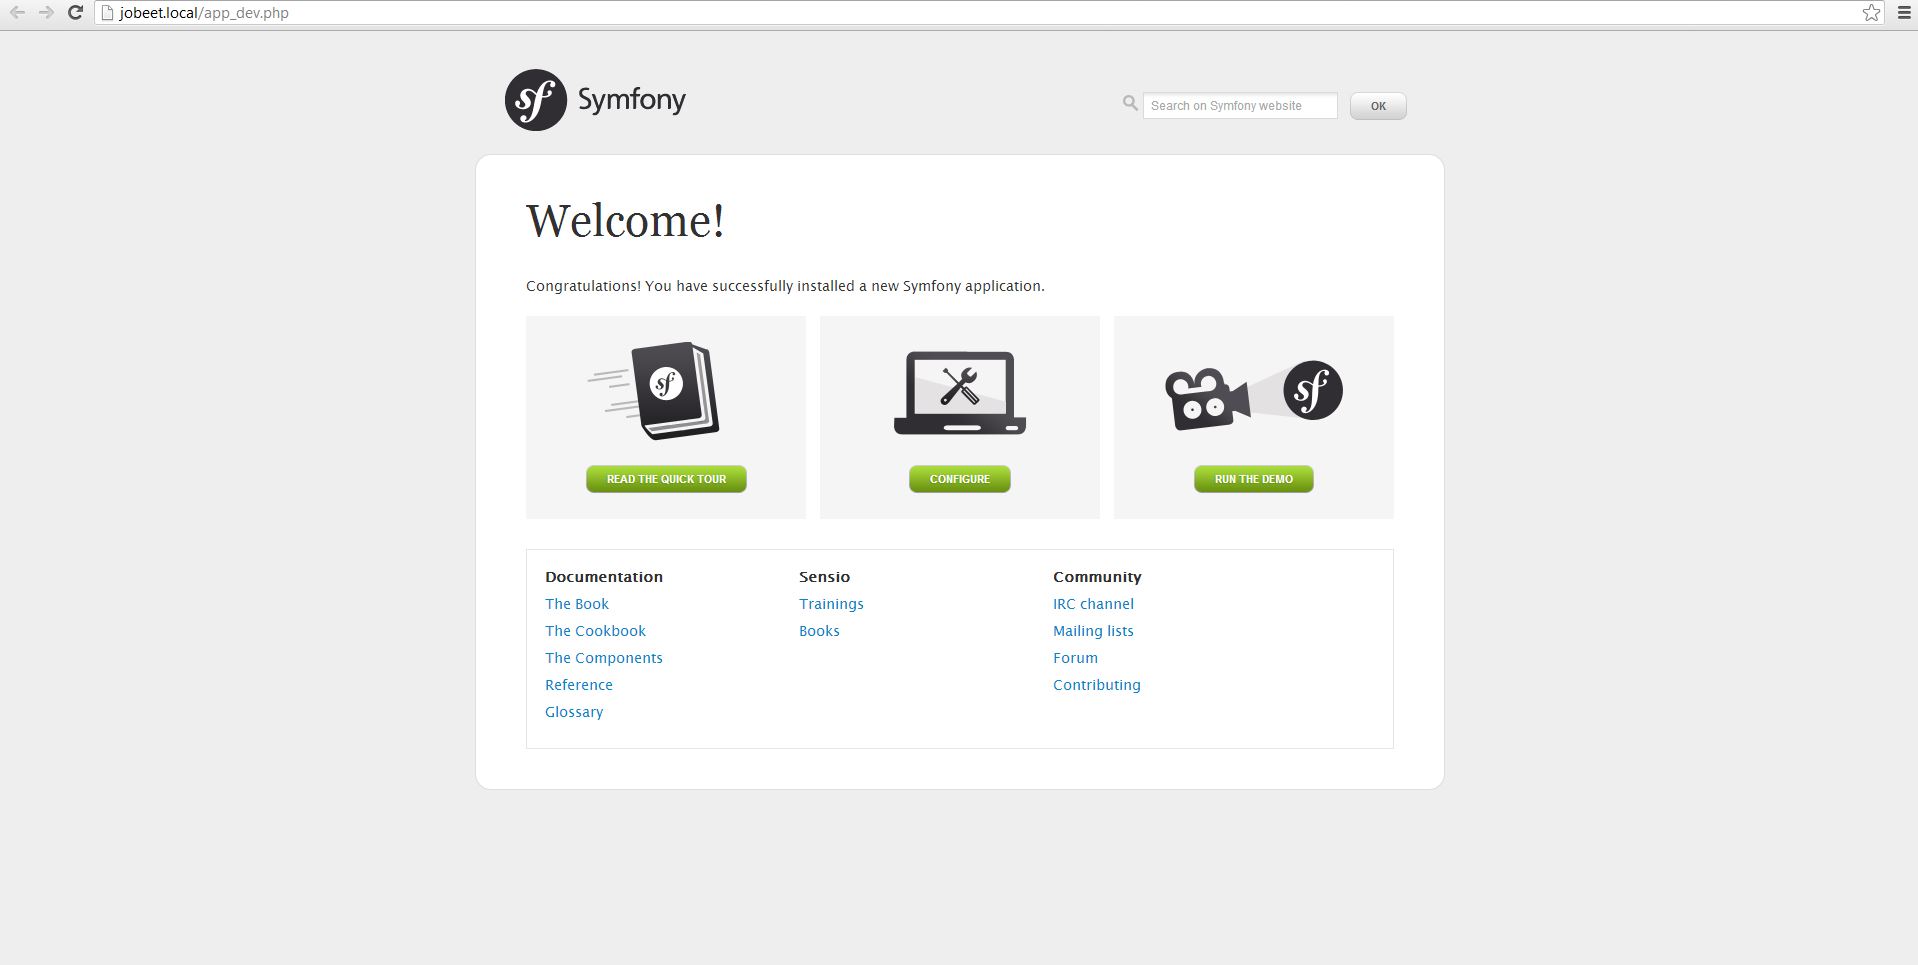
After restarting Apache, open a browser window and type in http://jobeet.local/app_dev.php. You should see the following page:
Symfony2 Console
Symfony2 comes with the console component tool that you will use for different tasks. To see a list of things it can do for you type at the command prompt:
php app/console list
Creating the Application Bundle
What exactly is a bundle?
Is similar to a plugin in other software, but even better. The key difference is that everything is a bundle in Symfony 2.3.2, including both core framework functionality and the code written for your application.
A bundle is a structured set of files within a directory that implement a single feature.
Tips: A bundle can live anywhere as long as it can be autoloaded (app/autoload.php).
You can read more here: http://symfony.com/doc/current/book/page_creation.html#the-bundle-system – The Bundle System.
Creating a basic bundle skeleton
Run the following command to start the Symfony’s bundle generator:
php app/console generate:bundle --namespace=Ibw/JobeetBundle
The generator will ask you some questions before generating the bundle. Here are the questions and answers (all, except one, are the default answers):
Bundle name [IbwJobeetBundle]: IbwJobeetBundle
Target directory [/var/www/jobeet/src]: /var/www/jobeet/src
Configuration format (yml, xml, php, or annotation) [yml]: yml
Do you want to generate the whole directory structure [no]? yes
Do you confirm generation [yes]? yes
Confirm automatic update of your Kernel [yes]? yes
Confirm automatic update of the Routing [yes]? yes
Clear the cache after generating the new bundle with:
php app/console cache:clear --env=prod
php app/console cache:clear --env=dev
The new Jobeet bundle can be now found in the src directory of your project: src/Ibw/JobeetBundle. The bundle generator made a DefaultController with an index action. You can access this in your browser: http://jobeet.local/hello/jobeet or http://jobeet.local/app_dev.php/hello/jobeet.
How to remove the AcmeDemoBundle
The Symfony 2.3.2 Standard Edition comes with a complete demo that lives inside a bundle called AcmeDemoBundle. It is a great boilerplate to refer to while starting a project, but you’ll probably want to eventually remove it.
1. Type the command to delete Acme directory:
rm -rf /var/www/jobeet/src/Acme
2. Go to: /var/www/jobeet/app/AppKernel.php and delete:
// ...

$bundles[] = new AcmeDemoBundleAcmeDemoBundle();

// ...
and now delete from app/config/routing_dev.yml:
# ...

# AcmeDemoBundle routes (to be removed)
_acme_demo:
    resource: "@AcmeDemoBundle/Resources/config/routing.yml"
3. Finally, clear the cache.
The Environments
Symfony 2.3.2 has different environments. If you look in the project’s web directory, you will see two php files: app.php and app_dev.php. These files are called front controllers; all requests to the application are made through them. The app.php file is for production environment and app_dev.php is used by web developers when they work on the application in the development environment. The development environment will prove very handy because it will show you all the errors and warnings and the Web Debug Toolbar – the developer’s best friend.
That’s all for today. See you on the next day of this tutorial, when we will talk about what exactly the Jobeet website will be about!
This work is licensed under a Creative Commons Attribution-ShareAlike 3.0 Unported License.