
Counting lines and words using Go
For those who need to count words and lines in text files, an easy approach for this matter is to use bufio.ScanWords and bufio.ScanLine in order to quickly solve the problem.
To count words:
input := "Spicy jalapeno pastrami ut ham turducken.\n Lorem sed ullamco, leberkas sint short loin strip steak ut shoulder shankle porchetta venison prosciutto turducken swine.\n Deserunt kevin frankfurter tongue aliqua incididunt tri-tip shank nostrud.\n"
scanner := bufio.NewScanner(strings.NewReader(input))

// Set the split function for the scanning operation.
scanner.Split(bufio.ScanWords)

// Count the words.
count := 0
for scanner.Scan() {
    count++
}

if err := scanner.Err(); err != nil {
    fmt.Fprintln(os.Stderr, "reading input:", err)
}

fmt.Printf("%d\n", count)
ScanWords is a split function for a Scanner that returns each space-separated (checks unicode.IsSpace) word of text, with trimmed whitespace.
To count lines:
input := "Spicy jalapeno pastrami ut ham turducken.\n Lorem sed ullamco, leberkas sint short loin strip steak ut shoulder shankle porchetta venison prosciutto turducken swine.\n Deserunt kevin frankfurter tongue aliqua incididunt tri-tip shank nostrud.\n"
scanner := bufio.NewScanner(strings.NewReader(input))

// Set the split function for the scanning operation.
scanner.Split(bufio. ScanLines)

// Count the lines.
count := 0
for scanner.Scan() {
    count++
}

if err := scanner.Err(); err != nil {
    fmt.Fprintln(os.Stderr, "reading input:", err)
}

fmt.Printf("%d\n", count)
ScanLines is a split function for a Scanner that returns each line of text (separated by "\r?\n"). It returns also empty lines and the last line is returned even if it has no newline at the end.
Debugging Golang apps in Docker with Visual Studio Code
Context
We’ve recently had some problems with a Go application that was running inside a Docker container in a very big Docker Compose setup.
After getting fed up with writing console prints and rebuilding the Docker image for that container and spinning up all the containers to debug things, we started investigating how we could speed up our debugging process.
Enter Visual Studio Code and its wonderful Go extension which supports Delve.
Now if you read through the pages linked above you will find out how to install and setup all these things. It’s pretty straight forward. The Docker part, however, is not. As such, I will show you a basic Go application which mimics what we had to deal with and how to set up debugging for it.
The application
The following is the main.go of our app. It will connect to a Redis server, set and get a value.
package main


import (
    "fmt"


    "github.com/garyburd/redigo/redis"
)


func main() {
    client, err := redis.Dial("tcp", "redis:6379")
    if err != nil {
        panic(err)
    }
    defer client.Close()


    result, err := client.Do("SET", "key1", "value1")
    if err != nil {
        panic(err)
    }
    fmt.Printf("%v\n", result)


    result, err = client.Do("GET", "key1")
    if err != nil {
        panic(err)
    }
    fmt.Printf("%v\n", result)
}
As you can see, it relies on the Redigo package, so make sure you get it and place it in your vendor folder.
To make sure you have everything setup the right way, go ahead and build it locally by running :
go build -o main main.go
If you run the application built this way, it will fail of course, because you need to connect to Redis. I’ve set the hostname for the server to redis which will point to an IP on the docker-machine when we docker-compose up.
The Dockerfile
Now we have to build the image for this application.
FROM golang


ENV GOPATH /opt/go:$GOPATH
ENV PATH /opt/go/bin:$PATH
ADD . /opt/go/src/local/myorg/myapp
WORKDIR /opt/go/src/local/myorg/myapp


RUN go get github.com/derekparker/delve/cmd/dlv
RUN go build -o main main.go
CMD ["./main"]
When this image will be built, it will basically copy the application code, set up the environment and build the Go application. The application’s entrypoint will be the main executable that will be built. We also install the Delve command line tool but we won’t use it if we run a container from this image directly (i.e. docker run).
Note the GOPATH variable and the path to which we copy our code. This path is very important for Delve and our debug configuration.
The Docker Compose file
Now that we have the Dockerfile to build the image, we have to define the docker-compose.yml file. Here, however we will overwrite the entrypoint for the container to launch Delve. Also the code that we copied will be replaced with a volume that will point to the code on the host machine, and we will also remove some security constraints that prevent Delve from forking the process.
Essentially, for the context I mentioned above we try not to touch the base image for the application since it might get accidentally pushed to the Docker Hub with debugging parameters. So in order to avoid that we have our Docker Compose process override the image with what we need to go about debugging.
Here’s the docker-compose.yml file :
version: '2'
services:
  redis:
    image: redis
    ports:
      - "6379:6379"
    expose:
      - "6379"
  myapp:
    build: .
    security_opt:
      - seccomp:unconfined
    entrypoint: dlv debug local/myorg/myapp -l 0.0.0.0:2345 --headless=true --log=true -- server
    volumes:
      - .:/opt/go/src/local/myorg/myapp
    ports:
      - "2345:2345"
    expose:
      - "2345"
It's here that we introduce the Redis server dependency we have. Note that for the myapp container we’ve exposed the ports that the Delve command line tool listens to.
So to see that everything is working, you can now run :
docker-compose up --build
This will build the image and start up the redis and myapp containers.
You should see the following output coming from the myapp container:
myapp_1  | 2016/12/15 08:50:39 server.go:71: Using API v1
myapp_1  | 2016/12/15 08:50:39 debugger.go:65: launching process with args: [/opt/go/src/local/myorg/myapp/debug server]
myapp_1  | API server listening at: [::]:2345
Which means that the Delve command line tool compiled our Go code into a debug executable, started it, and it’s listening for remote connections to the debugger on port 2345.
Now we just have to set up our launch.json config in the .vscode folder of our project.
The launch configuration
Here’s how our launch.json should look like:
{
    "version": "0.2.0",
    "configurations": [
       {
           "name": "Remote Docker",
           "type": "go",
           "request": "launch",
           "mode": "remote",
           "remotePath": "/opt/go/src/local/myorg/myapp",
           "port": 2345,
           "host": "192.168.99.100",
           "program": "${workspaceRoot}",
           "env": {},
           "args": []
       }
    ]
}
You might have to change the host IP to what your docker-machine ip output is.
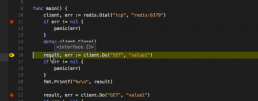
Now all we have to do is set up a few breakpoints and start the debugger using the Remote Docker configuration.
Our docker compose terminal should print something like this from the myapp container :
myapp_1  | 2016/12/15 08:50:45 debugger.go:242: created breakpoint: &api.Breakpoint{ID:1, Name:"", Addr:0x4010af, File:"/opt/go/src/local/myorg/myapp/main.go", Line:11, FunctionName:"main.main", Cond:"", Tracepoint:false, Goroutine:false, Stacktrace:0, Variables:[]string(nil), LoadArgs:(*api.LoadConfig)(nil), LoadLocals:(*api.LoadConfig)(nil), HitCount:map[string]uint64{}, TotalHitCount:0x0}
myapp_1  | 2016/12/15 08:50:45 debugger.go:242: created breakpoint: &api.Breakpoint{ID:2, Name:"", Addr:0x401116, File:"/opt/go/src/local/myorg/myapp/main.go", Line:16, FunctionName:"main.main", Cond:"", Tracepoint:false, Goroutine:false, Stacktrace:0, Variables:[]string(nil), LoadArgs:(*api.LoadConfig)(nil), LoadLocals:(*api.LoadConfig)(nil), HitCount:map[string]uint64{}, TotalHitCount:0x0}
myapp_1  | 2016/12/15 08:50:45 debugger.go:242: created breakpoint: &api.Breakpoint{ID:3, Name:"", Addr:0x4013d1, File:"/opt/go/src/local/myorg/myapp/main.go", Line:22, FunctionName:"main.main", Cond:"", Tracepoint:false, Goroutine:false, Stacktrace:0, Variables:[]string(nil), LoadArgs:(*api.LoadConfig)(nil), LoadLocals:(*api.LoadConfig)(nil), HitCount:map[string]uint64{}, TotalHitCount:0x0}
myapp_1  | 2016/12/15 08:50:45 debugger.go:397: continuing
You can Next and Continue, look at the callstack, see the locals, view contents of specific variables, etc.
Final thoughts
I hope this proves to be as useful to you as it did for us. The tools mentioned in this post really save us a heap of trouble.
We really have to thank the open source community that brought us these tools. They are the real heroes.
Happy debugging!

Start writing tests in Ruby: useful gems
Being a QA engineer is a continuous struggle in finding the right resources in order to get the job done easier and more efficiently. If you are planning to write automated tests in RSpec (Ruby's testing framework), then you should take a look over these gems. Please notice that I am most of the time automating backend tests only, so the libraries I am using are for this purpose mainly.
1. RestClient
gem install rest-client
If you want to make API calls on RESTful endpoints this should definitely be your choice. This library is easy to use and the response includes code, cookies, headers and body.
Let me show you how to make some calls (GET, PUT, POST, DELETE):
response = RestClient.get(url, header){|response, request, result | response}
response = RestClient.put(url, payload, header){|response, request, result | response}
response = RestClient.post(url, payload, header){|response, request, result | response}
response = RestClient.delete(url, header){|response, request, result | response}
Now you simply use this response for your purposes (response.code, response.body, etc.).
2. JSON
gem install json
If I told you about RestClient, then the next one should be json. RESTful services will return JSON format in body most of the times so you should parse that response to be easier to work with.
response = RestClient.post(url, payload, header){|response, request, result | response}
parsed_response = JSON.parse(response.body)
expect(parsed_response['errors'][0]['message']).to eq "Not Found"
See how simple this is? You only JSON.parse that response and that's all!
Since we are talking about JSON, let me show you how to build one:
payload_hash = {
            :key1 => :value1,
            :key2 => :value2
        }
payload_json = payload_hash.to_json
3. Nokogiri
JSON and XML are the most used formats in web development. So you probably guessed that now I will show you some tricks on how to use XML in your awesome tests.
gem install nokogiri
When I have installed this gem on my ubuntu (v14.04) virtual machine, I have had the following error:
ERROR: Error installing nokogiri:
ERROR: Failed to build gem native extension.

/usr/bin/ruby1.9.1 extconf.rb
/usr/lib/ruby/1.9.1/rubygems/custom_require.rb:36:in `require': cannot load such file -- mkmf (LoadError)
from /usr/lib/ruby/1.9.1/rubygems/custom_require.rb:36:in `require'
from extconf.rb:4:in `'
But this was quickly fixed after installing ruby-dev and ruby1.9.1-dev:
sudo apt-get install ruby-dev
 sudo apt-get install ruby1.9.1-dev
Now let's say you have the following XML:
<Envelope xmlns="http://schemas.xmlsoap.org/soap/envelope/">
    <Body>
        <Login>
            <username>username</name>
            <password>secret_password</password>
        </Login>
    </Body>
</Envelope>
If you want to access the values for username and password, simply do this:
your_file = Nokogiri::XML(your_XML_file)
your_file.remove_namespaces!
puts your_file.css('username').text
puts your_file.css('password').text
Also, you can use xpath instead of css.
Let me show you how to build the previous XML file using Nokogiri:
builder = Nokogiri::XML::Builder.new do |xml|
  xml.Envelope {
    xml.Body {
      xml.Login {
        xml.username "username"
        xml.password "secret_password"
      }
    }
  }
end
puts builder.to_xml
4. Sinatra
This gem is used to mock endpoints. See more about it here.
5. Dotenv
gem install dotenv
It is recommended to keep environment variables and stuff like usernames, passwords and URLs in a .env file. In order to load those variables in your tests, you must use this gem.
Dotenv.load

login_url = ENV['VAR_NAME']
signup_url = ENV['VAR_NAME']
First you load the .env file, then use those variables in your tests.
6. Mysql
gem install mysql
The name itself says what this is used for. See below how to open a connection to a MySql database and do a simple operation:
con = Mysql.new(db_host, db_user, db_pass, db_schema, db_port)

rs = con.query("UPDATE table_references SET col_name1= ... WHERE where_condition")

con.close
I will update this post when I will use some new awesome Ruby library. What gems are you using?
Setup Testing and Fixtures in Symfony2: The Easy Way
Setting up testing and fixtures in Symfony2 is vital if you plan on starting Test Driven Development or you simply want to start covering your code with properly written tests that can access mock data.
1. Install PHPUnit and php 5.6
The first thing you need to do is to install PHPUnit on your machine:
$ wget https://phar.phpunit.de/phpunit.phar
$ chmod +x phpunit.phar
$ sudo mv phpunit.phar /usr/local/bin/phpunit
$ phpunit --version
and then, if needed, also upgrade your PHP version to 5.6:
$ sudo apt-get install language-pack-en-base
$ export LC_CTYPE="en_US.UTF-8"
$ sudo add-apt-repository ppa:ondrej/php5-5.6
$ sudo apt-get update
$ sudo apt-get install php5
and make sure everything's ok by running: phpunit -c app/
Please note that this is not a testing tutorial so if you'd like to learn more about how to actually test your Symfony2 app, then please read their documentation.
2. Setup and create a test database
In order to be able to configure testing and fixtures in a Symfony2 app a separate, independent database is needed so that your dev environment is not affected.
In the config_test.yml file you simply need to add:
doctrine:
    dbal:
        host:     127.0.0.1
        dbname:   testdb
        user:     [YOUR_MYSQL_USERNAME]
        password:  [YOUR_MYSQL_PASSWORD]
then simply run php app/console doctrine:database:create --env=test
Related: Send Emails in Symfony2: The Right Way
3. Build the BaseTestSetup class
Once our test database is ready we can start building our BaseTestSetup class, one which will serve as parent for all of our tests.
<?php
namespace AppBundle\Tests;
use Symfony\Bundle\FrameworkBundle\Test\WebTestCase;

abstract class BaseTestSetup extends WebTestCase
{
    protected $client;
    protected $container;
    protected $em;

    protected function setUp()
    {
        $this->client = static::createClient();
        $this->container = $this->client->getContainer();
        $this->em = static::$kernel->getContainer()
            ->get('doctrine')
            ->getManager();
    }
}
4. Install the LiipFunctionalTestBundle
Even though Symfony does have an out of the box solution to setup and test your app, the LiipFunctionalTestBundle provides base classes for functional tests to assist in setting up testing and fixtures and HTML5 validation.
After you install and configure the bundle, go back to your BaseTestSetup class and make the necessary modifications:
<?php
namespace AppBundle\Tests;
use Doctrine\ORM\Tools\SchemaTool;
use Liip\FunctionalTestBundle\Test\WebTestCase;

abstract class BaseTestSetup extends WebTestCase
{
    protected $client;
    protected $container;
    protected $em;

    protected function setUp()
    {
        $this->client = static::createClient();
        $this->container = $this->client->getContainer();
        $this->em = static::$kernel->getContainer()
            ->get('doctrine')
            ->getManager();

        if (!isset($metadatas)) {
            $metadatas = $this->em->getMetadataFactory()->getAllMetadata();
        }
        $schemaTool = new SchemaTool($this->em);
        $schemaTool->dropDatabase();
        if (!empty($metadatas)) {
            $schemaTool->createSchema($metadatas);
        }
        $this->postFixtureSetup();

        $this->loadFixtures(array(
            'AppBundle\DataFixtures\ORM\LoadUserData',
        ));

    }
}
The new code above simply drops and creates the database each them tests run. Then it loads the fixtures that you'll need. The LoadUserData class does not exist yet so we'll go right ahead and add it by following the handy tutorial found on Symfony's website.
5. Write the very first test
Now that have your fixtures ready, you can go ahead and write your first test. Create a new file in your AppBundle/Tests folder called UserTest.php, next to BaseTestSetup.php:
<?php
namespace AppBundle\Tests;

use AppBundle\Tests\BaseTestSetup;

class UserTest extends BaseTestSetup
{
    public function testSuggestImprovementEmail()
    {
        // assuming that you named your user 'username' in your Fixtures
        $crawler = $this->client->request('GET', '/show/username');

        $this->assertGreaterThan(
            0,
            $crawler->filter('html:contains("Hello first user!")')->count()
        );
    }

}
And that's about it! You now have everything you need to properly test your awesome app.
Building a Face Detection Web API in Node.js
Introduction
As a follow-up to my previous article on how to use your webcam for face detection with OpenCV, I’d like to show you how you can create your own web API for that.
There are a few Node.js modules out there that do just that. A few of them even provide bindings for OpenCV so you can use it directly from Javascript.
The catch is that most of these modules either rely directly on binaries or they need to be built for your machine from a makefile or a Visual Studio project, etc. That’s why some of them work on Windows for example, but not on Mac, or vice-versa.
The objective of this article is to show you the steps needed to create such a module for yourself so that you can customize it for your machine specifically. What we’re going to do is create a native Node.js add-on and a web server that will use that add-on to detect faces and show them to you.
Prerequisites
I’ve built this on a MacBook Pro running OS X El Capitan Version 10.11.1.
Since we’re going to use OpenCV you’ll need to set this up for your machine, I’ve described how to do this in this article.
Next, we’ll need Node.js which you can get from here. This will also install NPM (the package manager for node) which we need to install some extra node modules.
The next thing we need is node-gyp which you can install using npm. But before you do that make sure you have all the dependencies required which are described here. For Mac they are python 2.7, xcode, gcc and make. So basically if you followed the OpenCV installation guide you should be good on everything except python which you should install. After that you can install node-gyp like this :
npm install -g node-gyp
Node-gyp is used to generate the appropriate files needed to build a native node.js add-on.
That’s pretty much it. Next up, we’ll generate a simple native add-on.
Setting up
First, we need to create a folder for the node project, I’m doing this in my home directory :
mkdir ~/node-face-detect && cd ~/node-face-detect
Now we need a folder to hold the native module and navigate to it :
mkdir face-detect && cd face-detect
Node-gyp uses a file which specifies the target module name, source files, includes and libraries and other cflags to use when building the module. We need to create that file and call it binding.gyp. It’s contents should look like this :
{
  "targets": [
    {
      "target_name": "face-detect",
      "cflags" : [ "-std=c++1", "-stdlib=libc++" ],
      "conditions": [
        [ 'OS!="win"', {
          "cflags+": [ "-std=c++11" ],
          "cflags_c+": [ "-std=c++11" ],
          "cflags_cc+": [ "-std=c++11" ],
        }],
        [ 'OS=="mac"', {
          "xcode_settings": {
            "OTHER_CPLUSPLUSFLAGS" : [ "-std=c++11", "-stdlib=libc++" ],
            "OTHER_LDFLAGS": [ "-stdlib=libc++" ],
            "MACOSX_DEPLOYMENT_TARGET": "10.11"
                  },
        }],
      ],
      "sources": [ "src/face-detect.cpp" ],
      "include_dirs": [
        "include", "/usr/local/include"
      ],
      "libraries": [
        "-lopencv_core",
        "-lopencv_imgproc",
        "-lopencv_objdetect",
        "-lopencv_imgcodecs",
        "-lopencv_highgui",
        "-lopencv_hal",
        "-lopencv_videoio",
        "-L/usr/local/lib",
        "-llibpng",
        "-llibjpeg",
        "-llibwebp",
        "-llibtiff",
        "-lzlib",
        "-lIlmImf",
        "-llibjasper",
        "-L/usr/local/share/OpenCV/3rdparty/lib",
        "-framework AVFoundation",
        "-framework QuartzCore",
        "-framework CoreMedia",
        "-framework Cocoa",
        "-framework QTKit"
      ]
    }
  ]
}
Node-gyp still has some hiccups on Mac OS X and will use only either cc or c++ by default when building (instead of gcc/g++ or whatever you have configured).
Now we use node-gyp to generate the project files :
node-gyp configure
The native module
As specified in the binding.gyp file, we now need to create the source file of the native module i.e. src/face-detect.cpp.
Here is the source code for that :
//Include native addon headers
#include <node.h>
#include <node_buffer.h>
#include <v8.h>

#include <vector>

//Include OpenCV
#include <opencv2/opencv.hpp>

void faceDetect(const v8::FunctionCallbackInfo<v8::Value>& args) {
  v8::Isolate* isolate = args.GetIsolate();
  v8::HandleScope scope(isolate);

  //Get the image from the first argument
  v8::Local<v8::Object> bufferObj = args[0]->ToObject();
  unsigned char* bufferData = reinterpret_cast<unsigned char *>(node::Buffer::Data(bufferObj));
  size_t bufferLength = node::Buffer::Length(bufferObj);

  //The image decoding process into OpenCV's Mat format
  std::vector<unsigned char> imageData(bufferData, bufferData + bufferLength);
  cv::Mat image = cv::imdecode(imageData, CV_LOAD_IMAGE_COLOR);
  if(image.empty())
  {
    //Return null when the image can't be decoded.
    args.GetReturnValue().Set(v8::Null(isolate));
    return;
  }

  //OpenCV saves detection rules as something called a CascadeClassifier which
  //  can be used to detect objects in images.
  cv::CascadeClassifier faceCascade;

  //We'll load the lbpcascade_frontalface.xml containing the rules to detect faces.
  //The file should be right next to the binary of the native addon.
  if(!faceCascade.load("lbpcascade_frontalface.xml"))
  {
    //Return null when no classifier is found.
    args.GetReturnValue().Set(v8::Null(isolate));
    return;
  }

  //This vector will hold the rectangle coordinates to a detection inside the image.
  std::vector<cv::Rect> faces;

  //This function detects the faces in the image and places the rectangles of the faces in the vector.
  //See the detectMultiScale() documentation for more details about the rest of the parameters.
  faceCascade.detectMultiScale(
    image,
    faces,
    1.09,
    3,
    0 | CV_HAAR_SCALE_IMAGE,
    cv::Size(30, 30));

  //Here we'll build the json containing the coordinates to the detected faces
  std::ostringstream facesJson;

  facesJson << "{ \"faces\" : [ ";
  for(auto it = faces.begin(); it != faces.end(); it++)
  {
    if(it != faces.begin())
      facesJson << ", ";

    facesJson << "{ ";
    facesJson << "\"x\" : " << it->x << ", ";
    facesJson << "\"y\" : " << it->y << ", ";
    facesJson << "\"width\" : " << it->width << ", ";
    facesJson << "\"height\" : " << it->height;
    facesJson << " }";
  }

  facesJson << "] }";

  //And return it to the node server as an utf-8 string
  args.GetReturnValue().Set(v8::String::NewFromUtf8(isolate, facesJson.str().c_str()));
}

void init(v8::Local<v8::Object> target) {
  NODE_SET_METHOD(target, "detect", faceDetect);
}

NODE_MODULE(binding, init);
Basically what this code does is register a method to our module. The method gets the first parameter as a buffer, decodes it to an OpenCV Mat image, detects the faces within the image using the classifier (which should be placed next to the binary), and returns a JSON string containing the coordinates of the faces found in the image.
Now that we have all the pieces in place for the native module, we can build it using :
node-gyp build
If everything goes well, in the folder ./build/Release you should find a file called face-detect.node. This file represents our native module and we should now be able to require it in our javascript files. Also, next to this file, we need to copy the lbpcascade_frontalface.xml from the OpenCV source folder under /data/lbpcascades/.
The Server
Now we have to create the server.js file for the node server. We should load the native add-on for face detection, create a server that will listen to PUT requests and call the native add-on on the contents of these requests. The code for that should look like this :
//The path to our built native add-on
var faceDetect = require('./face-detect/build/Release/face-detect');

var http = require('http');

//Our web server
var server = http.createServer(function (request, response) {
  //Respond to PUT requests
  if (request.method == 'PUT')
  {
    request.setEncoding('binary');

    //Collect body chunks
    var body = null;
    request.on('data', function (data) {
      if(null == body)
        body = data;
      else
        body += data;

      //Destroy the connection if the file is too big to handle
      if (body.length > 1e6)
        request.connection.destroy();
    });

    //All chunks have been sent
    request.on('end', function () {
      //Create a node buffer from the body to send to the native add-on
      var bodyBuffer = new Buffer(body, "binary");

      //Call the native add-on
      var detectedFaces = faceDetect.detect(bodyBuffer);
      if(null == detectedFaces)
      {
        //Unsupported image format or classifier missing
        response.writeHead(500, {'Content-Type': 'applcation/json'});
        response.end('{"error" : "internal server error"}');
      }
      else
      {
        //Faces detected
        response.writeHead(200, {'Content-Type': 'applcation/json'});
        response.end(detectedFaces);
      }
    });
  }
  else
  {
    //Unsupported methods
    response.writeHead(405, {'Content-Type': 'applcation/json'});
    response.end('{"error" : "method not allowed"}');
  }
});

//Start listening to requests
server.listen(7000, "localhost");
To start the server just run :
node server.js
Test it out
Save an image containing human faces as image.jpg. Then, using curl from the command line send the image via a PUT request to the node server like this :
curl -i -X PUT http://localhost:7000/ -H "Content-Type: application/octet-stream" --data-binary "@image.jpg"
Depending on the image you send, you should see something like this :
HTTP/1.1 200 OK
Content-Type: applcation/json
Date: Wed, 17 Feb 2016 07:19:44 GMT
Connection: keep-alive
Transfer-Encoding: chunked
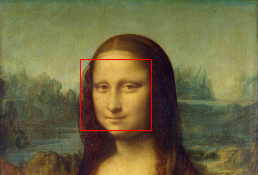
{ "faces" : [ { "x" : 39, "y" : 91, "width" : 240, "height" : 240 }] }Conclusion
Sometimes Node.js libraries might not meet your application needs or they might not fit your machine resulting in errors during npm install. When that happens, you can write your own custom native Node.js add-on to address those needs and hopefully, this article showed you that it’s possible.
As an exercise you can try changing this application to return an image with rectangles surrounding the detected faces. If you’re having trouble returning a new buffer from inside the native add-on, try returning the image as Data URI string.
How To Mock Endpoints in Automated Acceptance Tests
The purpose of acceptance testing is to reproduce production environment as much as possible in order to evaluate the software in a 'real-world' situation similar to what the customers will experience and this includes using real endpoints.
But using real endpoints has some disadvantages. In automated acceptance tests, the endpoint will be stressed out and this is not performance testing. Also, you must use production data (even usernames and passwords) and this is not good because you might break something there. The list with the reasons could go on and on and this is why you should mock some endpoints in automated acceptance tests. Also, you should keep your endpoint's URL stored in environment variables to be able to change it easily (production URL or mock URL).
I will show you some basic examples of mocking endpoints written in Ruby, Python and GO.
Mock endpoint in Ruby
I have used Sinatra (DSL for quickly creating web applications in Ruby) which is very easy to use.
Install the gem:
gem install sinatra
#myapp.rb

require ‘json’
require ‘sinatra’

get '/:username' do
  if params[:username] != 'your_username'
  	status 404
  else
  	content_type :json
  	{'message' => 'success'}.to_json
  end
end
ruby myapp.rb -o 0.0.0.0 -p 5000 > /dev/null 2>&1 &
This will start the process in background and your endpoint on http://localhost:5000.
If you make a GET request on http://localhost:5000/your_username you will get a ‘success’ message, else a 404 status code.
Mock endpoint in Python
In Python it is very easy to create an endpoint with Flask.
To install it you have to run:
pip install flask-restful
#myapp.py

#!flask/bin/python
from flask import Flask, jsonify
from flask import Response
import json

app = Flask(__name__)

@app.route("/<username>", methods=['GET'])
def put_username(username):
    if username == 'your_username':
        resp = Response("success!\n", mimetype='application/json')
    else:
        resp = Response("", status=404, mimetype='application/json')

    return resp

if __name__ == '__main__':
    app.run(debug=True)
As you can see, this does the exact same thing as the endpoint created in Ruby.
You simply run it with
python myapp.py
Mock endpoint in GO
//myapp.go
package main

import (
	"fmt"
	"net/http"
	"github.com/julienschmidt/httprouter"
)

func username(w http.ResponseWriter, r *http.Request, p httprouter.Params) {
	if p.ByName("username") == "your_username" {
		w.Header().Set("Content-Type", "application/json")
		w.WriteHeader(200)
		fmt.Fprint(w, `{"message":"success"}`)
	} else {
		w.WriteHeader(404)
	}
}

func main() {
	r := httprouter.New()
	r.GET("/:username", username)
	http.ListenAndServe("localhost:5000", r)
}
This does the same thing as the previous two endpoints and you run it with:
go run myapp.go
Thanks for reading this. What other ways of mocking an endpoint did you find?

Send Emails in Symfony2: The Right Way
No matter what your app is about, at one you point you will have to send emails in Symfony2. Even though this process might seem straightforward and easy to apply, it can actually get pretty tricky. Here's how you can send emails in Symfony2 by properly splitting your functionality and templates.
1. Mailer parameters
First off, you're going to need to add some email data into your parameters.yml file that will tell Swift Mailer which SMTP server to use. At this point, it would be advised to create an account at an email sending service. For this short tutorial, we're going to use SendGrid.
mailer_transport: smtp
mailer_host: smtp.sendgrid.net
mailer_user: your_sendgrid_username
mailer_password: 'your_sendgrid_password'
mailer_port: 587

contact_email: contact@yourapp.com
from_email: hello@yourapp.com
from_name: YourApp
As you can see, we've also added three parameters that will help us to send emails in Symfony2: contact email, from email and from name.
2. Send emails in Symfony2 using a MailManager
Having a MailManager is helpful because the code needed to send emails will only reside in a single place. Thus, it will be way easier to maintain. Here's how you should build the MailManager class:
<?php

namespace AppBundle\Lib;

class MailManager
{
    protected $mailer;
    protected $twig;

    public function __construct(\Swift_Mailer $mailer, \Twig_Environment $twig)
    {
        $this->mailer = $mailer;
        $this->twig = $twig;
    }

    /**
     * Send email
     *
     * @param   string   $template      email template
     * @param   mixed    $parameters    custom params for template
     * @param   string   $to            to email address or array of email addresses
     * @param   string   $from          from email address
     * @param   string   $fromName      from name
     *
     * @return  boolean                 send status
     */
    public function sendEmail($template, $parameters, $to, $from, $fromName = null)
    {
        $template = $this->twig->loadTemplate('AppBundle:Mail:' . $template . '.html.twig');

        $subject  = $template->renderBlock('subject', $parameters);
        $bodyHtml = $template->renderBlock('body_html', $parameters);
        $bodyText = $template->renderBlock('body_text', $parameters);

        try {
            $message = \Swift_Message::newInstance()
                ->setSubject($subject)
                ->setFrom($from, $fromName)
                ->setTo($to)
                ->setBody($bodyHtml, 'text/html')
                ->addPart($bodyText, 'text/plain')
            ;
            $response = $this->mailer->send($message);

        } catch (\Exception $ex) {
            return $ex->getMessage();
        }

        return $response;
    }
}
In the sendEmail function, you can easily define a $template variable which will hold whatever template you need, depending on the type of email. You'll see the MailManager in action in the 4th and last section of this short tutorial, where you'll use it to send a contact email.
Oh, and don't forget to register the service in services.yml:
mail_manager:
    class:     AppBundle\Lib\MailManager
    arguments: ["@mailer", "@twig"]
Related: Symfony2 Facebook and Google Login: The Easy Way
3. Define a simple template
In this section you'll be building the three main blocks any email should have (subject, html and text) and store them in a template which you'll extend as needed.
{# src/AppBundle/Mail/template.html.twig #}

{% block subject %}
    default subject
{% endblock %}

{% block body_text %}
    default text
{% endblock %}

{% block body_html %}
    <p>default body</p>
{% endblock %}
4. A sample email sending action
Now that you have everything set, you can go ahead and build your first mail sending action. As an example, here's how a contact action should look like. It will send emails to the email address defined in parameters.yml.
public function contactAction(Request $request)
    {
        $form = $this->createForm(new ContactType());

        $form->handleRequest($request);

        //this is where we define which template to use
        $template = 'contact';

        if($form->isValid()){
            //Get data from the submitted form
            $data = $form->getData();
            $mail_params = array(
                'firstName' => $data["firstName"],
                'lastName'  => $data["lastName"],
                'message'   => $data["message"],
                'phoneNumber' => $data["phoneNumber"],
                'email'     => $data["email"]
            );

            //grab the addresses defined in parameters.yml
            $to = $this->container->getParameter('contact_email');
            $from =  $this->container->getParameter('from_email');
            $fromName = $this->container->getParameter('from_name');

            //use the MailManager service to send emails
            $message = $this->container->get('mail_manager');
            $message->sendEmail($template, $mail_params, $to, $from, $fromName);

            return $this->redirectToRoute('contact');
        }

        return $this->render('AppBundle:StaticPages:contact.html.twig',array(
            'form' => $form->createView()
        ));
    }
Since you'll be using the contact email body, you will need to build it by extending the template defined at step #3:
{% extends "AppBundle:Mail:template.html.twig" %}

{% block subject %}
    YourApp Contact Message
{% endblock %}

{% block body_text %}
    {% autoescape false %}
        Name: {{ firstName }} {{ lastName }}
        Message: {{ message }}
        Phone Number: {{ phoneNumber }}
        Email address: {{ email }}
    {% endautoescape %}
{% endblock %}

{% block body_html %}
    {% autoescape false %}
        <p>Name: {{ firstName }} {{ lastName }}</p>
        <p>Message: {{ message }}</p>
        <p>Phone Number: {{ phoneNumber }}</p>
        <p>Email address: {{ email }}</p>
    {% endautoescape %}
{% endblock %}
And there you have it - an easy way to build and maintain your emails. If you know of any other easier system used to send emails in Symfony2, please let me know in the comment section below.

Build a Face Detector on OS X Using OpenCV and C++
Building and using C++ libraries can be a daunting task, even more so for big libraries like OpenCV. This article should get you started with a minimal build of OpenCV and a sample application written in C++.
This application will get images from the webcam, draw rectangles around the faces in the images and show them to you on screen
Build a Face Detector on OS X Using OpenCV and C - Requirements
I've built this on a MacBook Pro running OS X El Capitan Version 10.11.1.
We'll be using the GNU C++ compiler (g++) from the command line. Note that you should still have Xcode installed (I have Xcode 7.1 installed).
Here's what you need to do :
- Get "OpenCV for Linux/Mac" from the OpenCV Downloads Page I got version 3.0.
- Extract the contents of the zip file from step 1 to a folder of your choosing (I chose ~/opencv-3.0.0).
- Get a binary distribution of Cmake from the Cmake Downloads Page I got cmake-3.4.0-Darwin-x86_64.dmg.
- Install Cmake.
Building OpenCV
OpenCV uses CMake files to describe how the project needs to be built. CMake can transform these files into actual project settings (e.g. an Xcode project, Unix makefiles, a Visual Studio project, etc.) depending on the generator you choose.
First open CMake and a small window will pop-up that will let you choose your build options based on the CMakeList.txt files in the opencv source directory. First click on the Browse Source... button and choose the path to the opencv source folder (the folder you extracted the zip file to at step 2). Then click on the Browse Build... button and choose a path to a build folder, I'm going to create a new folder called build in the previously mentioned source folder.
If at any point you are prompted to choose a generator, pick Unix Makefiles. If the paths you chose were correct, after you click the Configure button, you should be looking at something like this :
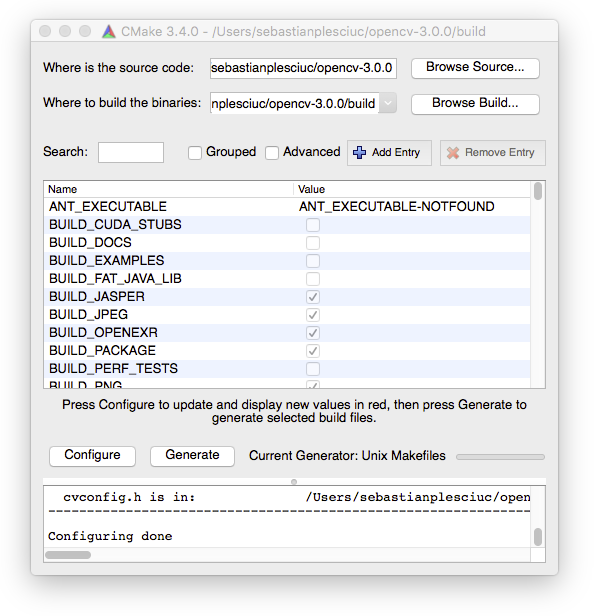
For a somewhat minimal OpenCV build, make sure you only have the following options enabled :
- BUILD_JASPER
- BUILD_JPEG
- BUILD_OPENEXR
- BUILD_PACKAGE
- BUILD_PNG
- BUILD_TIFF
- BUILD_WITH_DEBUG_INFO
- BUILD_ZLIB
- BUILD_opencv_apps
- BUILD_opencv_calib3d
- BUILD_opencv_core
- BUILD_opencv_features2d
- BUILD_opencv_flann
- BUILD_opencv_hal
- BUILD_opencv_highgui
- BUILD_opencv_imgcodecs
- BUILD_opencv_imgproc
- BUILD_opencv_ml
- BUILD_opencv_objdetect
- BUILD_opencv_photo
- BUILD_opencv_python2
- BUILD_opencv_shape
- BUILD_opencv_stitching
- BUILD_opencv_superres
- BUILD_opencv_ts
- BUILD_opencv_video
- BUILD_opencv_videoio
- BUILD_opencv_videostab
- ENABLE_SSE
- ENABLE_SSE2
- WITH_1394
- WITH_JASPER
- WITH_JPEG
- WITH_LIBV4L
- WITH_OPENEXR
- WITH_PNG
- WITH_TIFF
- WITH_V4L
- WITH_WEBP
You should disable the options that are not in the list, especially the BUILD_SHARED_LIBS one. Don't touch the options that are text fields unless you know what you're doing.
Most of these options you don't need for this particular exercise, but it will save you time by not having to rebuild OpenCV should you decide to try something else.
Once you have selected the settings above, click Generate. Now you can navigate to the build folder, I'll do so with cd ~/opencv-3.0.0/build/ and run make to build OpenCV.
Installing OpenCV
If everything goes well, after the build finishes, run make install to add the OpenCV includes to the /usr/local/include folder and the libraries to the /usr/local/lib and /usr/local/share/OpenCV/3rdparty/lib folders.
After that's done, you should be able to build your own C++ applications that link against OpenCV.
The Face Detector Application
Now let's try to build our first application with OpenCV
Here's the code and comments that explain how to do just that :
#include <iostream>

//Include OpenCV
#include <opencv2/opencv.hpp>

int main(void )
{
   //Capture stream from webcam.
   cv::VideoCapture capture(0);

   //Check if we can get the webcam stream.
   if(!capture.isOpened())
   {
      std::cout << "Could not open camera" << std::endl;
      return -1;
   }

   //OpenCV saves detection rules as something called a CascadeClassifier which
   //    can be used to detect objects in images.
   cv::CascadeClassifier faceCascade;

   //We'll load the lbpcascade_frontalface.xml containing the rules to detect faces.
   //The file should be right next to the binary.
   if(!faceCascade.load("lbpcascade_frontalface.xml"))
   {
      std::cout << "Failed to load cascade classifier" << std::endl;
      return -1;
   }

   while (true)
   {
      //This variable will hold the image from the camera.
      cv::Mat cameraFrame;

      //Read an image from the camera.
      capture.read(cameraFrame);

      //This vector will hold the rectangle coordinates to a detection inside the image.
      std::vector<cv::Rect> faces;

      //This function detects the faces in the image and
      // places the rectangles of the faces in the vector.
      //See the detectMultiScale() documentation for more details
      // about the rest of the parameters.
      faceCascade.detectMultiScale(
        cameraFrame,
        faces,
        1.09,
        3,
        0 | CV_HAAR_SCALE_IMAGE,
        cv::Size(30, 30));

      //Here we draw the rectangles onto the image with a red border of thikness 2.
      for( size_t i = 0; i < faces.size(); i++ )
            cv::rectangle(cameraFrame, faces[i], cv::Scalar(0, 0, 255), 2);

      //Here we show the drawn image in a named window called "output".
      cv::imshow("output", cameraFrame);

      //Waits 50 miliseconds for key press, returns -1 if no key is pressed during that time
      if (cv::waitKey(50) >= 0)
          break;
   }

   return 0;
}
I saved this as main.cpp. To build it I used the following command :
g++ -o main main.cpp -I/usr/local/include \
-L/usr/local/lib -lopencv_core -lopencv_imgproc -lopencv_objdetect \
-lopencv_imgcodecs -lopencv_highgui -lopencv_hal -lopencv_videoio \
-L/usr/local/share/OpenCV/3rdparty/lib -llibpng -llibjpeg -llibwebp \
-llibtiff -lzlib -lIlmImf -llibjasper -framework AVFoundation -framework QuartzCore \
-framework CoreMedia -framework Cocoa -framework QTKit
Hopefully, no errors should occur.
Conclusions
Build a Face Detector on OS X Using OpenCV and C? Before running the application, you have to copy the lbpcascade_frontalface.xml next to the main file. You can find this file in the OpenCV source folder under /data/lbpcascades/. You can also find some other cascades to detect eyes, cat faces, etc.
Now just run the ./main and enjoy!

Symfony2 Facebook and Google Login: The Easy Way
Since pretty much any potential user of an app has a Facebook or a Google account, it's crucial to have a login or registration service using these social networks. Luckily, HWIOAuthBundle provides the necessary tools to accomplish this. So here's an easy and straightforward way to integrate HWIOAuth in our app alongside FOSUserBundle:
Symfony2 Facebook and Google Login: The Easy Way
1. Configure HWIOauthBundle
Assuming that you've already installed and configured FOSUserBundle, we now need to add HWIOAuthBundle in our application. As mentioned in their setup page, we simply have to:
composer require hwi/oauth-bundle
Then we should enable the bundle in the kernel:
// app/AppKernel.php

public function registerBundles()
{
    $bundles = array(
        // ...
        new HWI\Bundle\OAuthBundle\HWIOAuthBundle(),
    );
}
and then we can import the social routes:
# app/config/routing.yml
hwi_oauth_redirect:
    resource: "@HWIOAuthBundle/Resources/config/routing/redirect.xml"
    prefix:   /connect

hwi_oauth_login:
    resource: "@HWIOAuthBundle/Resources/config/routing/login.xml"
    prefix:   /login
Once we have these setup, we can start configuring the security details in security.yml:
firewalls:
    main:
        pattern: ^/
        oauth:
            failure_path: your_path
            login_path: your_path
            check_path: /connect_check
            provider: fos_userbundle
            resource_owners:
                facebook: "/login/check-facebook"
                google: "/login/check-google"
            oauth_user_provider:
                service: app.provider.oauth
And then we can finally add Facebook and Google into HWIOAuth's configuration in config.yml:
hwi_oauth:
    # name of the firewall in which this bundle is active, this setting MUST be set
    firewall_name: main
    connect:
        account_connector: app.provider.oauth
    resource_owners:
        facebook:
            type:                facebook
            client_id:           %facebook_client_id%
            client_secret:       %facebook_client_secret%
            scope:               "email, public_profile"
            infos_url:           "https://graph.facebook.com/me?fields=id,name,email,picture.type(large)"
            paths:
                email: email
            options:
                display: page
        google:
            type:                google
            client_id:           %google_client_id%
            client_secret:       %google_client_secret%
            scope:              "https://www.googleapis.com/auth/userinfo.email https://www.googleapis.com/auth/userinfo.profile"
            paths:
                email: email
2. Build our own user provider by extending HWIOAuth's FOSUBUserProvider
As you've probably noticed, we used app.provider.oauth in both security.yml and config.yml. So we need to define that service in services.yml:
app.provider.oauth:
    class: AppBundle\Security\Core\User\OAuthUserProvider
    arguments: [@fos_user.user_manager,{facebook: facebookID, google: googleID}]
And then build it in our AppBundle:
<?php
namespace AppBundle\Security\Core\User;

use HWI\Bundle\OAuthBundle\OAuth\Response\UserResponseInterface;
use HWI\Bundle\OAuthBundle\Security\Core\User\FOSUBUserProvider as BaseClass;
use Symfony\Component\Security\Core\Exception\AuthenticationException;
use Symfony\Component\Security\Core\User\UserChecker;
use Symfony\Component\Security\Core\User\UserInterface;
/**
 * Class OAuthUserProvider
 * @package AppBundle\Security\Core\User
 */
class OAuthUserProvider extends BaseClass
{
    /**
     * {@inheritdoc}
     */
    public function loadUserByOAuthUserResponse(UserResponseInterface $response)
    {
        $socialID = $response->getUsername();
        $user = $this->userManager->findUserBy(array($this->getProperty($response)=>$socialID));
        $email = $response->getEmail();
        //check if the user already has the corresponding social account
        if (null === $user) {
            //check if the user has a normal account
            $user = $this->userManager->findUserByEmail($email);

            if (null === $user || !$user instanceof UserInterface) {
                //if the user does not have a normal account, set it up:
                $user = $this->userManager->createUser();
                $user->setEmail($email);
                $user->setPlainPassword(md5(uniqid()));
                $user->setEnabled(true);
            }
            //then set its corresponding social id
            $service = $response->getResourceOwner()->getName();
            switch ($service) {
                case 'google':
                    $user->setGoogleID($socialID);
                    break;
                case 'facebook':
                    $user->setFacebookID($socialID);
                    break;
            }
            $this->userManager->updateUser($user);
        } else {
            //and then login the user
            $checker = new UserChecker();
            $checker->checkPreAuth($user);
        }

        return $user;
    }
}
Related: What Nobody Tells You When You're a Junior Developer
3. Override the User Model
In our user provider defined above we modified two attributes that do not exist in FOSUser's User model: $facebookId and $googleId. So we need to override the User model and add them.
namespace AppBundle\Entity;

use FOS\UserBundle\Model\User as BaseUser;
use Doctrine\ORM\Mapping as ORM;

/**
 * @ORM\Entity(repositoryClass="AppBundle\Entity\UserRepository")
 * @ORM\Table(name="fos_user")
 */
class User extends BaseUser
{
    /**
     * @ORM\Id
     * @ORM\Column(type="integer")
     * @ORM\GeneratedValue(strategy="AUTO")
     */
    protected $id;

    /**
     * @var string
     *
     * @ORM\Column(name="facebook_id", type="string", nullable=true)
     */
    private $facebookID;

    /**
     * @var string
     *
     * @ORM\Column(name="google_id", type="string", nullable=true)
     */
    private $googleID;

    // ...
}
Don't forget to update your database and then you can move forward to the next step.
4. Add Facebook and Google to our login and register pages
Now we're all set to update our Twig files with HWIOauth's paths. Since we're using FOSUser, we've overridden their register.html.twig and login.html.twig files and then added the social links:
{# ... #}
<a href="{{ path('hwi_oauth_service_redirect', {'service': 'facebook' }) }}">
    <span>Facebook</span>
</a>
<a href="{{ path('hwi_oauth_service_redirect', {'service': 'google' }) }}">
    <span>Google</span>
</a>
{# ... #}
And there you have it: a fully functional Facebook and Google login and signup system. Now we can go to Facebook Developers and Google Developers Console, create our apps and add our client_id and client_secret in config.yml. Have fun!
If you have a different take on this process and can make it even easier, please let us know in the comment section below.

What Nobody Tells You When You're a Junior Developer
Hooray! You've landed your dream job and you can now proudly call yourself a Junior Developer. The future looks nothing but bright and your awesome life story is underway. But now the hard part actually begins. Here's how you can stay on top of things with some useful tips I wish I knew when I was in your shoes as a junior developer.