Great stuff is coming from Apple this autumn! Among a lot of new APIs there is the Vision Framework which helps with detection of faces, face features, object tracking and others.
In this post we will take a look at how can one put the face detection to work. We will make a simple application that can take a photo (using the camera of from the library) and will draw some lines on the faces it detects to show you the power of Vision.
Table of Contents
ToggleSelect an Image
I will go fast through this so if you are a really beginner and you find this too hard to follow, please check the my previous iOS related post, Building a Travel Photo Sharing iOS App, first, as it has the same photo selection functionality but explained in greater detail.
You will need Xcode 9 beta and a device running iOS 11 beta to test this. Let’s start by creating a new Single View App project named FaceVision:

Open the Main.storyboard and drag a button Take Photo to the center of it. Use the constraints to make it stay there 🙂 Create a takePhoto action for it:
@IBAction func takePhoto(_ sender: UIButton) {
    let picker = UIImagePickerController()
    picker.delegate = self
    let alert = UIAlertController(title: nil, message: nil, preferredStyle: .actionSheet)
    if UIImagePickerController.isSourceTypeAvailable(.camera) {
        alert.addAction(UIAlertAction(title: "Camera", style: .default, handler: {action in
            picker.sourceType = .camera
            self.present(picker, animated: true, completion: nil)
        }))
    }
    alert.addAction(UIAlertAction(title: "Photo Library", style: .default, handler: { action in
        picker.sourceType = .photoLibrary
        // on iPad we are required to present this as a popover
        if UIDevice.current.userInterfaceIdiom == .pad {
            picker.modalPresentationStyle = .popover
            picker.popoverPresentationController?.sourceView = self.view
            picker.popoverPresentationController?.sourceRect = self.takePhotoButton.frame
        }
        self.present(picker, animated: true, completion: nil)
    }))
    alert.addAction(UIAlertAction(title: "Cancel", style: .cancel, handler: nil))
    // on iPad this is a popover
    alert.popoverPresentationController?.sourceView = self.view
    alert.popoverPresentationController?.sourceRect = takePhotoButton.frame
    self.present(alert, animated: true, completion: nil)
}
Here we used an UIImagePickerController to get an image so we have to make our ViewController implement the UIImagePickerControllerDelegate and UINavigationControllerDelegate protocols:
class ViewController: UIViewController, UIImagePickerControllerDelegate, UINavigationControllerDelegate {We also need an outlet for the button:
@IBOutlet weak var takePhotoButton: UIButton!
And an image var:
var image: UIImage!
We also need to add the following in the Info.plist to be able to access the camera and the photo library:
Privacy - Camera Usage Description: Access to the camera is needed in order to be able to take a photo to be analyzed by the appPrivacy - Photo Library Usage Description: Access to the photo library is needed in order to be able to choose a photo to be analyzed by the app
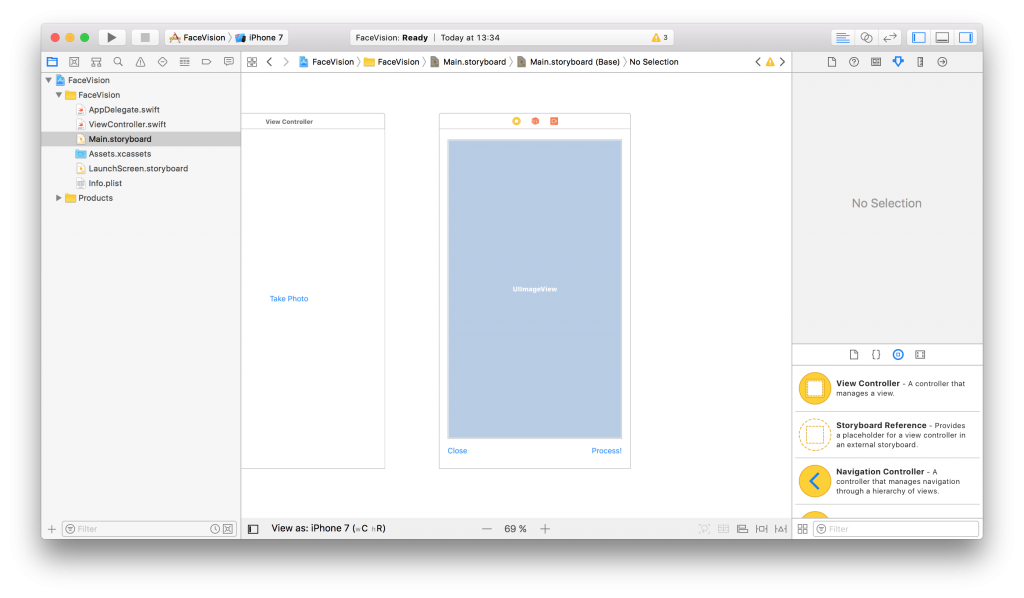
After the users chooses an image we will use another view controller to show it and to let the user start the processing or go back to the first screen. Add a new View Controller in the Main.storyboard. In it, add an Image View with an Aspect Fit Content Mode and two buttons like in the image below (don’t forget to use the necessary constraints):
Now, create a new UIViewController class named ImageViewControler.swift and set it to be the class of the new View Controller you just added in the Main.storyboard:
import UIKit

class ImageViewController: UIViewController {

    override func viewDidLoad() {
        super.viewDidLoad()

        // Do any additional setup after loading the view.
    }
}
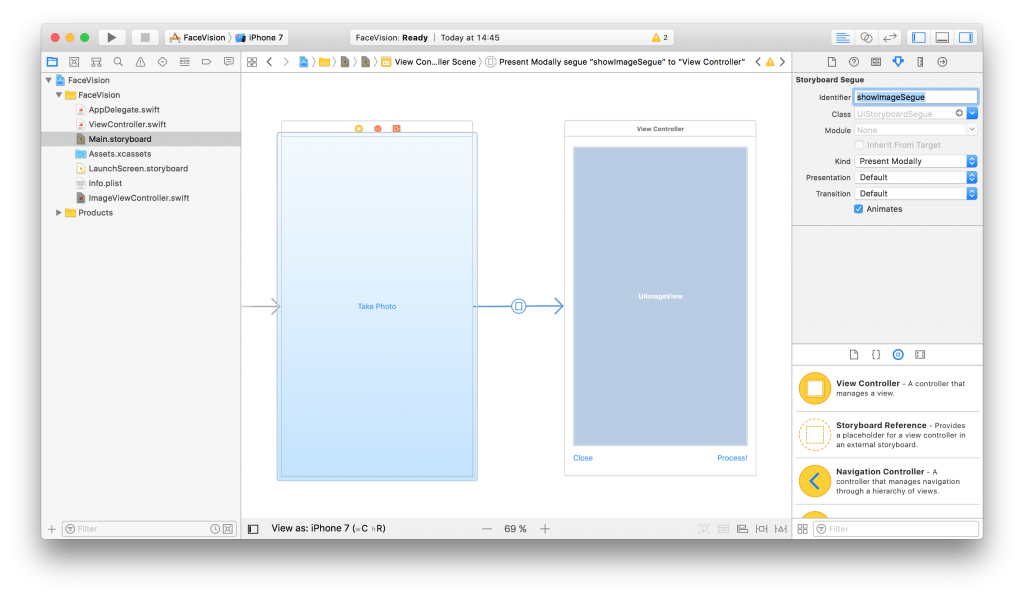
Still in the Main.storyboard, create a Present Modally kind segue between the two view controllers with the showImageSegue identifier:
Also add an outlet for the Image View and a new property to hold the image from the user:
@IBOutlet weak var imageView: UIImageView!

var image: UIImage!
Now, back to our initial ViewController class, we need to present the new ImageViewController and set the selected image:
func imagePickerController(_ picker: UIImagePickerController, didFinishPickingMediaWithInfo info: [String : Any]) {
    dismiss(animated: true, completion: nil)
    image = info[UIImagePickerControllerOriginalImage] as! UIImage
    performSegue(withIdentifier: "showImageSegue", sender: self)
}

override func prepare(for segue: UIStoryboardSegue, sender: Any?) {
    if segue.identifier == "showImageSegue" {
        if let imageViewController = segue.destination as? ImageViewController {
            imageViewController.image = self.image
        }
    }
}
We also need an exit method to be called when we press the Close button from the Image View Controller:
@IBAction func exit(unwindSegue: UIStoryboardSegue) {
    image = nil
}
To make this work, head back to the Main.storyboard and Ctrl+drag from the Close button to the exit icon of the Image View Controller and select the exit method from the popup.
To actually show the selected image to the user we have to set it to the imageView:
override func viewDidLoad() {
    super.viewDidLoad()

    // Do any additional setup after loading the view.
    imageView.image = image
}
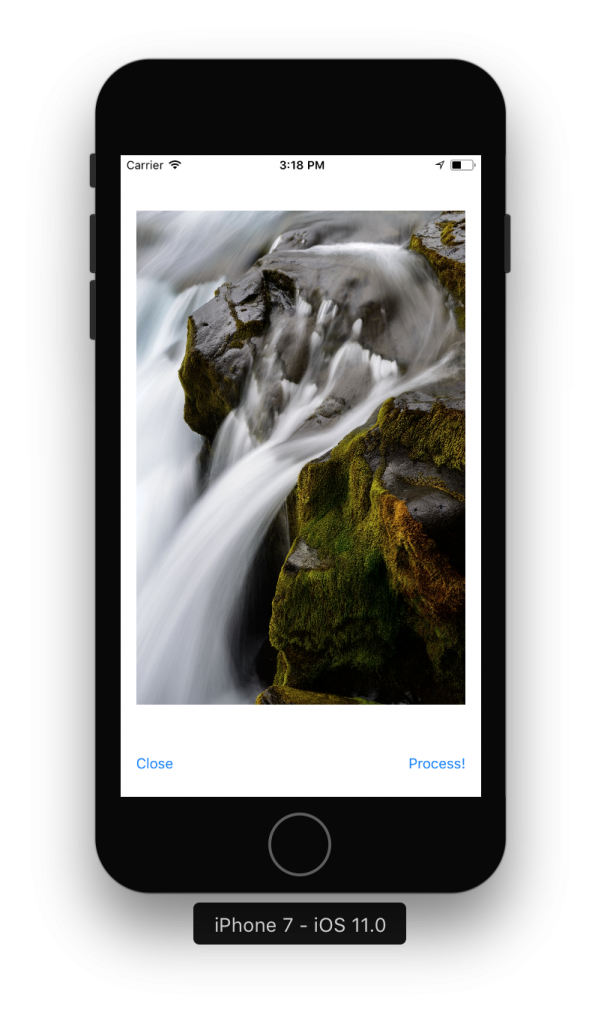
If you run the app now you should be able to select a photo either from the camera or from the library and it will be presented to you in the second view controller with the Close and Process! buttons below it.
Detect Face Features
It’s time to get to the fun part, detect the faces and faces features in the image.
Create a new process action for the Process! button with the following content:
@IBAction func process(_ sender: UIButton) {
    var orientation:Int32 = 0

    // detect image orientation, we need it to be accurate for the face detection to work
    switch image.imageOrientation {
    case .up:
        orientation = 1
    case .right:
        orientation = 6
    case .down:
        orientation = 3
    case .left:
        orientation = 8
    default:
        orientation = 1
    }

    // vision
    let faceLandmarksRequest = VNDetectFaceLandmarksRequest(completionHandler: self.handleFaceFeatures)
    let requestHandler = VNImageRequestHandler(cgImage: image.cgImage!, orientation: orientation ,options: [:])
    do {
        try requestHandler.perform([faceLandmarksRequest])
    } catch {
        print(error)
    }
}
After translating the image orientation from UIImageOrientationx values to kCGImagePropertyOrientation values (not sure why Apple didn’t make them the same), the code will start the detection process from the Vision framework. Don’t forget to import Vision to have access to it’s API.
We’ll add now the method that will be called when the Vision’s processing is done:
func handleFaceFeatures(request: VNRequest, errror: Error?) {
    guard let observations = request.results as? [VNFaceObservation] else {
        fatalError("unexpected result type!")
    }

    for face in observations {
        addFaceLandmarksToImage(face)
    }
}
This also calls yet another method that does the actual drawing on the image based on the data received from the detect face landmarks request:
func addFaceLandmarksToImage(_ face: VNFaceObservation) {
    UIGraphicsBeginImageContextWithOptions(image.size, true, 0.0)
    let context = UIGraphicsGetCurrentContext()

    // draw the image
    image.draw(in: CGRect(x: 0, y: 0, width: image.size.width, height: image.size.height))

    context?.translateBy(x: 0, y: image.size.height)
    context?.scaleBy(x: 1.0, y: -1.0)

    // draw the face rect
    let w = face.boundingBox.size.width * image.size.width
    let h = face.boundingBox.size.height * image.size.height
    let x = face.boundingBox.origin.x * image.size.width
    let y = face.boundingBox.origin.y * image.size.height
    let faceRect = CGRect(x: x, y: y, width: w, height: h)
    context?.saveGState()
    context?.setStrokeColor(UIColor.red.cgColor)
    context?.setLineWidth(8.0)
    context?.addRect(faceRect)
    context?.drawPath(using: .stroke)
    context?.restoreGState()

    // face contour
    context?.saveGState()
    context?.setStrokeColor(UIColor.yellow.cgColor)
    if let landmark = face.landmarks?.faceContour {
        for i in 0...landmark.pointCount - 1 { // last point is 0,0
            let point = landmark.point(at: i)
            if i == 0 {
                context?.move(to: CGPoint(x: x + CGFloat(point.x) * w, y: y + CGFloat(point.y) * h))
            } else {
                context?.addLine(to: CGPoint(x: x + CGFloat(point.x) * w, y: y + CGFloat(point.y) * h))
            }
        }
    }
    context?.setLineWidth(8.0)
    context?.drawPath(using: .stroke)
    context?.saveGState()

    // outer lips
    context?.saveGState()
    context?.setStrokeColor(UIColor.yellow.cgColor)
    if let landmark = face.landmarks?.outerLips {
        for i in 0...landmark.pointCount - 1 { // last point is 0,0
            let point = landmark.point(at: i)
            if i == 0 {
                context?.move(to: CGPoint(x: x + CGFloat(point.x) * w, y: y + CGFloat(point.y) * h))
            } else {
                context?.addLine(to: CGPoint(x: x + CGFloat(point.x) * w, y: y + CGFloat(point.y) * h))
            }
        }
    }
    context?.closePath()
    context?.setLineWidth(8.0)
    context?.drawPath(using: .stroke)
    context?.saveGState()

    // inner lips
    context?.saveGState()
    context?.setStrokeColor(UIColor.yellow.cgColor)
    if let landmark = face.landmarks?.innerLips {
        for i in 0...landmark.pointCount - 1 { // last point is 0,0
            let point = landmark.point(at: i)
            if i == 0 {
                context?.move(to: CGPoint(x: x + CGFloat(point.x) * w, y: y + CGFloat(point.y) * h))
            } else {
                context?.addLine(to: CGPoint(x: x + CGFloat(point.x) * w, y: y + CGFloat(point.y) * h))
            }
        }
    }
    context?.closePath()
    context?.setLineWidth(8.0)
    context?.drawPath(using: .stroke)
    context?.saveGState()

    // left eye
    context?.saveGState()
    context?.setStrokeColor(UIColor.yellow.cgColor)
    if let landmark = face.landmarks?.leftEye {
        for i in 0...landmark.pointCount - 1 { // last point is 0,0
            let point = landmark.point(at: i)
            if i == 0 {
                context?.move(to: CGPoint(x: x + CGFloat(point.x) * w, y: y + CGFloat(point.y) * h))
            } else {
                context?.addLine(to: CGPoint(x: x + CGFloat(point.x) * w, y: y + CGFloat(point.y) * h))
            }
        }
    }
    context?.closePath()
    context?.setLineWidth(8.0)
    context?.drawPath(using: .stroke)
    context?.saveGState()

    // right eye
    context?.saveGState()
    context?.setStrokeColor(UIColor.yellow.cgColor)
    if let landmark = face.landmarks?.rightEye {
        for i in 0...landmark.pointCount - 1 { // last point is 0,0
            let point = landmark.point(at: i)
            if i == 0 {
                context?.move(to: CGPoint(x: x + CGFloat(point.x) * w, y: y + CGFloat(point.y) * h))
            } else {
                context?.addLine(to: CGPoint(x: x + CGFloat(point.x) * w, y: y + CGFloat(point.y) * h))
            }
        }
    }
    context?.closePath()
    context?.setLineWidth(8.0)
    context?.drawPath(using: .stroke)
    context?.saveGState()

    // left pupil
    context?.saveGState()
    context?.setStrokeColor(UIColor.yellow.cgColor)
    if let landmark = face.landmarks?.leftPupil {
        for i in 0...landmark.pointCount - 1 { // last point is 0,0
            let point = landmark.point(at: i)
            if i == 0 {
                context?.move(to: CGPoint(x: x + CGFloat(point.x) * w, y: y + CGFloat(point.y) * h))
            } else {
                context?.addLine(to: CGPoint(x: x + CGFloat(point.x) * w, y: y + CGFloat(point.y) * h))
            }
        }
    }
    context?.closePath()
    context?.setLineWidth(8.0)
    context?.drawPath(using: .stroke)
    context?.saveGState()

    // right pupil
    context?.saveGState()
    context?.setStrokeColor(UIColor.yellow.cgColor)
    if let landmark = face.landmarks?.rightPupil {
        for i in 0...landmark.pointCount - 1 { // last point is 0,0
            let point = landmark.point(at: i)
            if i == 0 {
                context?.move(to: CGPoint(x: x + CGFloat(point.x) * w, y: y + CGFloat(point.y) * h))
            } else {
                context?.addLine(to: CGPoint(x: x + CGFloat(point.x) * w, y: y + CGFloat(point.y) * h))
            }
        }
    }
    context?.closePath()
    context?.setLineWidth(8.0)
    context?.drawPath(using: .stroke)
    context?.saveGState()

    // left eyebrow
    context?.saveGState()
    context?.setStrokeColor(UIColor.yellow.cgColor)
    if let landmark = face.landmarks?.leftEyebrow {
        for i in 0...landmark.pointCount - 1 { // last point is 0,0
            let point = landmark.point(at: i)
            if i == 0 {
                context?.move(to: CGPoint(x: x + CGFloat(point.x) * w, y: y + CGFloat(point.y) * h))
            } else {
                context?.addLine(to: CGPoint(x: x + CGFloat(point.x) * w, y: y + CGFloat(point.y) * h))
            }
        }
    }
    context?.setLineWidth(8.0)
    context?.drawPath(using: .stroke)
    context?.saveGState()

    // right eyebrow
    context?.saveGState()
    context?.setStrokeColor(UIColor.yellow.cgColor)
    if let landmark = face.landmarks?.rightEyebrow {
        for i in 0...landmark.pointCount - 1 { // last point is 0,0
            let point = landmark.point(at: i)
            if i == 0 {
                context?.move(to: CGPoint(x: x + CGFloat(point.x) * w, y: y + CGFloat(point.y) * h))
            } else {
                context?.addLine(to: CGPoint(x: x + CGFloat(point.x) * w, y: y + CGFloat(point.y) * h))
            }
        }
    }
    context?.setLineWidth(8.0)
    context?.drawPath(using: .stroke)
    context?.saveGState()

    // nose
    context?.saveGState()
    context?.setStrokeColor(UIColor.yellow.cgColor)
    if let landmark = face.landmarks?.nose {
        for i in 0...landmark.pointCount - 1 { // last point is 0,0
            let point = landmark.point(at: i)
            if i == 0 {
                context?.move(to: CGPoint(x: x + CGFloat(point.x) * w, y: y + CGFloat(point.y) * h))
            } else {
                context?.addLine(to: CGPoint(x: x + CGFloat(point.x) * w, y: y + CGFloat(point.y) * h))
            }
        }
    }
    context?.closePath()
    context?.setLineWidth(8.0)
    context?.drawPath(using: .stroke)
    context?.saveGState()

    // nose crest
    context?.saveGState()
    context?.setStrokeColor(UIColor.yellow.cgColor)
    if let landmark = face.landmarks?.noseCrest {
        for i in 0...landmark.pointCount - 1 { // last point is 0,0
            let point = landmark.point(at: i)
            if i == 0 {
                context?.move(to: CGPoint(x: x + CGFloat(point.x) * w, y: y + CGFloat(point.y) * h))
            } else {
                context?.addLine(to: CGPoint(x: x + CGFloat(point.x) * w, y: y + CGFloat(point.y) * h))
            }
        }
    }
    context?.setLineWidth(8.0)
    context?.drawPath(using: .stroke)
    context?.saveGState()

    // median line
    context?.saveGState()
    context?.setStrokeColor(UIColor.yellow.cgColor)
    if let landmark = face.landmarks?.medianLine {
        for i in 0...landmark.pointCount - 1 { // last point is 0,0
            let point = landmark.point(at: i)
            if i == 0 {
                context?.move(to: CGPoint(x: x + CGFloat(point.x) * w, y: y + CGFloat(point.y) * h))
            } else {
                context?.addLine(to: CGPoint(x: x + CGFloat(point.x) * w, y: y + CGFloat(point.y) * h))
            }
        }
    }
    context?.setLineWidth(8.0)
    context?.drawPath(using: .stroke)
    context?.saveGState()

    // get the final image
    let finalImage = UIGraphicsGetImageFromCurrentImageContext()

    // end drawing context
    UIGraphicsEndImageContext()

    imageView.image = finalImage
}
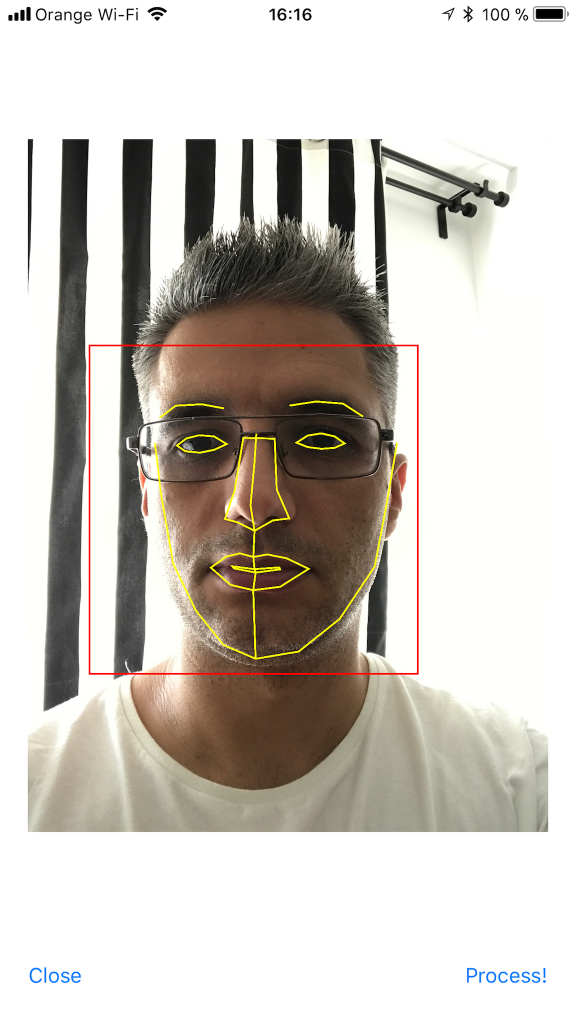
As you can see we have quite a lot of features that Vision is able to identify: the face contour, the mouth (both inner and outer lips), the eyes together with the pupils and eyebrows, the nose and the nose crest and, finally, the median line of the faces.
You can now run the app and take some unusual selfies of yourself. Here’s mine:
I hope you enjoyed this, please let me know in the comments how did it go and if there are things that can be improved. Also, some pictures taken with the app wouldn’t hurt at all 🙂
You can get the code from here: https://github.com/intelligentbee/FaceVision
Thanks!
1 Comment
Comments are closed.
At the end of addFaceLandmarksToImage you need to add storing the finalImage back into image, so the next iteration draws on the changed image. Also, the (at: i) thing doesn’t work with the current version of IOS or Swift. [i] does work. I don’t know Swift, so I don’t know why that construct fails the way it does.
Great little program, that demonstrates the concept of face recognition well.