Android Vs iOS: What Platform Should You Build Your Mobile App For?
Now that we live in a society that’s heavily reliant on mobile technology, mobile app development has seen a boom over the last few years. As smartphones get an upgrade with each brand’s release of their flagship device, apps become more advanced. They dish out more features that not only help users but also businesses to expand their operations through this platform. Apple has even trademarked the catchphrase “there’s an app for that” to let users know there is one that can actually help with just about any particular task.

According to an App Annie report, the mobile app industry earned a whopping US$41.1 billion in gross annual revenue and according to Statista, it’s projected to hit US$101.1 billion by 2020. With the population of smartphone users growing each year, the market is far from saturated.
Internet on-the-go is clearly a necessity for many users, and there’s nowhere to go but up. More companies are starting to jump into the mobile app arena after regarding smartphones as a catalyst that can grow their business. The mobile app platform has become a channel to boost sales, increase brand awareness and deliver content through branded apps.
But how do you jump into the fray? Like all things technical, there’s a process you need to go through. Here’s how it currently goes:
Choose an initial platform for the app
There are two giants that dominate the current smartphone market: Android and iOS. To find out which one has more users, a study by Gartner found that 87.8% of smartphones sold in Q3 of 2016 globally were Android. In contrast, Apple only had 11.5%. While there is a huge difference, that doesn’t mean going for Android is the better choice.
Test and get feedback
Once you’ve developed your app on your preferred platform, you will need to beta test it to an intended audience and collect feedback on how it works. During this process, you will know if everything about how the app is designed works perfectly. You will also find out if there are bugs you need to fix and improvements that would make your app better.
Make iterations and expand features
After zeroing in on the bugs and identifying what you need to improve on, you can release new versions packed with all the new features. This is a continuous process; as your business improves, so does your app to deliver the best user experience you can offer.
Build and release the app on the other platform
You will eventually be able to figure out how everything works on your initial operating system. The next step is to widen your reach, so your next move is to release your app on the other platform.
But for your initial development, testing, and optimization processes, you should be able to address the question: Which platform should you go for? Let’s weigh up the differences.
Android
The Pros: With its open-source software, Android offers app developers a low barrier of entry and allows the use of crowd-created frameworks and plugins. This results in a platform that’s more flexible, which gives developers the freedom to play around with their app’s features and functionalities. This kind of technical environment enables them to modify apps to make the necessary improvements.
As mentioned earlier, Android operating systems have a huge monopoly over the smartphone market. Although this makes Android look like the obvious first choice, there are many other factors that come into play.
The Cons: Although Android’s open-source nature is favorable for developers, it’s a double-edged sword. Android app development is more complex, taking more time to master. And while the OS covers a wide variety of devices and iterations, this benefit causes a large amount of fragmentation. This results in varied user experiences across all devices.
With its highly-fragmented platform, developers are faced with a real challenge as apps need to be optimized for various screen sizes and operating systems. This leads to a lot of compatibility and testing required, ultimately increasing development costs. For this reason, app development takes longer than those on iOS.
iOS
The Pros: iOS offers a more stable and exclusive platform for developers, making the apps easier to use. Apple designed it to be a closed platform, so the company can design all of their own hardware and software around it. This gives them the authority to impose strict guidelines, resulting to a quick and responsive platform where apps are designed well with less piracy involved.
Since 2016, over 25% of iOS developers earned over US$5,000 in monthly revenue, while only 16% of Android developers generated the same amount. And when it comes to monthly revenues earned by mobile operating systems, a Statista study estimates iOS earns US$8,100 on average per month, bumping Android to second place with US$4,900. But despite these numbers favoring iOS, a third of developers prefer Android.
Compared to the thousands of devices using Android, iOS runs on a mere 20 devices. And with both resolution and screen size playing a smaller role in the app development process, it’s quicker and easier. This results in significantly less device fragmentation.
To put things into perspective, developing an app compatible with three of the latest iOS version covers about 97% of all iOS users. This makes it a fitting choice for first-timers in app development.
The Cons: Due to its restrictive nature, developer guidelines offer a fixed set of tools to build an app, making customization limited. And with the frameworks used to build an app, many of them licensed, development costs could increase.
Additionally, iOS is widely regarded as a more mature operating system than Android, with established rules and standards. These can make approval from the App Store more difficult, taking 4-5 days for an app to be granted one.
Cross-Platform App Development
The Pros: Essentially, cross-platform app development allows you to develop two apps---both for Android and iOS---at the same time. The tools you can use reduces the time and costs related to app development on both platforms. One of the most influential frameworks currently out there is React Native.
React Native is the brainchild of Facebook with the goal of having a framework for smooth and easy cross-platform mobile development. This means no more creating apps separately for Android and iOS. All it takes is one codebase and you’ll be able to create awesome apps that work on both platforms without compromising user experience or interface.
Since cross-platform app development has a ‘write once, run everywhere’ approach, it greatly reduces costs and development time. This means there is no need to learn multiple technologies; all you need is to master a few and you can set things in motion. Initial deployment for your app will move along much faster due to its single codebase nature.
Additionally, any changes needed to be done on the app can be implemented simultaneously without making separate changes on each platform. In terms of business, it’s ideal to develop cross-platform apps to reach a wider audience, which would ultimately lead to higher revenues.
The Cons: Compared to Android and iOS, cross-platform apps do not perfectly integrate into their target operating systems. This results in some apps failing to perform at an optimal level due to erratic communication between cross-platform code and the device’s Android or iOS components. This may also result in failure when it comes to delivering optimized user experiences.
Conclusion
Your choice will entirely depend on your business goals and budget. Each of these platforms has its strengths and weaknesses, but to help you decide, you should know what’s going to work for your business. After careful consideration of your costing, the time of release, and the reach/target audience you’re aiming for, you may have a clearer picture as to where you would want to build your app.
Looking for a pro to help with your mobile app development project? Contact our seasoned experts at Intelligent Bee to learn what we can do for your business!
Introduction to iBeacons on iOS
Hello, I got my hands on some interesting devices from Estimote called iBeacons which they are used for sending signals to the users (iOS/ Android) phone using Bluetooth.
What I’m going to do next is to build an iOS app using these devices which changes the background color accordingly to the nearest one of these 3 beacons.
![]()
Introduction to iBeacons on iOS
The first thing that you have to do after you create a new project from XCode of Single View Application type is to install ‘EstimoteSDK’ using Cocoa pods. If you don’t have Cocoapods installed on your Mac please do it by following the instructions they offer.
From the terminal window use "cd" to navigate into your project directory and run "pod init". This will create a podfile in your project directory. Open it and under "# Pods for your project name" add the following line:
pod 'EstimoteSDK'
Then run "pod install" command in your terminal. After the installation of the cocoapod close the project and open the .workspace file and create a bridging header. Import there the EstimoteSDK with the code below.
#import <EstimoteSDK/EstimoteSDK.h>
Now let’s continue by creating a ‘iBeaconViewController’ with a UILabel inside of it having full width and height and the text aligned center, after this please create an IBOutlet to it and name it 'label' . Then set the new created view controller as the root view for the window.
 func application(_ application: UIApplication, didFinishLaunchingWithOptions launchOptions: [UIApplicationLaunchOptionsKey: Any]?) -> Bool {
        // Override point for customization after application launch.

        window?.rootViewController = UIBeaconViewController(nibName: String(describing: UIBeaconViewController.self), bundle: nil)

        return true
    }
The next step is creating the ‘BeaconManager’< file, you have it’s content below.
import UIKit

enum MyBeacon: String {

    case pink = "4045"
    case magenta = "20372"
    case yellow = "22270"
}

let BeaconsUUID: String = "B9407F30-F5F8-466E-AFF9-25556B57FE6D"
let RegionIdentifier: String  = "IntelligentBee Office"
let BeaconsMajorID: UInt16  = 11111

class BeaconManager: ESTBeaconManager {

    static let main : BeaconManager = BeaconManager()

}
But let’s first explain what is the purpose of each item in this file. So an iBeacon contains the following main properties, an UUID, MajorID, MinorID. All of these properties represents a way for the phone to know which device should listen to.
The MajorID is used when having groups of beacons and the MinorID is to know each specific device, the minor ids are represented in the MyBeacon enum among with the beacon color. The RegionIdentifier represents a way for the app to know what region are the beacons part of and it’s used to differentiate all the regions that are monitored by the app.
Now let’s go back on the UIBeaconViewController and start writing some action.
import UIKit

class UIBeaconViewController: UIViewController, ESTBeaconManagerDelegate {

    // MARK: - Props

    let region = CLBeaconRegion(
        proximityUUID: UUID(uuidString: BeaconsUUID)!,
        major: BeaconsMajorID, identifier: RegionIdentifier)

    let colors: [MyBeacon : UIColor] =
        [MyBeacon.pink: UIColor(red: 240/255.0, green: 183/255.0, blue: 183/255.0, alpha: 1),
         MyBeacon.magenta : UIColor(red: 149/255.0, green: 70/255.0, blue: 91/255.0, alpha: 1),
         MyBeacon.yellow : UIColor(red: 251/255.0, green: 254/255.0, blue: 53/255.0, alpha: 1)]

    // MARK: - IBOutlets

    @IBOutlet weak var label: UILabel!
You can guess what region does, it defines a location to detect beacons, pretty intuitive. The colors is an array which contains the mapping between the minorID and the color of each beacon.
// MARK: - UI Utilities

    func resetBackgroundColor() {
        self.view.backgroundColor = UIColor.green
    }

    // MARK: - ESTBeaconManagerDelegate - Utilities

    func setupBeaconManager() {
        BeaconManager.main.delegate = self

        if (BeaconManager.main.isAuthorizedForMonitoring() && BeaconManager.main.isAuthorizedForRanging()) == false {
            BeaconManager.main.requestAlwaysAuthorization()
        }
    }

    func startMonitoring() {

        BeaconManager.main.startMonitoring(for: region)
        BeaconManager.main.startRangingBeacons(in: region)
    }
The functions above are pretty self describing from their names, one thing I need to describe is Monitoring and Ranging. The monitoring actions are triggered when the phone enters/ exits a beacons area and the ranging is based on the proximity of the beacon.
    // MARK: - ESTBeaconManagerDelegate

    func beaconManager(_ manager: Any, didChange status: CLAuthorizationStatus) {

        if status == .authorizedAlways ||
            status == .authorizedWhenInUse {
            startMonitoring()
        }
    }

    func beaconManager(_ manager: Any, monitoringDidFailFor region: CLBeaconRegion?, withError error: Error) {
        label.text = "FAIL " + (region?.proximityUUID.uuidString)!
    }

    func beaconManager(_ manager: Any, didEnter region: CLBeaconRegion) {

        label.text = "Hello beacons from \(region.identifier)"
    }

    func beaconManager(_ manager: Any, didExitRegion region: CLBeaconRegion) {

        label.text = "Bye bye beacons from \(region.identifier)"
    }

    func beaconManager(_ manager: Any, didRangeBeacons beacons: [CLBeacon], in region: CLBeaconRegion) {

        let knownBeacons = beacons.filter { (beacon) -> Bool in

            return beacon.proximity != CLProximity.unknown
        }

        if let firstBeacon = knownBeacons.first,
            let myBeacon = MyBeacon(rawValue:firstBeacon.minor.stringValue)   {

            let beaconColor = colors[myBeacon]
            self.view.backgroundColor = beaconColor
        }
        else {
            resetBackgroundColor()
        }
    }

    func beaconManager(_ manager: Any, didFailWithError error: Error) {
        label.text = "DID FAIL WITH ERROR" + error.localizedDescription
    }
}
After the insertion of all the code, the app should run with no errors or warning and should look like this:
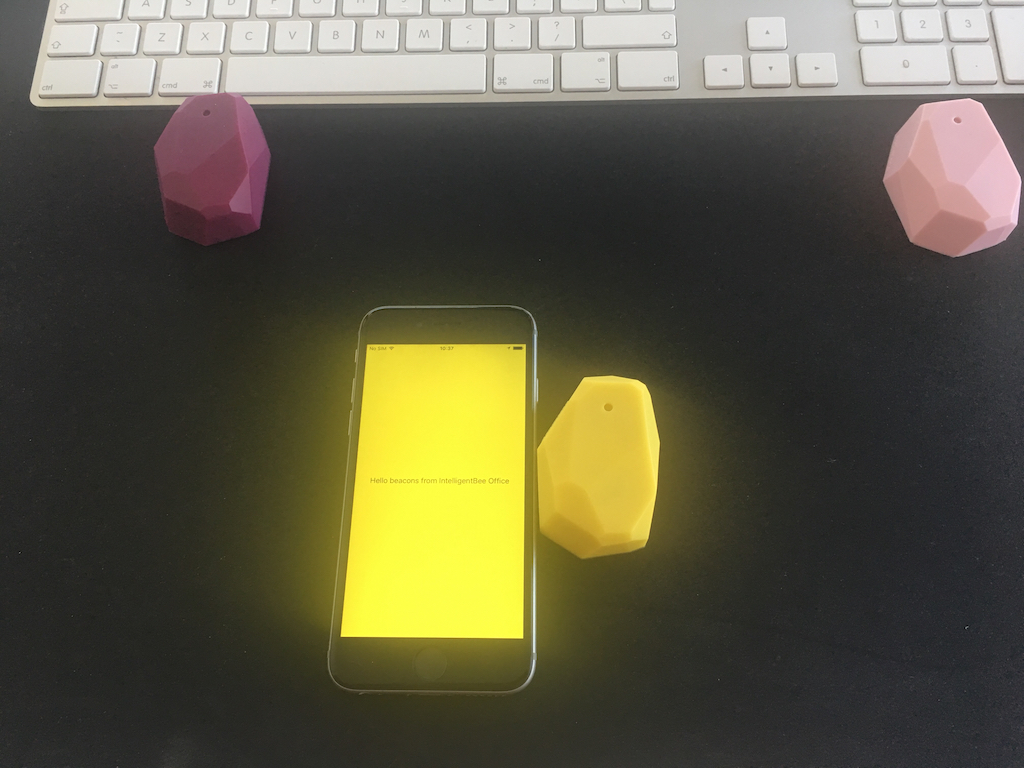
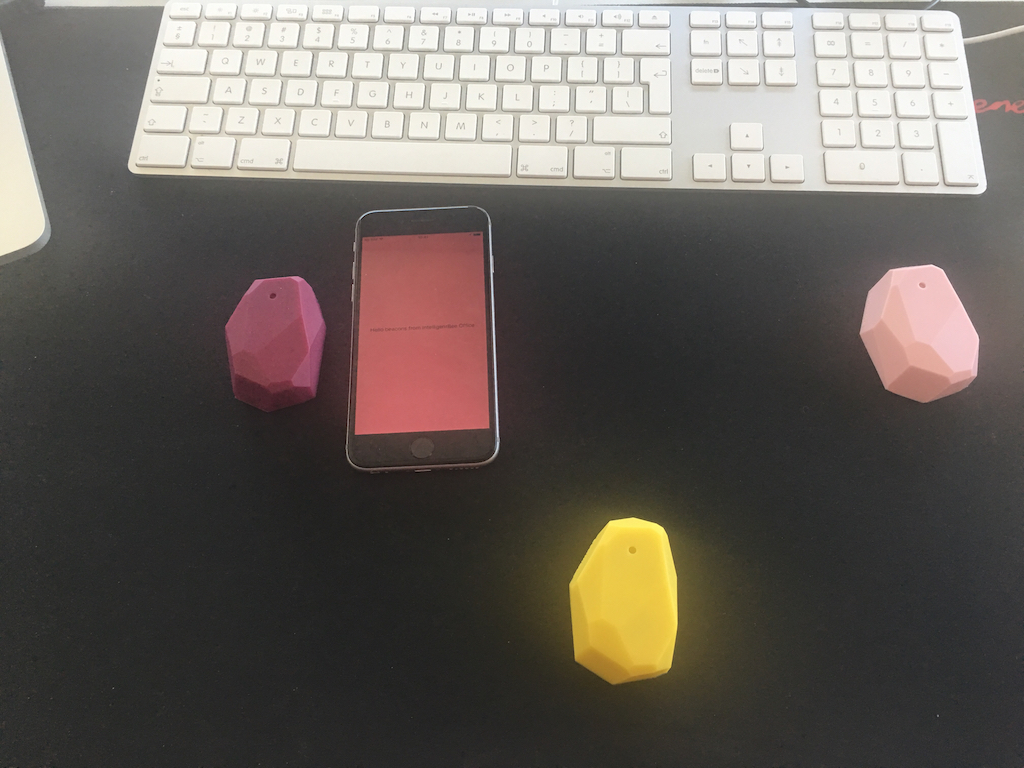
I hope this is a good introduction for iBeacons in iOS Mobile App Development. If you have any improvements or suggestions please leave a comment below.
You can get the code from here: https://github.com/intelligentbee/iBeaconTest
How to create a bridging header in iOS
Hello ! If you want to import a Objective-C code into a Swift Xcode project you definitely have to create a bridging header (this allows you to communicate with your old Objective-C classes from your Swift classes).
The process of doing this is very easy. Go to File -> New -> File… , a window will appear in which you will select “Objective-C File” , name the file however you choose, then select Create. A pop-up will appear asking you if you want to create a bridging header like in the image bellow.

Choose “Create Bridging Header” and voila, you a have it.
To complete the process delete the .m file that you choose the name and move the bridging header to a more suitable group inside the project navigator.
That’s it, hope you find this post useful and if you have suggestions please leave a comment below.
Face Detection with Apple’s iOS 11 Vision Framework
Great stuff is coming from Apple this autumn! Among a lot of new APIs there is the Vision Framework which helps with detection of faces, face features, object tracking and others.
In this post we will take a look at how can one put the face detection to work. We will make a simple application that can take a photo (using the camera of from the library) and will draw some lines on the faces it detects to show you the power of Vision.
Select an Image
I will go fast through this so if you are a really beginner and you find this too hard to follow, please check the my previous iOS related post, Building a Travel Photo Sharing iOS App, first, as it has the same photo selection functionality but explained in greater detail.
You will need Xcode 9 beta and a device running iOS 11 beta to test this. Let’s start by creating a new Single View App project named FaceVision:

Open the Main.storyboard and drag a button Take Photo to the center of it. Use the constraints to make it stay there :) Create a takePhoto action for it:
@IBAction func takePhoto(_ sender: UIButton) {
    let picker = UIImagePickerController()
    picker.delegate = self
    let alert = UIAlertController(title: nil, message: nil, preferredStyle: .actionSheet)
    if UIImagePickerController.isSourceTypeAvailable(.camera) {
        alert.addAction(UIAlertAction(title: "Camera", style: .default, handler: {action in
            picker.sourceType = .camera
            self.present(picker, animated: true, completion: nil)
        }))
    }
    alert.addAction(UIAlertAction(title: "Photo Library", style: .default, handler: { action in
        picker.sourceType = .photoLibrary
        // on iPad we are required to present this as a popover
        if UIDevice.current.userInterfaceIdiom == .pad {
            picker.modalPresentationStyle = .popover
            picker.popoverPresentationController?.sourceView = self.view
            picker.popoverPresentationController?.sourceRect = self.takePhotoButton.frame
        }
        self.present(picker, animated: true, completion: nil)
    }))
    alert.addAction(UIAlertAction(title: "Cancel", style: .cancel, handler: nil))
    // on iPad this is a popover
    alert.popoverPresentationController?.sourceView = self.view
    alert.popoverPresentationController?.sourceRect = takePhotoButton.frame
    self.present(alert, animated: true, completion: nil)
}
Here we used an UIImagePickerController to get an image so we have to make our ViewController implement the UIImagePickerControllerDelegate and UINavigationControllerDelegate protocols:
class ViewController: UIViewController, UIImagePickerControllerDelegate, UINavigationControllerDelegate {We also need an outlet for the button:
@IBOutlet weak var takePhotoButton: UIButton!
And an image var:
var image: UIImage!
We also need to add the following in the Info.plist to be able to access the camera and the photo library:
Privacy - Camera Usage Description: Access to the camera is needed in order to be able to take a photo to be analyzed by the appPrivacy - Photo Library Usage Description: Access to the photo library is needed in order to be able to choose a photo to be analyzed by the app
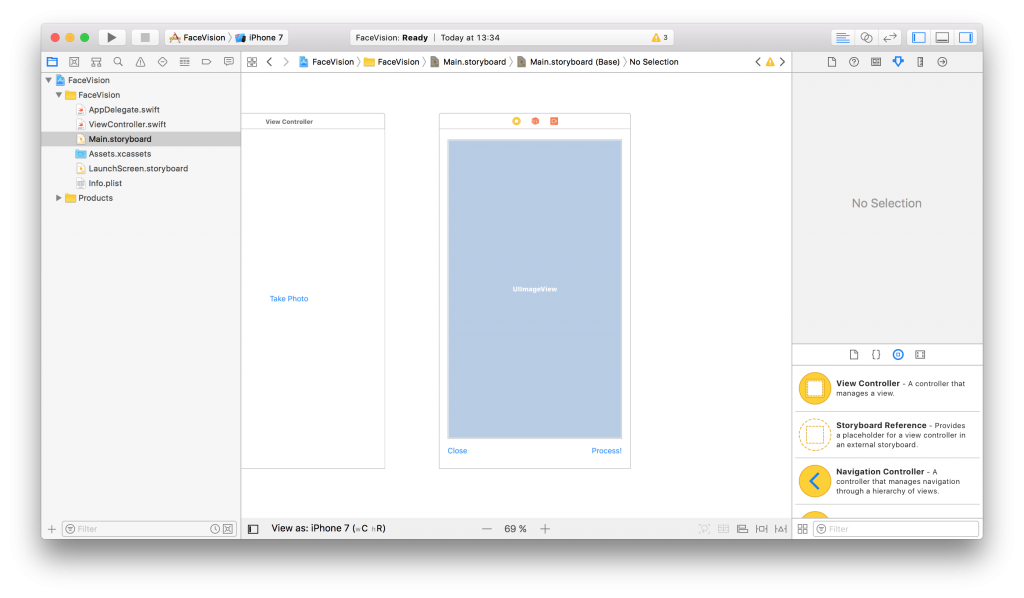
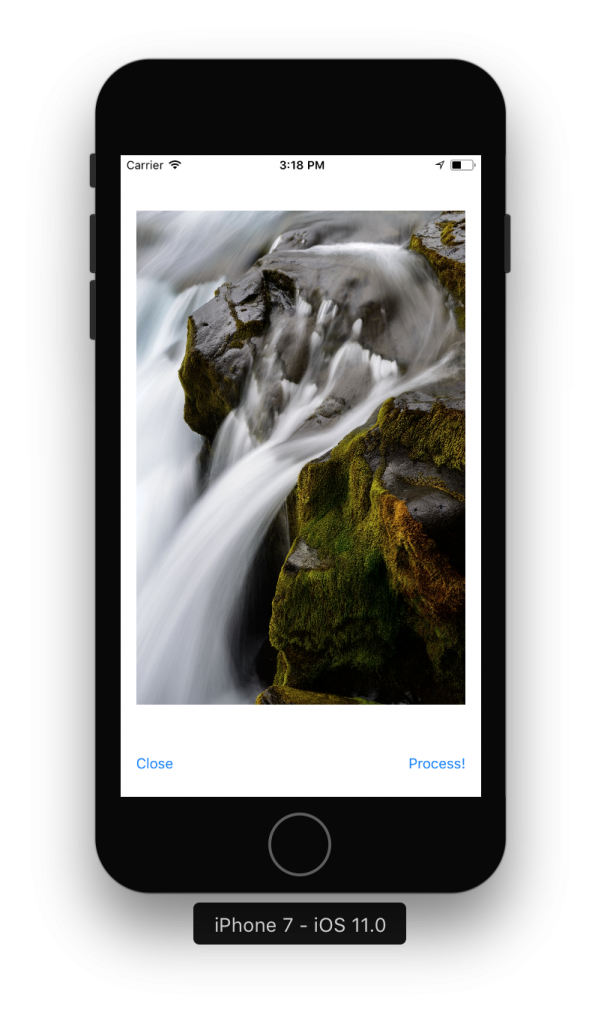
After the users chooses an image we will use another view controller to show it and to let the user start the processing or go back to the first screen. Add a new View Controller in the Main.storyboard. In it, add an Image View with an Aspect Fit Content Mode and two buttons like in the image below (don’t forget to use the necessary constraints):
Now, create a new UIViewController class named ImageViewControler.swift and set it to be the class of the new View Controller you just added in the Main.storyboard:
import UIKit

class ImageViewController: UIViewController {

    override func viewDidLoad() {
        super.viewDidLoad()

        // Do any additional setup after loading the view.
    }
}
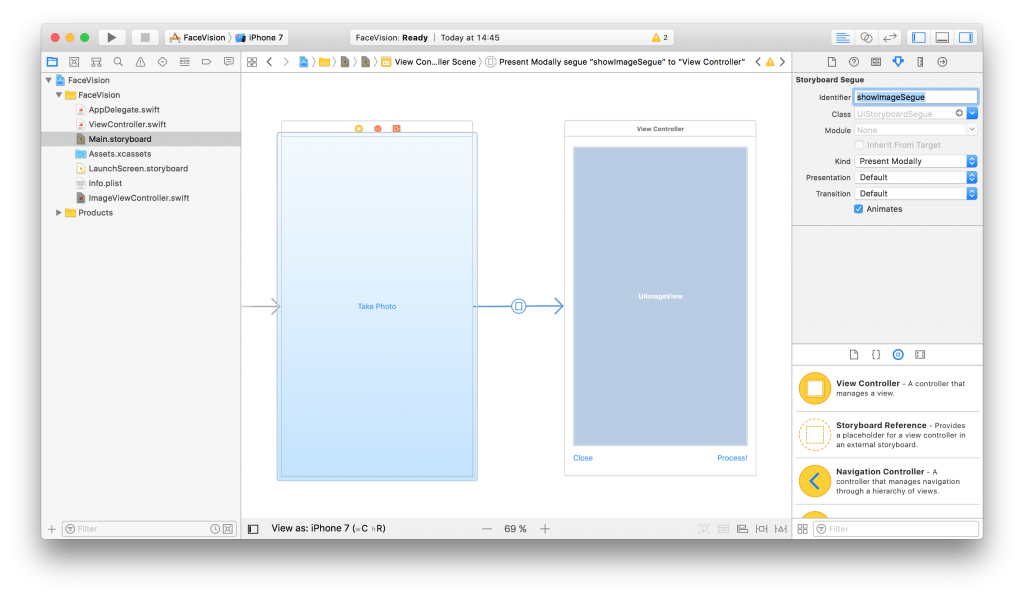
Still in the Main.storyboard, create a Present Modally kind segue between the two view controllers with the showImageSegue identifier:
Also add an outlet for the Image View and a new property to hold the image from the user:
@IBOutlet weak var imageView: UIImageView!

var image: UIImage!
Now, back to our initial ViewController class, we need to present the new ImageViewController and set the selected image:
func imagePickerController(_ picker: UIImagePickerController, didFinishPickingMediaWithInfo info: [String : Any]) {
    dismiss(animated: true, completion: nil)
    image = info[UIImagePickerControllerOriginalImage] as! UIImage
    performSegue(withIdentifier: "showImageSegue", sender: self)
}

override func prepare(for segue: UIStoryboardSegue, sender: Any?) {
    if segue.identifier == "showImageSegue" {
        if let imageViewController = segue.destination as? ImageViewController {
            imageViewController.image = self.image
        }
    }
}
We also need an exit method to be called when we press the Close button from the Image View Controller:
@IBAction func exit(unwindSegue: UIStoryboardSegue) {
    image = nil
}
To make this work, head back to the Main.storyboard and Ctrl+drag from the Close button to the exit icon of the Image View Controller and select the exit method from the popup.
To actually show the selected image to the user we have to set it to the imageView:
override func viewDidLoad() {
    super.viewDidLoad()

    // Do any additional setup after loading the view.
    imageView.image = image
}
If you run the app now you should be able to select a photo either from the camera or from the library and it will be presented to you in the second view controller with the Close and Process! buttons below it.
Detect Face Features
It’s time to get to the fun part, detect the faces and faces features in the image.
Create a new process action for the Process! button with the following content:
@IBAction func process(_ sender: UIButton) {
    var orientation:Int32 = 0

    // detect image orientation, we need it to be accurate for the face detection to work
    switch image.imageOrientation {
    case .up:
        orientation = 1
    case .right:
        orientation = 6
    case .down:
        orientation = 3
    case .left:
        orientation = 8
    default:
        orientation = 1
    }

    // vision
    let faceLandmarksRequest = VNDetectFaceLandmarksRequest(completionHandler: self.handleFaceFeatures)
    let requestHandler = VNImageRequestHandler(cgImage: image.cgImage!, orientation: orientation ,options: [:])
    do {
        try requestHandler.perform([faceLandmarksRequest])
    } catch {
        print(error)
    }
}
After translating the image orientation from UIImageOrientationx values to kCGImagePropertyOrientation values (not sure why Apple didn’t make them the same), the code will start the detection process from the Vision framework. Don’t forget to import Vision to have access to it’s API.
We’ll add now the method that will be called when the Vision’s processing is done:
func handleFaceFeatures(request: VNRequest, errror: Error?) {
    guard let observations = request.results as? [VNFaceObservation] else {
        fatalError("unexpected result type!")
    }

    for face in observations {
        addFaceLandmarksToImage(face)
    }
}
This also calls yet another method that does the actual drawing on the image based on the data received from the detect face landmarks request:
func addFaceLandmarksToImage(_ face: VNFaceObservation) {
    UIGraphicsBeginImageContextWithOptions(image.size, true, 0.0)
    let context = UIGraphicsGetCurrentContext()

    // draw the image
    image.draw(in: CGRect(x: 0, y: 0, width: image.size.width, height: image.size.height))

    context?.translateBy(x: 0, y: image.size.height)
    context?.scaleBy(x: 1.0, y: -1.0)

    // draw the face rect
    let w = face.boundingBox.size.width * image.size.width
    let h = face.boundingBox.size.height * image.size.height
    let x = face.boundingBox.origin.x * image.size.width
    let y = face.boundingBox.origin.y * image.size.height
    let faceRect = CGRect(x: x, y: y, width: w, height: h)
    context?.saveGState()
    context?.setStrokeColor(UIColor.red.cgColor)
    context?.setLineWidth(8.0)
    context?.addRect(faceRect)
    context?.drawPath(using: .stroke)
    context?.restoreGState()

    // face contour
    context?.saveGState()
    context?.setStrokeColor(UIColor.yellow.cgColor)
    if let landmark = face.landmarks?.faceContour {
        for i in 0...landmark.pointCount - 1 { // last point is 0,0
            let point = landmark.point(at: i)
            if i == 0 {
                context?.move(to: CGPoint(x: x + CGFloat(point.x) * w, y: y + CGFloat(point.y) * h))
            } else {
                context?.addLine(to: CGPoint(x: x + CGFloat(point.x) * w, y: y + CGFloat(point.y) * h))
            }
        }
    }
    context?.setLineWidth(8.0)
    context?.drawPath(using: .stroke)
    context?.saveGState()

    // outer lips
    context?.saveGState()
    context?.setStrokeColor(UIColor.yellow.cgColor)
    if let landmark = face.landmarks?.outerLips {
        for i in 0...landmark.pointCount - 1 { // last point is 0,0
            let point = landmark.point(at: i)
            if i == 0 {
                context?.move(to: CGPoint(x: x + CGFloat(point.x) * w, y: y + CGFloat(point.y) * h))
            } else {
                context?.addLine(to: CGPoint(x: x + CGFloat(point.x) * w, y: y + CGFloat(point.y) * h))
            }
        }
    }
    context?.closePath()
    context?.setLineWidth(8.0)
    context?.drawPath(using: .stroke)
    context?.saveGState()

    // inner lips
    context?.saveGState()
    context?.setStrokeColor(UIColor.yellow.cgColor)
    if let landmark = face.landmarks?.innerLips {
        for i in 0...landmark.pointCount - 1 { // last point is 0,0
            let point = landmark.point(at: i)
            if i == 0 {
                context?.move(to: CGPoint(x: x + CGFloat(point.x) * w, y: y + CGFloat(point.y) * h))
            } else {
                context?.addLine(to: CGPoint(x: x + CGFloat(point.x) * w, y: y + CGFloat(point.y) * h))
            }
        }
    }
    context?.closePath()
    context?.setLineWidth(8.0)
    context?.drawPath(using: .stroke)
    context?.saveGState()

    // left eye
    context?.saveGState()
    context?.setStrokeColor(UIColor.yellow.cgColor)
    if let landmark = face.landmarks?.leftEye {
        for i in 0...landmark.pointCount - 1 { // last point is 0,0
            let point = landmark.point(at: i)
            if i == 0 {
                context?.move(to: CGPoint(x: x + CGFloat(point.x) * w, y: y + CGFloat(point.y) * h))
            } else {
                context?.addLine(to: CGPoint(x: x + CGFloat(point.x) * w, y: y + CGFloat(point.y) * h))
            }
        }
    }
    context?.closePath()
    context?.setLineWidth(8.0)
    context?.drawPath(using: .stroke)
    context?.saveGState()

    // right eye
    context?.saveGState()
    context?.setStrokeColor(UIColor.yellow.cgColor)
    if let landmark = face.landmarks?.rightEye {
        for i in 0...landmark.pointCount - 1 { // last point is 0,0
            let point = landmark.point(at: i)
            if i == 0 {
                context?.move(to: CGPoint(x: x + CGFloat(point.x) * w, y: y + CGFloat(point.y) * h))
            } else {
                context?.addLine(to: CGPoint(x: x + CGFloat(point.x) * w, y: y + CGFloat(point.y) * h))
            }
        }
    }
    context?.closePath()
    context?.setLineWidth(8.0)
    context?.drawPath(using: .stroke)
    context?.saveGState()

    // left pupil
    context?.saveGState()
    context?.setStrokeColor(UIColor.yellow.cgColor)
    if let landmark = face.landmarks?.leftPupil {
        for i in 0...landmark.pointCount - 1 { // last point is 0,0
            let point = landmark.point(at: i)
            if i == 0 {
                context?.move(to: CGPoint(x: x + CGFloat(point.x) * w, y: y + CGFloat(point.y) * h))
            } else {
                context?.addLine(to: CGPoint(x: x + CGFloat(point.x) * w, y: y + CGFloat(point.y) * h))
            }
        }
    }
    context?.closePath()
    context?.setLineWidth(8.0)
    context?.drawPath(using: .stroke)
    context?.saveGState()

    // right pupil
    context?.saveGState()
    context?.setStrokeColor(UIColor.yellow.cgColor)
    if let landmark = face.landmarks?.rightPupil {
        for i in 0...landmark.pointCount - 1 { // last point is 0,0
            let point = landmark.point(at: i)
            if i == 0 {
                context?.move(to: CGPoint(x: x + CGFloat(point.x) * w, y: y + CGFloat(point.y) * h))
            } else {
                context?.addLine(to: CGPoint(x: x + CGFloat(point.x) * w, y: y + CGFloat(point.y) * h))
            }
        }
    }
    context?.closePath()
    context?.setLineWidth(8.0)
    context?.drawPath(using: .stroke)
    context?.saveGState()

    // left eyebrow
    context?.saveGState()
    context?.setStrokeColor(UIColor.yellow.cgColor)
    if let landmark = face.landmarks?.leftEyebrow {
        for i in 0...landmark.pointCount - 1 { // last point is 0,0
            let point = landmark.point(at: i)
            if i == 0 {
                context?.move(to: CGPoint(x: x + CGFloat(point.x) * w, y: y + CGFloat(point.y) * h))
            } else {
                context?.addLine(to: CGPoint(x: x + CGFloat(point.x) * w, y: y + CGFloat(point.y) * h))
            }
        }
    }
    context?.setLineWidth(8.0)
    context?.drawPath(using: .stroke)
    context?.saveGState()

    // right eyebrow
    context?.saveGState()
    context?.setStrokeColor(UIColor.yellow.cgColor)
    if let landmark = face.landmarks?.rightEyebrow {
        for i in 0...landmark.pointCount - 1 { // last point is 0,0
            let point = landmark.point(at: i)
            if i == 0 {
                context?.move(to: CGPoint(x: x + CGFloat(point.x) * w, y: y + CGFloat(point.y) * h))
            } else {
                context?.addLine(to: CGPoint(x: x + CGFloat(point.x) * w, y: y + CGFloat(point.y) * h))
            }
        }
    }
    context?.setLineWidth(8.0)
    context?.drawPath(using: .stroke)
    context?.saveGState()

    // nose
    context?.saveGState()
    context?.setStrokeColor(UIColor.yellow.cgColor)
    if let landmark = face.landmarks?.nose {
        for i in 0...landmark.pointCount - 1 { // last point is 0,0
            let point = landmark.point(at: i)
            if i == 0 {
                context?.move(to: CGPoint(x: x + CGFloat(point.x) * w, y: y + CGFloat(point.y) * h))
            } else {
                context?.addLine(to: CGPoint(x: x + CGFloat(point.x) * w, y: y + CGFloat(point.y) * h))
            }
        }
    }
    context?.closePath()
    context?.setLineWidth(8.0)
    context?.drawPath(using: .stroke)
    context?.saveGState()

    // nose crest
    context?.saveGState()
    context?.setStrokeColor(UIColor.yellow.cgColor)
    if let landmark = face.landmarks?.noseCrest {
        for i in 0...landmark.pointCount - 1 { // last point is 0,0
            let point = landmark.point(at: i)
            if i == 0 {
                context?.move(to: CGPoint(x: x + CGFloat(point.x) * w, y: y + CGFloat(point.y) * h))
            } else {
                context?.addLine(to: CGPoint(x: x + CGFloat(point.x) * w, y: y + CGFloat(point.y) * h))
            }
        }
    }
    context?.setLineWidth(8.0)
    context?.drawPath(using: .stroke)
    context?.saveGState()

    // median line
    context?.saveGState()
    context?.setStrokeColor(UIColor.yellow.cgColor)
    if let landmark = face.landmarks?.medianLine {
        for i in 0...landmark.pointCount - 1 { // last point is 0,0
            let point = landmark.point(at: i)
            if i == 0 {
                context?.move(to: CGPoint(x: x + CGFloat(point.x) * w, y: y + CGFloat(point.y) * h))
            } else {
                context?.addLine(to: CGPoint(x: x + CGFloat(point.x) * w, y: y + CGFloat(point.y) * h))
            }
        }
    }
    context?.setLineWidth(8.0)
    context?.drawPath(using: .stroke)
    context?.saveGState()

    // get the final image
    let finalImage = UIGraphicsGetImageFromCurrentImageContext()

    // end drawing context
    UIGraphicsEndImageContext()

    imageView.image = finalImage
}
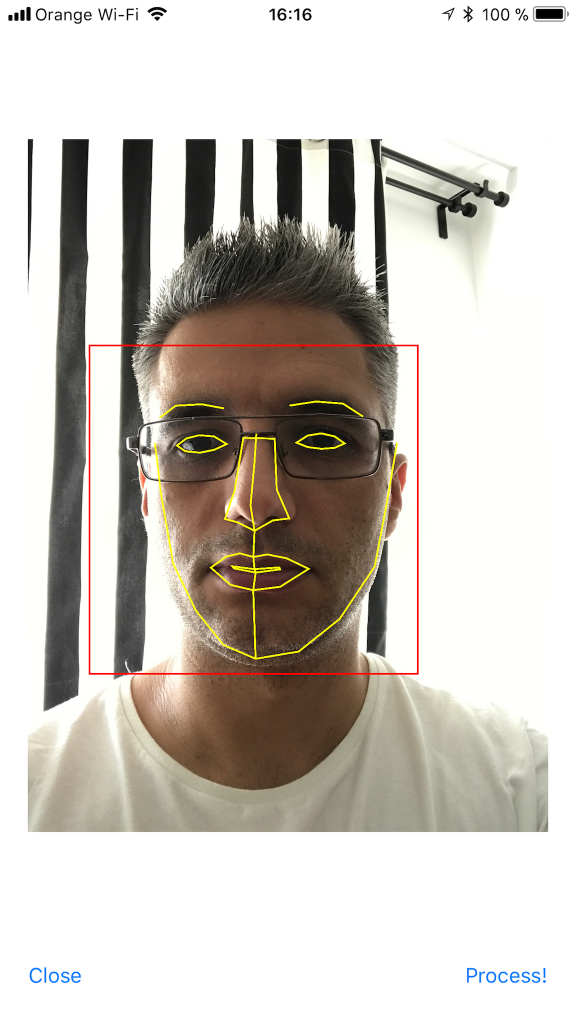
As you can see we have quite a lot of features that Vision is able to identify: the face contour, the mouth (both inner and outer lips), the eyes together with the pupils and eyebrows, the nose and the nose crest and, finally, the median line of the faces.
You can now run the app and take some unusual selfies of yourself. Here’s mine:
I hope you enjoyed this, please let me know in the comments how did it go and if there are things that can be improved. Also, some pictures taken with the app wouldn’t hurt at all :)
You can get the code from here: https://github.com/intelligentbee/FaceVision
Thanks!
iOS vs. Android - Which One Should You Choose?
Six users, six questions. After a (very) long research about which mobile OS is better between the two, I realized that the simplest way to find that out is by actually talking to people that use them. As you might expect, everyone has its own requirements and tastes, but in the end, one of the two OSs clearly stands out.
