Face Detection with Apple’s iOS 11 Vision Framework
Great stuff is coming from Apple this autumn! Among a lot of new APIs there is the Vision Framework which helps with detection of faces, face features, object tracking and others.
In this post we will take a look at how can one put the face detection to work. We will make a simple application that can take a photo (using the camera of from the library) and will draw some lines on the faces it detects to show you the power of Vision.
Select an Image
I will go fast through this so if you are a really beginner and you find this too hard to follow, please check the my previous iOS related post, Building a Travel Photo Sharing iOS App, first, as it has the same photo selection functionality but explained in greater detail.
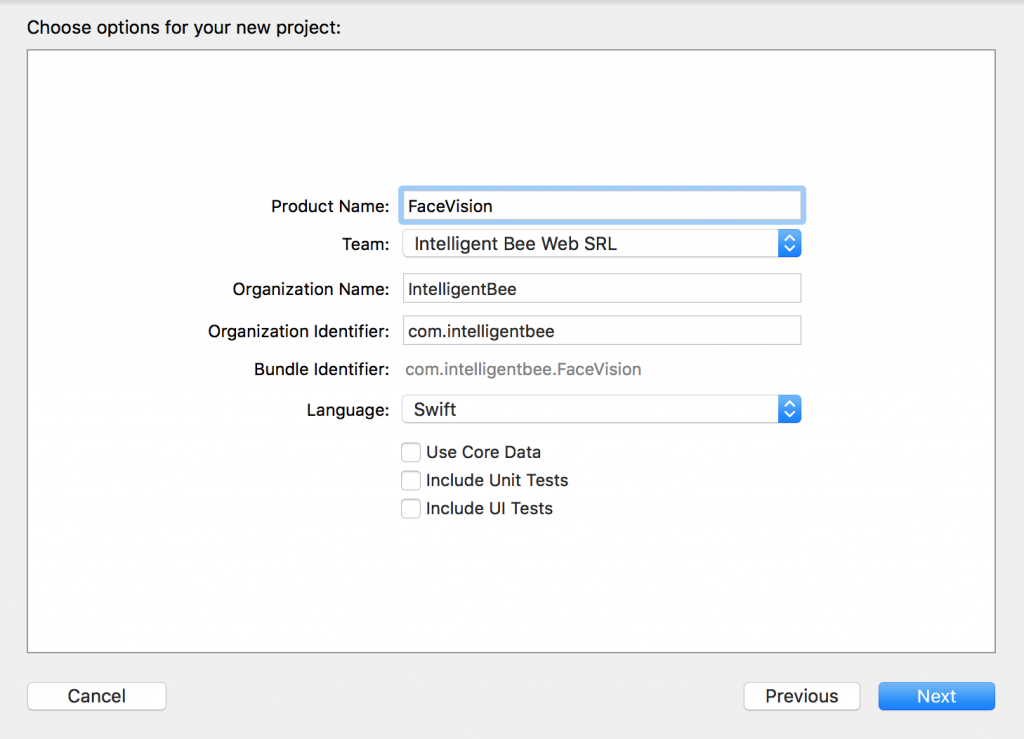
You will need Xcode 9 beta and a device running iOS 11 beta to test this. Let’s start by creating a new Single View App project named FaceVision:
Open the Main.storyboard and drag a button Take Photo to the center of it. Use the constraints to make it stay there :) Create a takePhoto action for it:
@IBAction func takePhoto(_ sender: UIButton) {
    let picker = UIImagePickerController()
    picker.delegate = self
    let alert = UIAlertController(title: nil, message: nil, preferredStyle: .actionSheet)
    if UIImagePickerController.isSourceTypeAvailable(.camera) {
        alert.addAction(UIAlertAction(title: "Camera", style: .default, handler: {action in
            picker.sourceType = .camera
            self.present(picker, animated: true, completion: nil)
        }))
    }
    alert.addAction(UIAlertAction(title: "Photo Library", style: .default, handler: { action in
        picker.sourceType = .photoLibrary
        // on iPad we are required to present this as a popover
        if UIDevice.current.userInterfaceIdiom == .pad {
            picker.modalPresentationStyle = .popover
            picker.popoverPresentationController?.sourceView = self.view
            picker.popoverPresentationController?.sourceRect = self.takePhotoButton.frame
        }
        self.present(picker, animated: true, completion: nil)
    }))
    alert.addAction(UIAlertAction(title: "Cancel", style: .cancel, handler: nil))
    // on iPad this is a popover
    alert.popoverPresentationController?.sourceView = self.view
    alert.popoverPresentationController?.sourceRect = takePhotoButton.frame
    self.present(alert, animated: true, completion: nil)
}
Here we used an UIImagePickerController to get an image so we have to make our ViewController implement the UIImagePickerControllerDelegate and UINavigationControllerDelegate protocols:
class ViewController: UIViewController, UIImagePickerControllerDelegate, UINavigationControllerDelegate {We also need an outlet for the button:
@IBOutlet weak var takePhotoButton: UIButton!
And an image var:
var image: UIImage!
We also need to add the following in the Info.plist to be able to access the camera and the photo library:
Privacy - Camera Usage Description: Access to the camera is needed in order to be able to take a photo to be analyzed by the appPrivacy - Photo Library Usage Description: Access to the photo library is needed in order to be able to choose a photo to be analyzed by the app
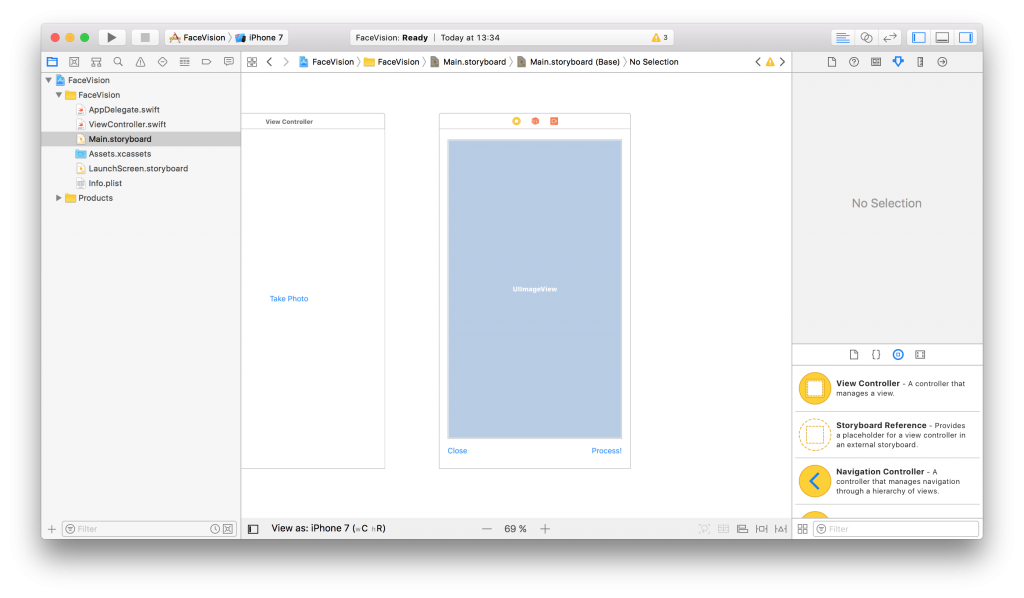
After the users chooses an image we will use another view controller to show it and to let the user start the processing or go back to the first screen. Add a new View Controller in the Main.storyboard. In it, add an Image View with an Aspect Fit Content Mode and two buttons like in the image below (don’t forget to use the necessary constraints):
Now, create a new UIViewController class named ImageViewControler.swift and set it to be the class of the new View Controller you just added in the Main.storyboard:
import UIKit

class ImageViewController: UIViewController {

    override func viewDidLoad() {
        super.viewDidLoad()

        // Do any additional setup after loading the view.
    }
}
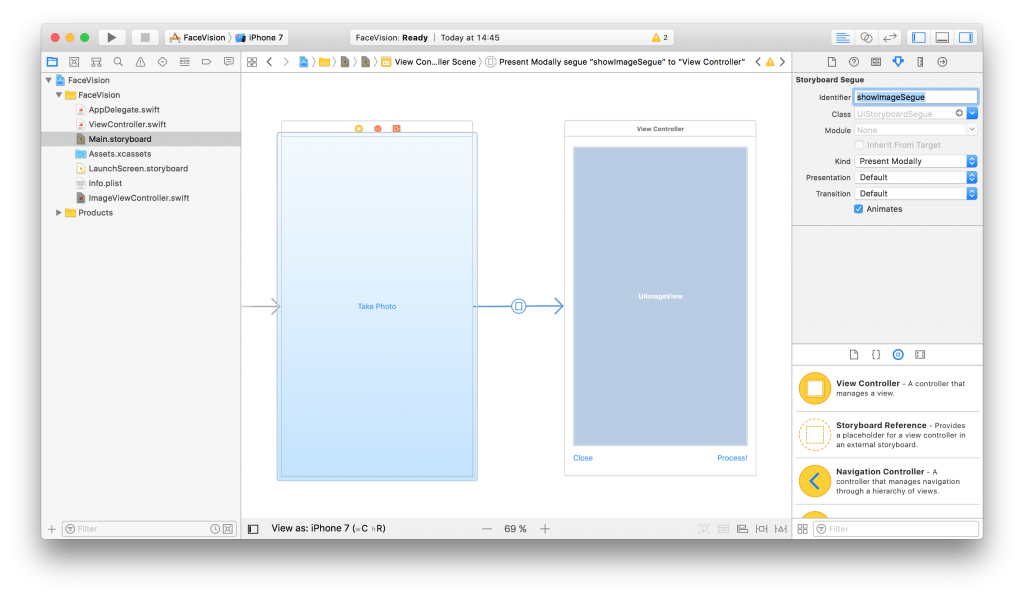
Still in the Main.storyboard, create a Present Modally kind segue between the two view controllers with the showImageSegue identifier:
Also add an outlet for the Image View and a new property to hold the image from the user:
@IBOutlet weak var imageView: UIImageView!

var image: UIImage!
Now, back to our initial ViewController class, we need to present the new ImageViewController and set the selected image:
func imagePickerController(_ picker: UIImagePickerController, didFinishPickingMediaWithInfo info: [String : Any]) {
    dismiss(animated: true, completion: nil)
    image = info[UIImagePickerControllerOriginalImage] as! UIImage
    performSegue(withIdentifier: "showImageSegue", sender: self)
}

override func prepare(for segue: UIStoryboardSegue, sender: Any?) {
    if segue.identifier == "showImageSegue" {
        if let imageViewController = segue.destination as? ImageViewController {
            imageViewController.image = self.image
        }
    }
}
We also need an exit method to be called when we press the Close button from the Image View Controller:
@IBAction func exit(unwindSegue: UIStoryboardSegue) {
    image = nil
}
To make this work, head back to the Main.storyboard and Ctrl+drag from the Close button to the exit icon of the Image View Controller and select the exit method from the popup.
To actually show the selected image to the user we have to set it to the imageView:
override func viewDidLoad() {
    super.viewDidLoad()

    // Do any additional setup after loading the view.
    imageView.image = image
}
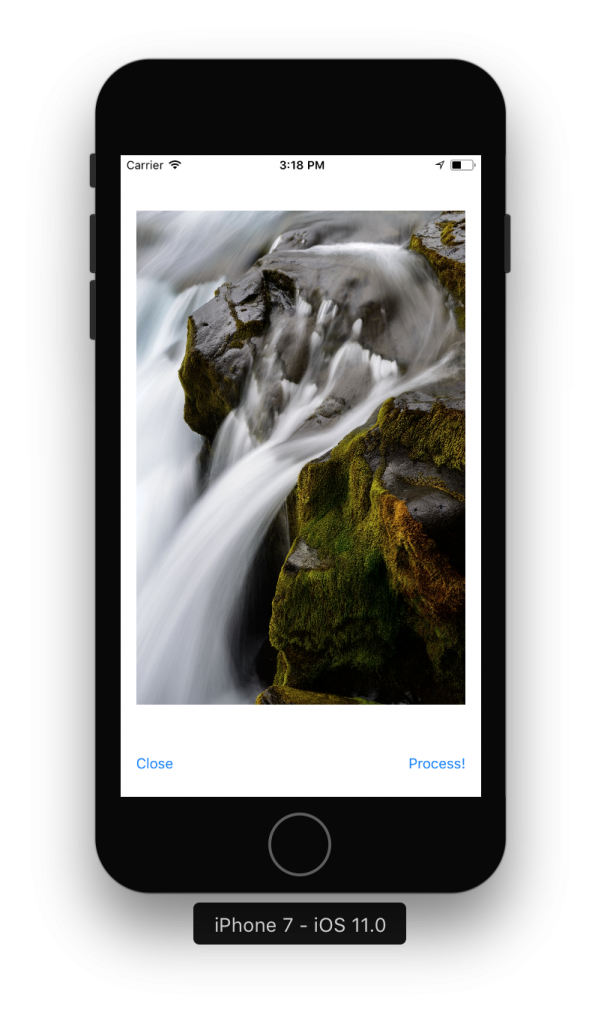
If you run the app now you should be able to select a photo either from the camera or from the library and it will be presented to you in the second view controller with the Close and Process! buttons below it.
Detect Face Features
It’s time to get to the fun part, detect the faces and faces features in the image.
Create a new process action for the Process! button with the following content:
@IBAction func process(_ sender: UIButton) {
    var orientation:Int32 = 0

    // detect image orientation, we need it to be accurate for the face detection to work
    switch image.imageOrientation {
    case .up:
        orientation = 1
    case .right:
        orientation = 6
    case .down:
        orientation = 3
    case .left:
        orientation = 8
    default:
        orientation = 1
    }

    // vision
    let faceLandmarksRequest = VNDetectFaceLandmarksRequest(completionHandler: self.handleFaceFeatures)
    let requestHandler = VNImageRequestHandler(cgImage: image.cgImage!, orientation: orientation ,options: [:])
    do {
        try requestHandler.perform([faceLandmarksRequest])
    } catch {
        print(error)
    }
}
After translating the image orientation from UIImageOrientationx values to kCGImagePropertyOrientation values (not sure why Apple didn’t make them the same), the code will start the detection process from the Vision framework. Don’t forget to import Vision to have access to it’s API.
We’ll add now the method that will be called when the Vision’s processing is done:
func handleFaceFeatures(request: VNRequest, errror: Error?) {
    guard let observations = request.results as? [VNFaceObservation] else {
        fatalError("unexpected result type!")
    }

    for face in observations {
        addFaceLandmarksToImage(face)
    }
}
This also calls yet another method that does the actual drawing on the image based on the data received from the detect face landmarks request:
func addFaceLandmarksToImage(_ face: VNFaceObservation) {
    UIGraphicsBeginImageContextWithOptions(image.size, true, 0.0)
    let context = UIGraphicsGetCurrentContext()

    // draw the image
    image.draw(in: CGRect(x: 0, y: 0, width: image.size.width, height: image.size.height))

    context?.translateBy(x: 0, y: image.size.height)
    context?.scaleBy(x: 1.0, y: -1.0)

    // draw the face rect
    let w = face.boundingBox.size.width * image.size.width
    let h = face.boundingBox.size.height * image.size.height
    let x = face.boundingBox.origin.x * image.size.width
    let y = face.boundingBox.origin.y * image.size.height
    let faceRect = CGRect(x: x, y: y, width: w, height: h)
    context?.saveGState()
    context?.setStrokeColor(UIColor.red.cgColor)
    context?.setLineWidth(8.0)
    context?.addRect(faceRect)
    context?.drawPath(using: .stroke)
    context?.restoreGState()

    // face contour
    context?.saveGState()
    context?.setStrokeColor(UIColor.yellow.cgColor)
    if let landmark = face.landmarks?.faceContour {
        for i in 0...landmark.pointCount - 1 { // last point is 0,0
            let point = landmark.point(at: i)
            if i == 0 {
                context?.move(to: CGPoint(x: x + CGFloat(point.x) * w, y: y + CGFloat(point.y) * h))
            } else {
                context?.addLine(to: CGPoint(x: x + CGFloat(point.x) * w, y: y + CGFloat(point.y) * h))
            }
        }
    }
    context?.setLineWidth(8.0)
    context?.drawPath(using: .stroke)
    context?.saveGState()

    // outer lips
    context?.saveGState()
    context?.setStrokeColor(UIColor.yellow.cgColor)
    if let landmark = face.landmarks?.outerLips {
        for i in 0...landmark.pointCount - 1 { // last point is 0,0
            let point = landmark.point(at: i)
            if i == 0 {
                context?.move(to: CGPoint(x: x + CGFloat(point.x) * w, y: y + CGFloat(point.y) * h))
            } else {
                context?.addLine(to: CGPoint(x: x + CGFloat(point.x) * w, y: y + CGFloat(point.y) * h))
            }
        }
    }
    context?.closePath()
    context?.setLineWidth(8.0)
    context?.drawPath(using: .stroke)
    context?.saveGState()

    // inner lips
    context?.saveGState()
    context?.setStrokeColor(UIColor.yellow.cgColor)
    if let landmark = face.landmarks?.innerLips {
        for i in 0...landmark.pointCount - 1 { // last point is 0,0
            let point = landmark.point(at: i)
            if i == 0 {
                context?.move(to: CGPoint(x: x + CGFloat(point.x) * w, y: y + CGFloat(point.y) * h))
            } else {
                context?.addLine(to: CGPoint(x: x + CGFloat(point.x) * w, y: y + CGFloat(point.y) * h))
            }
        }
    }
    context?.closePath()
    context?.setLineWidth(8.0)
    context?.drawPath(using: .stroke)
    context?.saveGState()

    // left eye
    context?.saveGState()
    context?.setStrokeColor(UIColor.yellow.cgColor)
    if let landmark = face.landmarks?.leftEye {
        for i in 0...landmark.pointCount - 1 { // last point is 0,0
            let point = landmark.point(at: i)
            if i == 0 {
                context?.move(to: CGPoint(x: x + CGFloat(point.x) * w, y: y + CGFloat(point.y) * h))
            } else {
                context?.addLine(to: CGPoint(x: x + CGFloat(point.x) * w, y: y + CGFloat(point.y) * h))
            }
        }
    }
    context?.closePath()
    context?.setLineWidth(8.0)
    context?.drawPath(using: .stroke)
    context?.saveGState()

    // right eye
    context?.saveGState()
    context?.setStrokeColor(UIColor.yellow.cgColor)
    if let landmark = face.landmarks?.rightEye {
        for i in 0...landmark.pointCount - 1 { // last point is 0,0
            let point = landmark.point(at: i)
            if i == 0 {
                context?.move(to: CGPoint(x: x + CGFloat(point.x) * w, y: y + CGFloat(point.y) * h))
            } else {
                context?.addLine(to: CGPoint(x: x + CGFloat(point.x) * w, y: y + CGFloat(point.y) * h))
            }
        }
    }
    context?.closePath()
    context?.setLineWidth(8.0)
    context?.drawPath(using: .stroke)
    context?.saveGState()

    // left pupil
    context?.saveGState()
    context?.setStrokeColor(UIColor.yellow.cgColor)
    if let landmark = face.landmarks?.leftPupil {
        for i in 0...landmark.pointCount - 1 { // last point is 0,0
            let point = landmark.point(at: i)
            if i == 0 {
                context?.move(to: CGPoint(x: x + CGFloat(point.x) * w, y: y + CGFloat(point.y) * h))
            } else {
                context?.addLine(to: CGPoint(x: x + CGFloat(point.x) * w, y: y + CGFloat(point.y) * h))
            }
        }
    }
    context?.closePath()
    context?.setLineWidth(8.0)
    context?.drawPath(using: .stroke)
    context?.saveGState()

    // right pupil
    context?.saveGState()
    context?.setStrokeColor(UIColor.yellow.cgColor)
    if let landmark = face.landmarks?.rightPupil {
        for i in 0...landmark.pointCount - 1 { // last point is 0,0
            let point = landmark.point(at: i)
            if i == 0 {
                context?.move(to: CGPoint(x: x + CGFloat(point.x) * w, y: y + CGFloat(point.y) * h))
            } else {
                context?.addLine(to: CGPoint(x: x + CGFloat(point.x) * w, y: y + CGFloat(point.y) * h))
            }
        }
    }
    context?.closePath()
    context?.setLineWidth(8.0)
    context?.drawPath(using: .stroke)
    context?.saveGState()

    // left eyebrow
    context?.saveGState()
    context?.setStrokeColor(UIColor.yellow.cgColor)
    if let landmark = face.landmarks?.leftEyebrow {
        for i in 0...landmark.pointCount - 1 { // last point is 0,0
            let point = landmark.point(at: i)
            if i == 0 {
                context?.move(to: CGPoint(x: x + CGFloat(point.x) * w, y: y + CGFloat(point.y) * h))
            } else {
                context?.addLine(to: CGPoint(x: x + CGFloat(point.x) * w, y: y + CGFloat(point.y) * h))
            }
        }
    }
    context?.setLineWidth(8.0)
    context?.drawPath(using: .stroke)
    context?.saveGState()

    // right eyebrow
    context?.saveGState()
    context?.setStrokeColor(UIColor.yellow.cgColor)
    if let landmark = face.landmarks?.rightEyebrow {
        for i in 0...landmark.pointCount - 1 { // last point is 0,0
            let point = landmark.point(at: i)
            if i == 0 {
                context?.move(to: CGPoint(x: x + CGFloat(point.x) * w, y: y + CGFloat(point.y) * h))
            } else {
                context?.addLine(to: CGPoint(x: x + CGFloat(point.x) * w, y: y + CGFloat(point.y) * h))
            }
        }
    }
    context?.setLineWidth(8.0)
    context?.drawPath(using: .stroke)
    context?.saveGState()

    // nose
    context?.saveGState()
    context?.setStrokeColor(UIColor.yellow.cgColor)
    if let landmark = face.landmarks?.nose {
        for i in 0...landmark.pointCount - 1 { // last point is 0,0
            let point = landmark.point(at: i)
            if i == 0 {
                context?.move(to: CGPoint(x: x + CGFloat(point.x) * w, y: y + CGFloat(point.y) * h))
            } else {
                context?.addLine(to: CGPoint(x: x + CGFloat(point.x) * w, y: y + CGFloat(point.y) * h))
            }
        }
    }
    context?.closePath()
    context?.setLineWidth(8.0)
    context?.drawPath(using: .stroke)
    context?.saveGState()

    // nose crest
    context?.saveGState()
    context?.setStrokeColor(UIColor.yellow.cgColor)
    if let landmark = face.landmarks?.noseCrest {
        for i in 0...landmark.pointCount - 1 { // last point is 0,0
            let point = landmark.point(at: i)
            if i == 0 {
                context?.move(to: CGPoint(x: x + CGFloat(point.x) * w, y: y + CGFloat(point.y) * h))
            } else {
                context?.addLine(to: CGPoint(x: x + CGFloat(point.x) * w, y: y + CGFloat(point.y) * h))
            }
        }
    }
    context?.setLineWidth(8.0)
    context?.drawPath(using: .stroke)
    context?.saveGState()

    // median line
    context?.saveGState()
    context?.setStrokeColor(UIColor.yellow.cgColor)
    if let landmark = face.landmarks?.medianLine {
        for i in 0...landmark.pointCount - 1 { // last point is 0,0
            let point = landmark.point(at: i)
            if i == 0 {
                context?.move(to: CGPoint(x: x + CGFloat(point.x) * w, y: y + CGFloat(point.y) * h))
            } else {
                context?.addLine(to: CGPoint(x: x + CGFloat(point.x) * w, y: y + CGFloat(point.y) * h))
            }
        }
    }
    context?.setLineWidth(8.0)
    context?.drawPath(using: .stroke)
    context?.saveGState()

    // get the final image
    let finalImage = UIGraphicsGetImageFromCurrentImageContext()

    // end drawing context
    UIGraphicsEndImageContext()

    imageView.image = finalImage
}
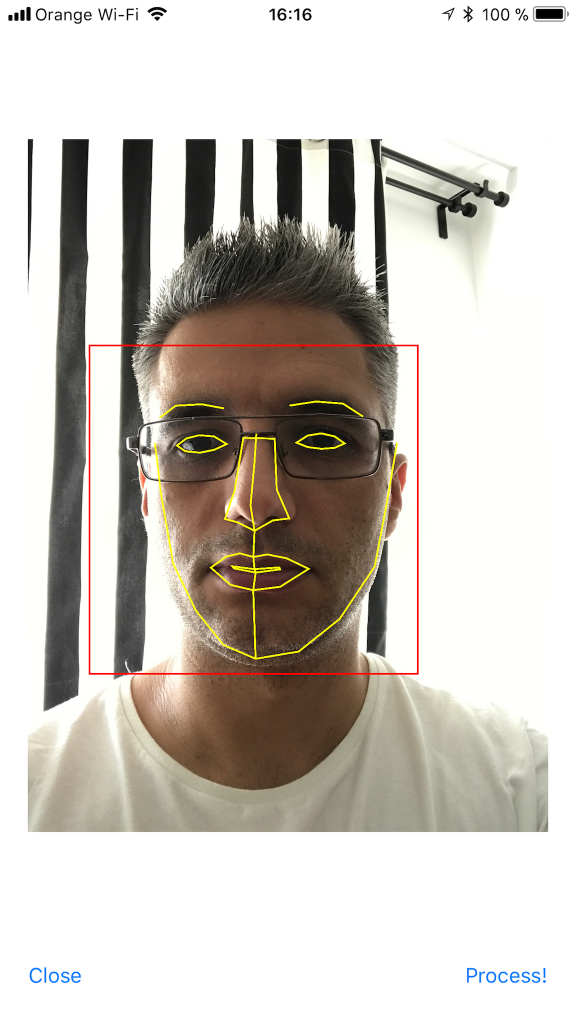
As you can see we have quite a lot of features that Vision is able to identify: the face contour, the mouth (both inner and outer lips), the eyes together with the pupils and eyebrows, the nose and the nose crest and, finally, the median line of the faces.
You can now run the app and take some unusual selfies of yourself. Here’s mine:
I hope you enjoyed this, please let me know in the comments how did it go and if there are things that can be improved. Also, some pictures taken with the app wouldn’t hurt at all :)
You can get the code from here: https://github.com/intelligentbee/FaceVision
Thanks!
Getting Started with Building APIs in Symfony2
Hello all you Interwebs friends! While we're passing through the shallow mists of time, REST is becoming more and more of a universal standard when building web applications. That said, here's a very brief tutorial on how to get started with building APIs in Symfony2.
Spoiler alert: the bits of code written below use FosUserBundle + Doctrine.
1. Generate a New Bundle
It's nice to keep your code neat and tidy, so ideally, you should create a separate bundle that will only store your API code, we can generically name ApiBundle.
$ php app/console generate:bundle --bundle-name=ApiBundle --format=annotation
2. Versioning
This isn't by any means mandatory, but if you believe that your API endpoints will suffer major changes along the way, that cannot be predicted from the get go, it would be nice to version your code. This means that you would, initially, have a prefix in your endpoints, like: `/v1`/endpoint.json, and you'd increase that value each time a new version comes along. I'll describe how to actually create the first version (`v1`) of your API a little further down the line.
3. Install a Few Useful Bundles
- FosRestBundle - this bundle will make our REST implementation a lot easier.
$ composer require friendsofsymfony/rest-bundle
and then include FOSRestBundle in your `AppKernel.php` file:
$bundles = array(

// ...
new FOS\RestBundle\FOSRestBundle(),
);
- JmsSerializerBundle - this will take care of the representation of our resources, converting objects into JSON.
composer require jms/serializer-bundle
and then include JMSSerializerBundle in your `AppKernel.php`:
$bundles = array(
// ...
new JMS\SerializerBundle\JMSSerializerBundle(),
// ...
);
4. Configurations
Configure the Response object to return JSON, as well as set a default format for our API calls. This can be achieved by adding the following code in `app/config/config.yml`:
fos_rest:
    format_listener:
          rules:
              - { path: ^/api/, priorities: [ html, json, xml ], fallback_format: ~, prefer_extension: true }
    routing_loader:
        default_format: json
    param_fetcher_listener: true
    view:
        view_response_listener: 'force'
        formats:
            xml: true
            json: true
        templating_formats:
            html: true
5. Routing
I prefer using annotations as far as routes go, so all we need to do in this scenario would be to modify our API Controllers registration in `/app/config/routing.yml`. This registration should have already been created when you ran the generate bundle command. Now we'll only need to add our version to that registration. As far as the actual routes of each endpoint go, we'll be manually defining them later on, in each action's annotation.
api:
    resource: "@ApiBundle/Controller/V1/"
    type: annotation
    prefix: /api/v1
At this point we're all set to start writing our first bit of code. First off, in our Controller namespace, we would want to create a new directory, called `V1`. This will hold all of our v1 API Controllers. Whenever we want to create a new version, we'll start from scratch by creating a `V2` namespace and so on.
After that's done let's create an action that will GET a user (assuming we've previously created a User entity and populated it with users). This would look something like:
<?php
namespace ApiBundle\Controller\V1;

use FOS\RestBundle\Controller\FOSRestController;
use FOS\RestBundle\Controller\Annotations as Rest;

class UserController extends FOSRestController
{
/**
* @return array
* @Rest\Get("/users/{id}")
* @Rest\View
*/
public function getUserAction($id)
{
     $em = $this->getDoctrine()->getManager();
     $user = $em->getRepository('AppBundle:User')->find($id);

     return array('user' => $user);
   }
}
If we want to GET a list of all users, that's pretty straightforward as well:
/**
 * GET Route annotation.
 * @return array
 * @Rest\Get("/users/get.{_format}")
 * @Rest\View
 */
public function getUsersAction()
{
    $em = $this->getDoctrine()->getManager();
    $users = $em->getRepository('AppBundle:User')->findAll();

    return array('users' => $users);
}
With that done, when running a GET request on `https://yourapp.com/api/v1/users/1.json`, you should get a `json` response with that specific user object.
What about a POST request? Glad you asked! There are actually quite a few options to do that. One would be to get the request data yourself, validate it and create the new resource yourself. Another (simpler) option would be to use Symfony Forms which would handle all this for us.
The scenario here would be for us to add a new user resource into our database.
If you're also using FosUserBundle to manage your users, you can just use a similar RegistrationFormType:
<?php
namespace ApiBundle\Form\Type;

use Symfony\Component\Form\AbstractType;
use Symfony\Component\Form\FormBuilderInterface;
use Symfony\Component\OptionsResolver\OptionsResolver;

class RegistrationFormType extends AbstractType
{
public function buildForm(FormBuilderInterface $builder, array $options)     {
         $builder
             ->add('email', 'email')
             ->add('username')
             ->add('plainPassword', 'password')
        ;
    }

    public function configureOptions(OptionsResolver $resolver)
    {
        $resolver->setDefaults(array(
            'data_class' => 'AppBundle\Entity\User',
            'csrf_protection'   => false
        ));
    }


    public function getName()
    {
        return 'my_awesome_form';
    }
}
Next, we'll want to actually create our addUserAction():
/**
 * POST Route annotation.
 * @Rest\Post("/users/new.{_format}")
 * @Rest\View
 * @return array
 */
public function addUserAction(Request $request)
{
    $userManager = $this->container->get('fos_user.user_manager');
    $user = $userManager->createUser();

    $form = $this->createForm(new \ApiBundle\Form\Type\RegistrationFormType(), $user);

    $form->handleRequest($request);

    if ($form->isValid())
    {
        $em = $this->getDoctrine()->getManager();
        $em->persist($user);
        $em->flush();

        return array('user' =>  $user);
    }

    return View::create($form, 400);
}
To make a request, you'll need to send the data as raw JSON, to our `https://yourapp.com/api/v1/users/new.json` POST endpoint:
{
    "my_awesome_form":{
            "email":"andrei@ibw.com",
            "username":"sdsa",
            "plainPassword":"asd"
    }
}
And that's all there is to it.
We haven't covered the cases where you'd want Delete or Update a user yet. Updating resources through the REST standards can be done using either PUT or PATCH. The difference between them is that PUT will completely replace your resource, while PATCH will only, well, patch it... meaning that it will partially update your resource with the input it got from the API request.
Let's get to it then. We'll use the same form as before, and we'll try to only change (we'll use the PATCH verb for that) the email address, username and password of our previously created user:
/**
 * PATCH Route annotation.
 * @Rest\Patch("/users/edit/{id}.{_format}")
 * @Rest\View
 * @return array
 */
public function editAction(Request $request, $id)
{
    $userManager = $this->container->get('fos_user.user_manager');
    $user = $userManager->findUserBy(array('id'=>$id));

    $form = $this->createForm(new \ApiBundle\Form\Type\RegistrationFormType(), $user, array('method' => 'PATCH'));

    $form->handleRequest($request);
    if ($user) {
        if ($form->isValid()) {

            $em = $this->getDoctrine()->getManager();
            $em->persist($user);
            $em->flush();

            return array('user' => $user);
        } else {
            return View::create($form, 400);
        }
    } else {
        throw $this->createNotFoundException('User not found!');
    }
}
The request body is the same as the one shown for the POST method, above. There are a few small differences in our edit action though. First off - we're telling our form to use the PATCH method. Second - we are handling the case where the user ID provided isn't found.
The Delete method is the easiest one yet. All we need to do is to find the user and remove it from our database. If no user is found, we'll throw a "user not found" error:
/**
 * DELETE Route annotation.
 * @Rest\Delete("/users/delete/{id}.{_format}")
 * @Rest\View(statusCode=204)
 * @return array
 */
public function deleteAction($id)
{
    $em = $this->getDoctrine()->getManager();
    $user = $em->getRepository('AppBundle:User')->find($id);

    $em->remove($user);
    $em->flush();
}
Related: Routing in Symfony2
Conclusions
Aaand we're done. We now have a fully working CRUD for our User Entity. Thanks for reading and please do share your opinions/suggestions in the comment section below.
How Teams Use Git for Big Projects
Every time a new member joins our team we have to guide him through our Git workflow. So I decided to write everything here in order to simply send them the link (and help others interested in learning how a real development team uses Git).
Should You Do Scrum?
"It is not the strongest of
the speciesteams that survives, nor the most intelligent. It is the one that is most adaptable to change."
That should be a good enough reason for all teams out there to adopt Scrum, from wedding planners to construction companies. But that isn't always the case and if you stick around, you're going to find out why.
